I remember when I first started working with Android, it was easy to see which requests an app was sending. All I had to do was install Charles on my computer, set up the Wi-Fi on my phone to proxy to my computer, and then download the certificate provided by Charles by entering a specific URL. Once installed, I was good to go.
However, when I tried the same process recently, I could see some packets being sent, but the traffic coming out of the app was empty. I searched online for various solutions, but none of them worked.
Finally, I found out that Android changed its security settings above 6.0, and by default, it does not trust certificates installed by users, which is why it cannot intercept them. One solution is to install a local VPN, which will route all traffic through the proxy, but I found it a bit cumbersome after trying it out.
Among the many methods, the most useful one I tried was to unpack the apk, modify some settings, and then repack it. This article will document the process and experience.
Series links:
- Android App Reverse Engineering Part 1: Unpacking and Rebuilding Apks
- Android App Reverse Engineering Part 2: Modifying Smali Code
- Android App Reverse Engineering Part 3: Monitoring App Packets
- Android App Reverse Engineering Part 4: Dynamic Analysis with Frida
Prerequisites
There are two prerequisites:
- Prepare a proxy
- Set up the phone
Any proxy can be used for the proxy part. I used the common Burp Suite, and the settings for other software should be similar.
First, go to Proxy -> Options to add Proxy Listeners, and remember to select all interfaces for the bind to address so that the phone can connect:
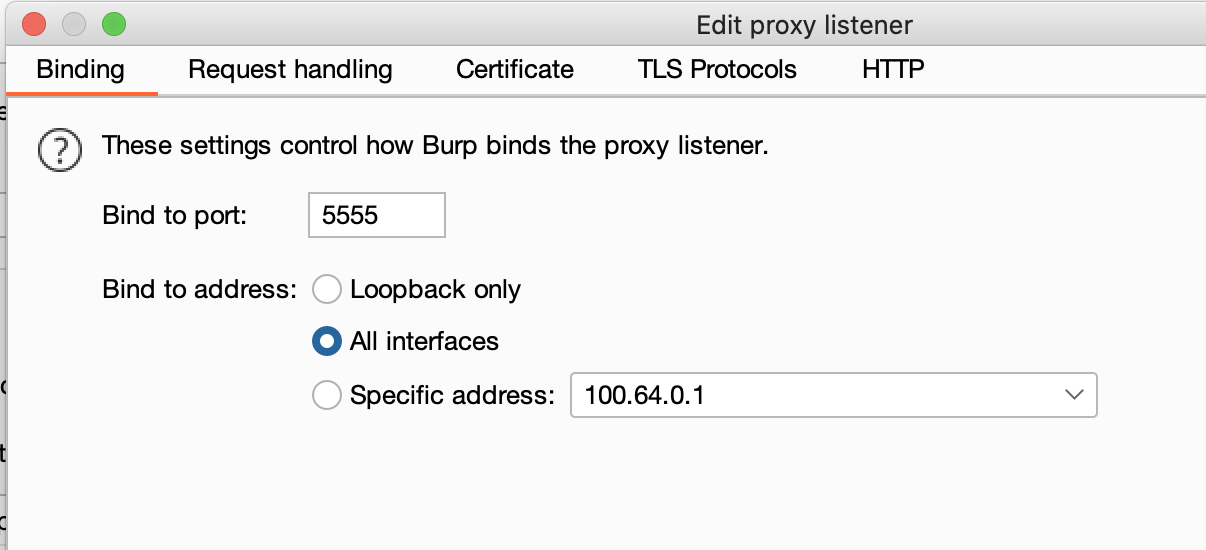
The computer’s proxy is now set up, and we can move on to setting up the phone.
Before starting the setup, make sure that the phone and computer are connected to the same Wi-Fi network. Then, check the internal IP address of the computer and go to Settings => Connections => Wi-Fi on the phone to edit the connected network and set up a manual proxy to route the phone’s traffic to the computer.
Next, we need to install Burp Suite’s certificate on the phone. Simply visit http://burpsuite on the phone, and a file called cert.der will be downloaded. Remember to rename it to cert.cer and then install the certificate.
At this point, the phone is ready.
Modifying the Apk
The apk used for this demonstration can be found here: https://github.com/aszx87410/demo/raw/master/android/demoapp-http.apk
The content of the app is simple: pressing a button sends a request, and if it is intercepted, it means that it was successful. After installing the app, you can try it out. You should find that even though all the settings are in place, the proxy is still empty.
As I mentioned at the beginning, there is a section in the Android official documentation that explains this: Network security configuration
The modification method is also simple and basically does not require any changes to the code. Therefore, we first use Apktool to unpack the apk.
Next, open AndroidManifest.xml and find <application>. Check if it has the attribute android:networkSecurityConfig. If it does not, add it: android:networkSecurityConfig="@xml/network_security_config". If it does, remember the name of the xml.
Then, go to res/xml and add network_security_config.xml, with the following content:
<?xml version="1.0" encoding="utf-8"?>
<network-security-config>
  <base-config cleartextTrafficPermitted="true">
    <trust-anchors>
      <certificates src="system" />
      <certificates src="user" />
    </trust-anchors>
  </base-config>
</network-security-config>
This file represents that the app trusts all certificates, including those installed by the user. If the app already has this file, you can replace the contents with the above to ensure that the app trusts user certificates.
Then repack the apk and click the button again to see if you can intercept the traffic from the proxy:

Certificate pinning
If the proxy still cannot listen after the above steps, it means that the app may have other security settings, such as certificate pinning.
What is certificate pinning? If a webpage uses https, it means that the server has an https certificate, and certificate pinning means that the app specifies what certificate should correspond to a certain domain. If the certificate does not match, it means that someone is messing with it in the middle, so the connection is rejected.
Taking the popular library OkHttp as an example, the document writes how to implement this feature:
String hostname = "publicobject.com";
CertificatePinner certificatePinner = new CertificatePinner.Builder()
    .add(hostname, "sha256/AAAAAAAAAAAAAAAAAAAAAAAAAAAAAAAAAAAAAAAAAAA=")
    .build();
OkHttpClient client = OkHttpClient.Builder()
    .certificatePinner(certificatePinner)
    .build();

Request request = new Request.Builder()
    .url("https://" + hostname)
    .build();
client.newCall(request).execute();
If you want to try it out, you can use this apk file: https://github.com/aszx87410/demo/raw/master/android/demoapp-pinning.apk
We still use apktool to unpack it, then put the network security config in as before, and then find where the code uses certificate pinner.
Because the code has turned on proguard this time, even okhttp has been obfuscated, and searching for the keyword certificatePinner may not find anything. What should we do? We can try another way. When using this feature, you must write a set of sha256 values in it, so we can search for: sha256/
We can find such a paragraph:
# virtual methods
.method public run()V
    .locals 13

    .line 1
    new-instance v0, Ljava/util/ArrayList;

    invoke-direct {v0}, Ljava/util/ArrayList;-><init>()V

    const-string v1, "sha256/AAAAAAAAAAAAAAAAAAAAAAAAAAAAAAAAAAAAAAAAAAA="

    .line 2
    filled-new-array {v1}, [Ljava/lang/String;

    move-result-object v1

    const-string v2, "archive.org"

    const-string v3, "pattern"

    .line 3
    invoke-static {v2, v3}, Lc/j/b/d;->d(Ljava/lang/Object;Ljava/lang/String;)V

    const-string v3, "pins"

    invoke-static {v1, v3}, Lc/j/b/d;->d(Ljava/lang/Object;Ljava/lang/String;)V

    const/4 v3, 0x0

    const/4 v4, 0x0
What should we do after finding it? Do we need to change smali and remove certificate pinner? In fact, there is a simpler way.
From the code, we can guess that the archive.org below should be the bound domain, so as long as we change this domain to any other string, other domains will not check whether the certificate matches.
After changing it, repack the app and install it, and you can listen to the traffic normally.
Like the above, changing where certificatePinner is used, there is another way to directly change the implementation of okhttp. Find okhttp3/CertificatePinner$Builder.smali in smali, and there is a function:
# virtual methods
.method public varargs add(Ljava/lang/String;[Ljava/lang/String;)Lokhttp3/CertificatePinner$Builder;
    .locals 5
This is the method that okhttp uses to handle adding certificate pinner. We just need to change it like this:
# virtual methods
.method public varargs add(Ljava/lang/String;[Ljava/lang/String;)Lokhttp3/CertificatePinner$Builder;
    .locals 5

    # patch
    const-string p1, "abc"
So the first parameter (domain) will always be abc and will never take effect.
Summary
In this article, we learned how to modify the app ourselves and remove some anti-man-in-the-middle attack mechanisms, such as changing the network security config and the part of the code that handles certificate pinning.
For general apps, this should be enough, at least to monitor traffic and see what the app is sending. And compared to the VPN solution, there is another advantage, that is, it can be repackaged twice, and a version that can work by replacing the API address can be produced, with higher flexibility.
In the next article, we will learn another way to analyze apps.
Series link:
Comments