Introduction
In the previous article, we mentioned the common solutions to CORS errors and the solution that should be chosen in most cases: “Ask the backend to add response headers.”
However, “cross-origin requests” can actually be further divided into two types: simple requests and non-simple requests. Simple requests can be solved using the solution in the previous article, but non-simple requests are more complicated.
In addition, cross-origin requests do not send cookies by default, and an additional setting is required when using xhr or fetch, and the backend also needs to add an additional header.
There are actually many headers related to CORS, some of which you may not have heard of. Originally, I wanted to list these things one by one and explain them, but after careful consideration, I felt that this would be a bit boring, and everyone would probably forget after reading it.
So what would be a better way? Everyone likes to hear stories, so in this article, let’s start from the perspective of a story and tell you a story about love and CORS.
The protagonist’s name is well known, yes, it’s the unoriginal Xiaoming.
Day 1: Simple CORS
Xiaoming works for a technology company as a rookie front-end engineer.
And his first task is to create a “contact us” form, allowing potential users who are interested in their services to contact the company and let the business contact them to discuss follow-up cooperation matters.
The form looks like this (although it looks a lot like Google Forms, it was made by Xiaoming himself):

Xiaoming spent less than half a day to create the page and almost completed the functionality, with only one step left. Xiaoming’s supervisor told him that the company often holds some events and provides this form to everyone at the end of the event, hoping that everyone can leave their contact information through the form.
Therefore, the “How did you know about our company?” on the form would like to dynamically adjust the field, adding an option of “Through the technical sharing session held on 1/10” during the event, and removing this option about two weeks after the event ends. The reason for wanting to dynamically adjust it is that the supervisor does not want the maintenance staff to return to the development end again. If it can be made dynamic from the beginning, they can maintain it themselves through the background control in the future.
So the backend created an API for Xiaoming to access and render the content into options. For testing convenience, the backend engineer first packaged the entire API service into a docker image and let Xiaoming run it on his own computer, with the URL being: http://localhost:3000.
After receiving this task, Xiaoming thought about first fetching the API content to see what it was like, so he wrote this code:
fetch('http://localhost:3000')Then he found an error message in the console:
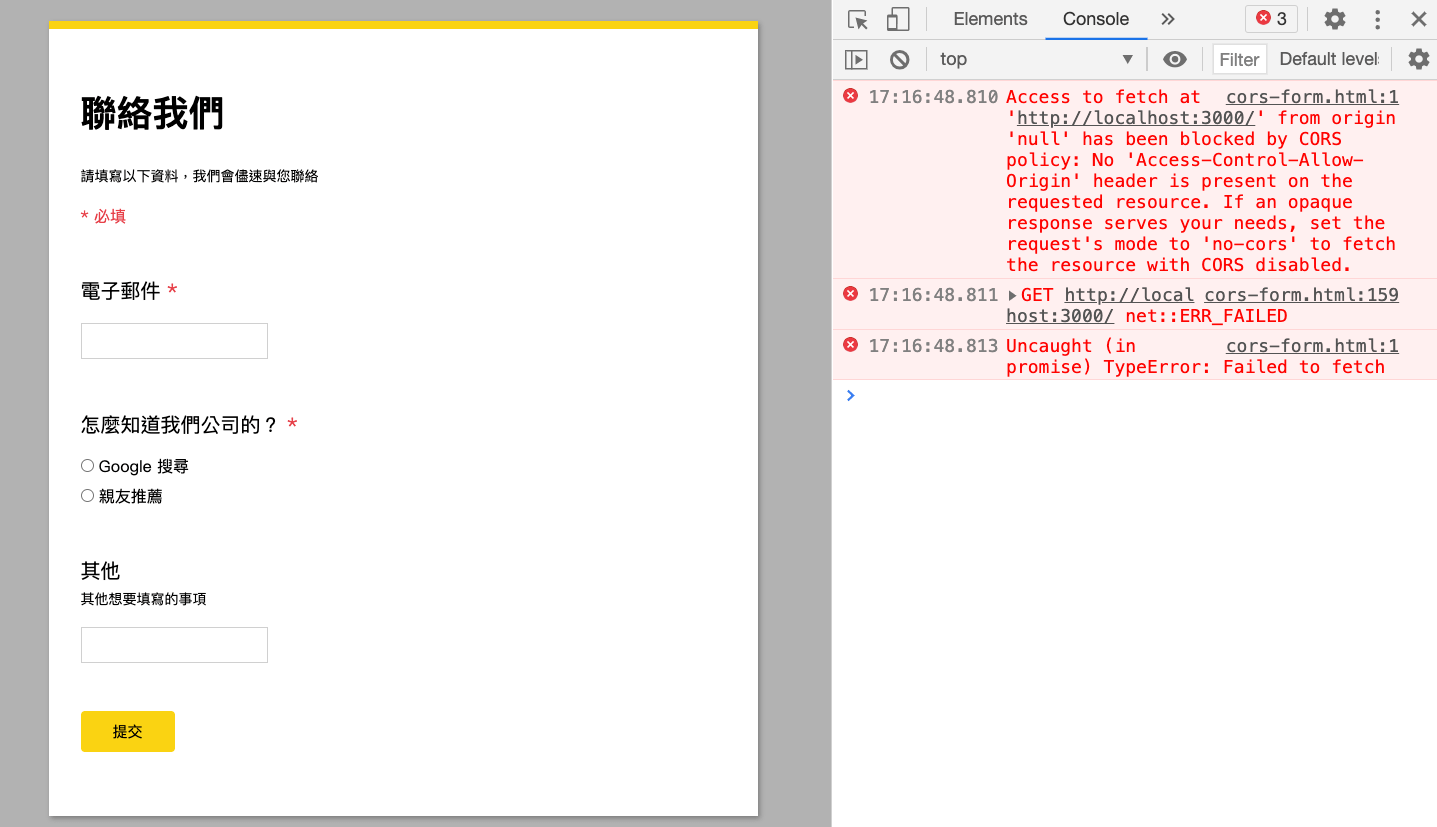
Xiaoming didn’t understand what it meant very well, but only noticed the last paragraph:
If an opaque response serves your needs, set the request’s mode to ‘no-cors’ to fetch the resource with CORS disabled.
So he added the no-cors mode to fetch:
fetch('http://localhost:3000', {
  mode: 'no-cors'
}).then(res => console.log(res))
After changing it, he refreshed the page and found that there were no errors, but the response printed out was particularly strange:
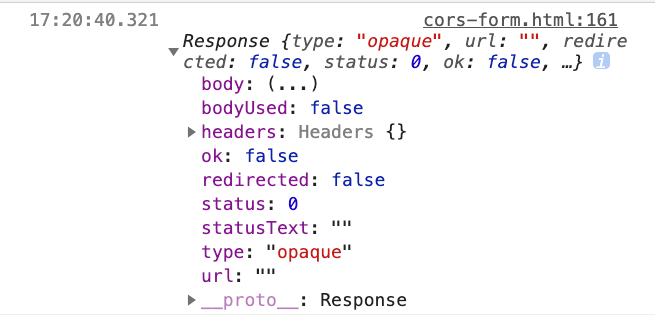
There was no data, and the status was actually 0. Xiaoming debugged for a long time after this and couldn’t find the reason. Seeing the deadline approaching, Xiaoming gathered the courage to ask his senior, Xiaohua, for help. Xiaohua told him:
This is normal.
no-corsis a parameter that is easy to mislead beginners. Its meaning is not “bypass cors to get data”, but “I know it can’t pass cors, but I don’t care, so don’t give me an error or response.”You must solve this problem through the backend. Let me tell the backend for you.
Xiaohua, the senior, is indeed experienced and solved Xiaoming’s problem in no time. The backend also helped to add a header: Access-Control-Allow-Origin: *, which means that the resource can be accessed by AJAX from any origin website.
Backend code:
app.get('/', (req, res) => {
  res.header('Access-Control-Allow-Origin', '*')
  res.json({
    data: db.getFormOptions(),
  })
})
Xiaoming removed the mode and changed it to:
fetch('http://localhost:3000')
  .then(res => res.json())
  .then(res => console.log(res))
After opening the browser, he found that he could successfully get the options, and also saw the newly added header in the network tab:
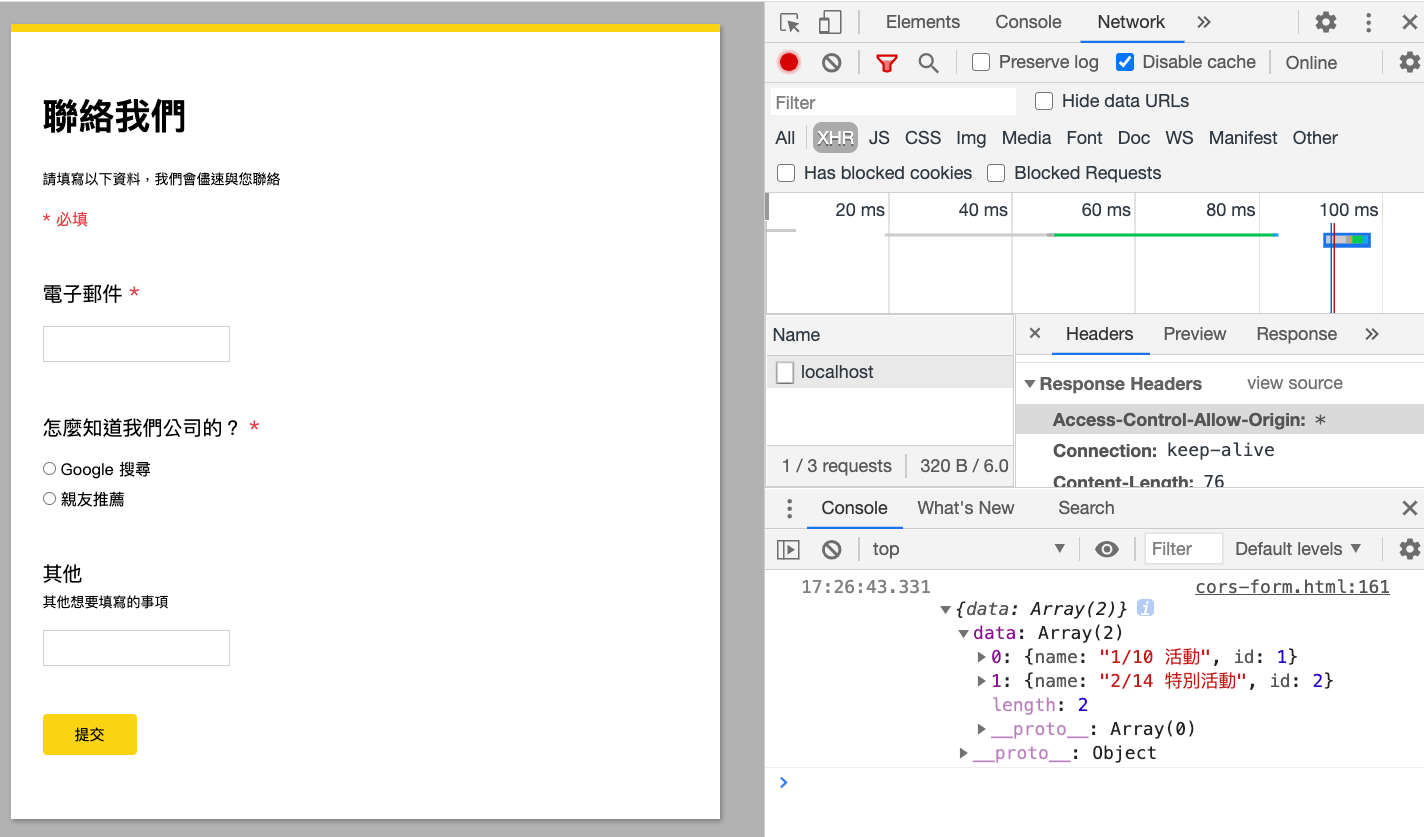
After receiving the data, all that was left was to put the options on the screen. After about half a day, Xiao Ming completed this feature and tested it, thanks to the help of his senior colleague, Xiao Hua.
Day 1 Summary
mode: 'no-cors' is not what you think it is, and it cannot solve the CORS problem.
When encountering a CORS problem, first check whether the backend has given you the Access-Control-Allow-Origin header. If not, please ask the backend to give it to you. Otherwise, you will not be able to pass no matter how hard you try.
The value of Access-Control-Allow-Origin can be set to *, which means wildcard, and any origin is legal. It can also be set to an origin like http://huli.tw, which means only this origin is legal.
If you want to bring multiple origins, sorry, there is no way, you can only give them all or give one origin. Therefore, some backends will decide the value of Access-Control-Allow-Origin in response based on the origin of the request, which we will discuss later.
Day 2: Not So Simple CORS
After a day, the supervisor told Xiao Ming that the higher-ups were not satisfied with the user experience. After submitting the form, it took one or two seconds to see the success screen, and there was no loading in between, which was not a good experience. They hoped to change the way the form was submitted to AJAX instead of page switching to improve the user experience.
To cope with this change, the backend added another API: POST /form, and this time the backend automatically added the Access-Control-Allow-Origin header:
app.post('/form', (req, res) => {
  res.header('Access-Control-Allow-Origin', '*')
  // 省略寫到 db 的程式碼
  res.json({
    success: true
  })
})
Xiao Ming had done something similar before, so he quickly wrote the code:
document.querySelector('.contact-us-form')
  .addEventListener('submit', (e) => {
    // 阻止表單送出
    e.preventDefault()

    // 設置參數
    var data = new URLSearchParams();
    data.append('email', '[email protected]')
    data.append('source', 'search')

    // 送出 request
    fetch('http://localhost:3000/form', {
      method: 'POST',
      headers: {
        'Content-Type': 'application/x-www-form-urlencoded'
      },
      body: data
    }).then(res => res.json())
      .then(res => console.log(res))
  })
After testing, there was no problem. Just as Xiao Ming was about to report to the supervisor, the backend came over and said to Xiao Ming, “Sorry, we have made some changes recently. We will unify the use of JSON as the data format in the future, so you need to change it too. You need to send JSON instead of urlencoded data.”
After hearing this, Xiao Ming thought, “This is easy, just change the data format, right?” So he changed it to this:
document.querySelector('.contact-us-form')
  .addEventListener('submit', (e) => {
    // 阻止表單送出
    e.preventDefault()

    // 設置參數
    var data = {
      email: '[email protected]',
      soruce: 'search'
    }

    // 送出 request
    fetch('http://localhost:3000/form', {
      method: 'POST',
      headers: {
        'Content-Type': 'application/json'
      },
      body: JSON.stringify(data)
    }).then(res => res.json())
      .then(res => console.log(res))
  })
It was just a matter of changing the data format to send data to the backend in JSON format. After the change, Xiao Ming tested it again and found that it crashed this time, and an error message appeared:
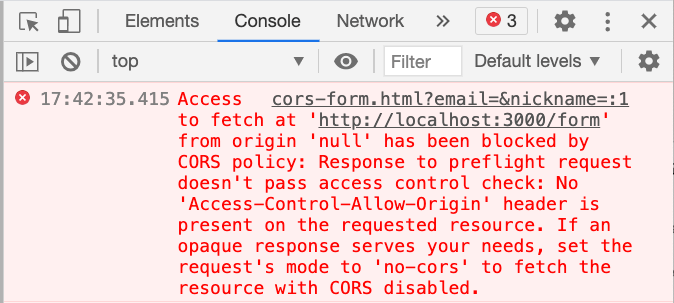
Access to fetch at ‘http://localhost:3000/form‘ from origin ‘null’ has been blocked by CORS policy: Response to preflight request doesn’t pass access control check: No ‘Access-Control-Allow-Origin’ header is present on the requested resource. If an opaque response serves your needs, set the request’s mode to ‘no-cors’ to fetch the resource with CORS disabled.
Switching to the network tab to see the request status, it was found that in addition to the expected POST, there was also an OPTIONS request:
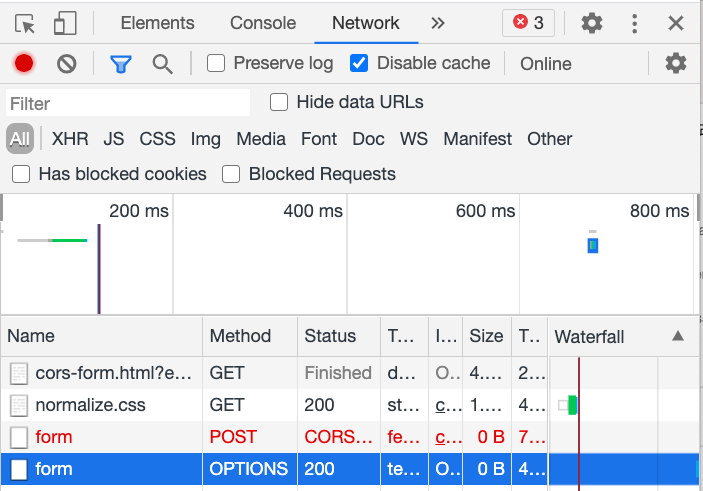
Xiao Ming searched for information using the keywords “preflight request” given in the error message and found that CORS was not as simple as he thought.
It turned out that the requests sent before were called “simple requests”. As long as the method is GET, POST, or HEAD and no custom headers are included, and the Content-Type does not exceed application/x-www-form-urlencoded, multipart/form-data, or text/plain, it can basically be regarded as a “simple request” (more detailed definitions will be discussed in the next article).
There was no error when connecting to the API at the beginning because the Content-Type was application/x-www-form-urlencoded, so it was considered a simple request. Later, when it was changed to application/json, it no longer met the definition of a simple request and became a “non-simple request”.
So what happens with non-simple requests? An additional thing is sent, called a preflight request. This request is what Xiao Ming saw in the network tab as the OPTIONS request. For this request, the browser will help bring two headers:
- Access-Control-Request-Headers
- Access-Control-Request-Method
For the preflight request of /form that we saw earlier, the content is:
- Access-Control-Request-Headers: content-type
- Access-Control-Request-Method: POST
The former will bring headers that do not belong to simple requests, and the latter will bring HTTP Method, allowing the backend to have more information about the request that the frontend wants to send.
If the backend is willing to allow it, just return an Access-Control-Allow-Origin as before. Knowing this, Xiao Ming immediately asked the backend colleague to make some changes, and the backend code became:
app.post('/form', (req, res) => {
  res.header('Access-Control-Allow-Origin', '*')
  res.json({
    success: true
  })
})

// 多加這個,讓 preflight 通過
app.options('/form', (req, res) => {
  res.header('Access-Control-Allow-Origin', '*')
  res.end()
})
After the changes were made, Xiao Ming tried again and found that there was still an error:
Access to fetch at ‘http://localhost:3000/form‘ from origin ‘null’ has been blocked by CORS policy: Request header field content-type is not allowed by Access-Control-Allow-Headers in preflight response.
When your CORS request contains custom headers, the preflight response needs to explicitly use Access-Control-Allow-Headers to indicate: “I am willing to accept this header”, and the browser will judge the preflight pass.
In this case, content-type belongs to a custom header, so the backend must explicitly indicate that it is willing to accept this header:
app.options('/form', (req, res) => {
  res.header('Access-Control-Allow-Origin', '*')
  res.header('Access-Control-Allow-Headers', 'content-type')
  res.end()
})
In this way, Xiao Ming can successfully pass the preflight request, and only after passing the preflight, the real request will be sent out.
The process will be like this:
- We want to send a POST request to http://localhost:3000/form
- The browser finds that it is a non-simple request, so it first sends a preflight request
- Check the response, preflight passes
- Send the POST request to http://localhost:3000/form
So if the preflight does not pass, the request of the first step will not be sent out.
After experiencing a series of twists and turns, this modification was finally completed successfully. Now we can successfully submit form data in the frontend using AJAX.
Summary of Day 2
CORS requests are divided into two types: simple requests and non-simple requests. Regardless of which type, the backend needs to give the Access-Control-Allow-Origin header. The biggest difference is that non-simple requests will send a preflight request before sending the formal request. If the preflight does not pass, the formal request will not be sent out.
For preflight requests, we must also give the Access-Control-Allow-Origin header to pass.
In addition, some products may want to send some custom headers, such as X-App-Version, which carries the current version of the website, so the backend can make a record:
fetch('http://localhost:3000/form', {
      method: 'POST',
      headers: {
        'X-App-Version': "v0.1",
        'Content-Type': 'application/json'
      },
      body: JSON.stringify(data)
    }).then(res => res.json())
      .then(res => console.log(res))
After you do this, the backend must also add Access-Control-Allow-Headers to pass the preflight:
app.options('/form', (req, res) => {
  res.header('Access-Control-Allow-Origin', '*')
  res.header('Access-Control-Allow-Headers', 'X-App-Version, content-type')
  res.end()
})
In short, preflight is a verification mechanism to ensure that the backend knows the request that the frontend wants to send is expected, and the browser will allow it. What I said before, “CORS request blocks response, not request”, only applies to simple requests. For non-simple requests with preflight, the request you really want to send will indeed be blocked.
So why do we need a preflight request? This can be thought from two perspectives:
- Compatibility
- Security
For the first point, you may have noticed that if a request is a non-simple request, you cannot make the same request using the HTML form element, and vice versa. For example, <form>‘s enctype does not support application/json, so this content type is a non-simple request; enctype supports multipart/form, so this content type belongs to a simple request.
For those old websites that existed even before XMLHttpRequest, their backends did not expect requests with methods like DELETE or PATCH, or requests with content-type application/json, because in those days, <form> and <img> were the only elements that could send requests.
There was no fetch back then, not even XMLHttpRequest. So, to prevent these backends from receiving unexpected requests, a preflight request was sent first. Since the old backends did not handle this preflight, it would not pass, and the browser would not send the actual request.
This is what I mean by compatibility. By passing the preflight request, early websites are not harmed and do not receive unexpected requests.
As for the second point, security, do you remember the question I asked in the first post? The one about sending a POST request to delete an article. Generally, the API for deleting would use the DELETE HTTP method. If there were no preflight request to block it, the browser would actually send this request, which could cause unexpected behavior on the backend (since it did not expect the browser to send it).
That’s why a preflight request is needed, to ensure that the backend knows that the request to be sent is legal before sending the actual request.
Yesterday’s version was highly praised by the upper management, and the supervisor even treated Xiao Ming and Xiao Hua to a celebratory drink. However, just as they were happy, the marketing department came and asked, “Why aren’t these requests carrying cookies? We need the user’s cookies for analysis. Please bring these cookies.”
It was then that Xiao Ming suddenly remembered, “Oh yeah, cross-origin requests don’t carry cookies by default.” After checking MDN, he found that as long as he added credentials: 'include', it should work:
fetch('http://localhost:3000/form', {
  method: 'POST',
  credentials: 'include', // 新增這個
  headers: {
    'Content-Type': 'application/json'
  },
  body: JSON.stringify(data)
}).then(res => res.json())
  .then(res => console.log(res))
But unexpectedly, there was an error message on the frontend:
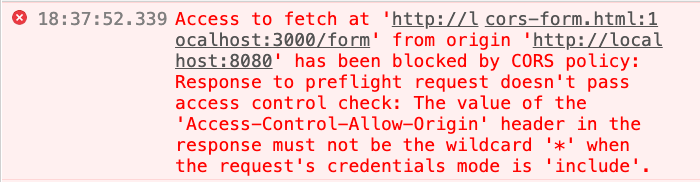
Access to fetch at ‘http://localhost:3000/form‘ from origin ‘http://localhost:8080‘ has been blocked by CORS policy: Response to preflight request doesn’t pass access control check: The value of the ‘Access-Control-Allow-Origin’ header in the response must not be the wildcard ‘*’ when the request’s credentials mode is ‘include’.
The error message actually explains it very clearly. If you want to carry cookies, Access-Control-Allow-Origin cannot be *, and the origin must be explicitly specified.
Why is that? Because if there were no such restrictions, any website (any origin) could send requests to this API and carry the user’s cookies, which would create security issues, similar to CSRF.
Therefore, for security reasons, if you want to carry cookies, the backend must explicitly specify which origin has permission. In addition, the backend must also include the Access-Control-Allow-Credentials: true header.
So Xiao Ming asked Xiao Hua to modify the backend again:
const VALID_ORIGIN = 'http://localhost:8080'
app.post('/form', (req, res) => {
  res.header('Access-Control-Allow-Origin', VALID_ORIGIN) // 明確指定
  res.header('Access-Control-Allow-Credentials', true) // 新增這個
  res.json({
    success: true
  })
})

app.options('/form', (req, res) => {
  res.header('Access-Control-Allow-Origin', VALID_ORIGIN) // 明確指定
  res.header('Access-Control-Allow-Credentials', true) // 新增這個
  res.header('Access-Control-Allow-Headers', 'content-type, X-App-Version')
  res.end()
})
After the modification, the version explicitly specifies that only http://localhost:8080 has permission to access the CORS Response, and adds the Access-Control-Allow-Credentials header.
With this, everything is done, and cookies can be successfully carried when sending requests. The marketing department’s requirements are also met, yay!
Day3 Summary
If you need to carry cookies when sending requests, you must meet three conditions:
- The backend Response header has
Access-Control-Allow-Credentials: true - The
Access-Control-Allow-Originin the backend Response header cannot be*, it must be explicitly specified - The front-end fetch adds
credentials: 'include'
If any of these three conditions are not met, the cookie cannot be carried.
In addition to this, there is one more thing to pay special attention to, which is not only to carry cookies, but also to set cookies. The backend can use the Set-Cookie header to let the browser set cookies, but the above three conditions must also be met. If these three conditions are not met at the same time, even if there is a Set-Cookie header, the browser will not set it, which should be noted.
In fact, whether you want to access cookies or not, it is recommended that Access-Control-Allow-Origin should not be set to *, but explicitly specify the origin to avoid unexpected cross-site access to resources. If you have multiple origins, it is recommended to have a list of origins on the backend, and determine whether the origin in the request header is in the list. If it is, set Access-Control-Allow-Origin, otherwise ignore it.
Day4: Accessing Custom Headers
Do you remember the API we connected to the backend at the beginning? The API for getting options. Although we have successfully completed it before, unexpectedly, a new requirement was added this morning.
This requirement is to version control the content of this API. The backend will add a header X-List-Version to the response header to let the frontend know which version the option list is.
The frontend needs to get this version and put the value into the form to submit it together.
The backend looks like this:
app.get('/', (req, res) => {
  res.header('Access-Control-Allow-Origin', '*')
  res.header('X-List-Version', '1.3')
  res.json({
    data: [
      {name: '1/10 活動', id: 1},
      {name: '2/14 特別活動', id: 2}
    ]
  })
})
Since the content of this API is public, it is okay to use a wildcard without allowing specific origins.
Xiaoming modified the code before and tried to print out the header first:
fetch('http://localhost:3000')
.then(res => {
console.log(res.headers.get('X-List-Version'))
return res.json()
})
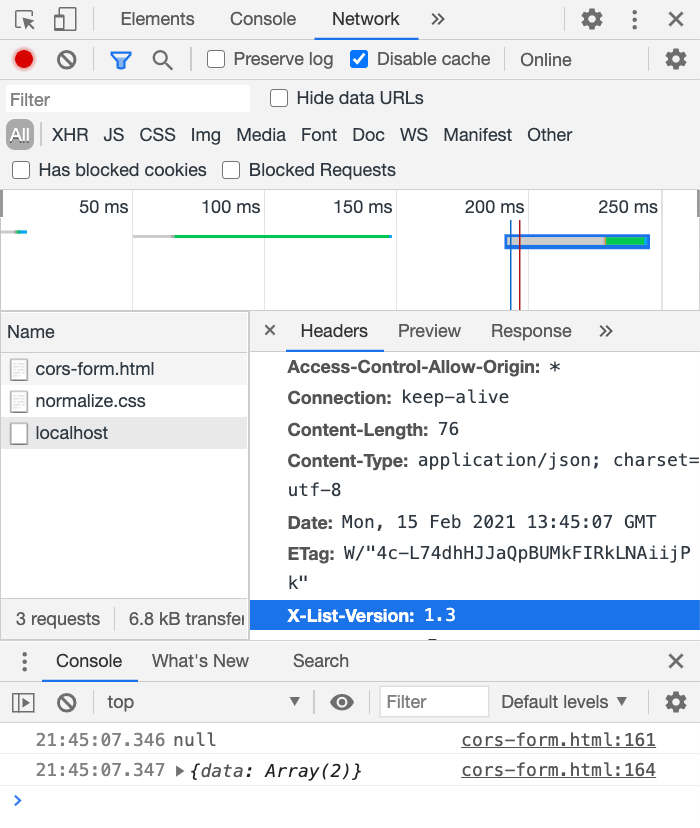
.then(res => console.log(res))At this time, a magical thing happened. Although we can see the response header we want from the network tab, we cannot get it in the program and output null. Xiaoming checked it several times, confirmed that there were no typos, and there were no error messages, but he still couldn’t get it.
After being stuck for an hour, Xiaoming decided to ask his senior colleague Xiaohua for help again. Xiaohua, as a senior colleague, said after seeing this situation:
If you want to access the header of the CORS response, especially custom headers, the backend needs to bring an
Access-Control-Expose-Headersheader, so that the frontend can get it.
“Oh, that’s how it is!” Xiaoming suddenly realized and went to find his backend colleague to add this header:
app.get('/', (req, res) => {
  res.header('Access-Control-Allow-Origin', '*')
  res.header('Access-Control-Expose-Headers', 'X-List-Version') // 加這個
  res.header('X-List-Version', '1.3')
  res.json({
    data: [
      {name: '1/10 活動', id: 1},
      {name: '2/14 特別活動', id: 2}
    ]
  })
})
After the modification, Xiaoming tested it again and found that he could indeed get the header correctly! Thank Xiaohua, praise Xiaohua, and another peaceful day passed.
Day4 Summary
When you get a cross-origin response, you can basically get the response body, that is, the content. But the header is different. Only a few basic headers can be obtained directly, such as Content-Type.
In addition, if you want to get other headers, especially custom headers, the backend needs to bring Access-Control-Expose-Headers, so that the browser knows: “I am willing to expose this header to let JS see it”, so that the frontend can successfully grab the header.
If it is not added, null will be obtained, just like this header does not exist.
Day5: Editing Data
Xiaoming, who thought everything was going smoothly, hit a snag again. This time it was a requirement raised by the boss. Now, once the form is submitted, there is no chance to change it. If the user realizes that there is a mistake in filling in somewhere, they can only fill it in again. The boss thinks that this experience is not good and hopes that there is a chance to edit the form just submitted after the user submits the form.
After discussing with the backend, the backend will give a token after submitting the form. The frontend only needs to bring this token to call the PATCH /form API to edit the content of the form just submitted.
The backend looks like this, and all the headers that need to be added are added:
const VALID_ORIGIN = 'http://localhost:8080'
app.patch('/form', (req, res) => {
  res.header('Access-Control-Allow-Origin', VALID_ORIGIN)
  res.header('Access-Control-Allow-Credentials', true)
  // 省略編輯的部分
  res.json({
    success: true
  })
})

app.options('/form', (req, res) => {
  res.header('Access-Control-Allow-Origin', VALID_ORIGIN)
  res.header('Access-Control-Allow-Credentials', true)
  res.header('Access-Control-Allow-Headers', 'content-type, X-App-Version')
  res.end()
})
Xiaoming immediately started working on the frontend part, which looks like this:
fetch('http://localhost:3000/form', {
  method: 'PATCH',
  credentials: 'include',
  headers: {
    'X-App-Version': "v0.1",
    'Content-Type': 'application/json'
  },
  body: JSON.stringify({
    token: 'test_token',
    content: 'new content'
  })
}).then(res => res.json())
  .then(res => console.log(res))
In fact, it is similar to the code for submitting the form before, with only minor differences in the body and method. However, when Xiaoming tested it, the browser reported an error again:
Access to fetch at ‘http://localhost:3000/form‘ from origin ‘http://localhost:8080‘ has been blocked by CORS policy: Method PATCH is not allowed by Access-Control-Allow-Methods in preflight response.
Cross-origin requests only accept three HTTP methods: GET, HEAD, and POST. If any other methods are used, the backend must return an Access-Control-Allow-Methods header to specify which methods are allowed.
Therefore, the backend needs to be modified as follows:
// preflight
app.options('/form', (req, res) => {
  res.header('Access-Control-Allow-Origin', VALID_ORIGIN)
  res.header('Access-Control-Allow-Credentials', true)
  res.header('Access-Control-Allow-Methods', 'PATCH') // 多這個
  res.header('Access-Control-Allow-Headers', 'content-type, X-App-Version')
  res.end()
})
This way, the browser knows that the frontend can use the PATCH method and will not block subsequent requests.
Summary of Day 5
If the frontend needs to send a request using an HTTP method other than GET, HEAD, or POST, the backend’s preflight response header must have Access-Control-Allow-Methods and specify the valid methods. Only then will the preflight pass and the browser send the actual request.
This is similar to Access-Control-Allow-Headers mentioned earlier, except that one specifies which methods can be used, while the other specifies which request headers can be used.
Day 6: Caching preflight requests
Just when they thought they had solved all the cross-origin issues, a problem arose on the technical side just before going live. During QA’s stress testing of the website, they found that there were too many preflight requests, and even if the same user had already preflighted, it still needed to be checked every time, which was quite wasteful in terms of performance.
So QA asked the backend to cache this so that if the same browser sent the request repeatedly, it would not need to preflight again.
Although Xiao Ming is a frontend developer, he wants to become a CORS expert. So he worked with the backend to figure out how to solve this problem. They found a header: Access-Control-Max-Age, which tells the browser how many seconds the preflight response can be cached.
Then the backend added this header:
app.options('/form', (req, res) => {
  res.header('Access-Control-Allow-Origin', VALID_ORIGIN)
  res.header('Access-Control-Allow-Credentials', true)
  res.header('Access-Control-Allow-Headers', 'content-type, X-App-Version')
  res.header('Access-Control-Max-Age', 300)
  res.end()
})
This way, the preflight response will be cached by the browser for 300 seconds, and within those 300 seconds, the same resource will not be preflighted again, but the cached data will be used directly.
Summary
Let’s review all the headers that appeared in the story.
At first, Xiao Ming needed to access the cross-origin request’s response, so the backend needed to provide Access-Control-Allow-Origin to prove that this origin has permission.
Then, because custom headers needed to be sent, the backend needed to provide Access-Control-Allow-Headers to specify which headers the client can send. At the same time, because there were more preflight requests, the backend needed to handle the OPTIONS request.
Then we needed to use cookies, so Access-Control-Allow-Origin cannot be * and must be changed to a single origin. The backend also needs to provide Access-Control-Allow-Credentials: true.
Next, if the frontend needs to access headers, the backend must provide Access-Control-Expose-Headers to tell the browser which headers the frontend can access. If the frontend needs to use methods other than HEAD, GET, and POST, the backend must add Access-Control-Allow-Methods.
Regarding caching, use Access-Control-Max-Age.
Looking at the whole story, you will find that there is actually not much for the frontend to do. The role of the frontend in the whole story is: write code => find errors => report to the backend => backend fixes => complete the function. This also echoes what I have repeatedly emphasized before: “CORS issues are usually not something that the frontend can solve.”
In short, CORS uses a bunch of response headers to tell the browser what the frontend has permission to access. Without these headers provided by the backend, the frontend can’t do anything. Therefore, both the frontend and the backend need to know these headers so that they can solve related problems in the future.
By the way, I think Chrome’s error messages are getting better and better. I remember they weren’t as detailed before, but now they are so detailed that you can even see the error message directly without Googling how to fix it.
I hope that through this article, everyone can understand which response headers CORS has and what preflight requests are and when they are triggered. After understanding these, you probably have about 80% understanding of the entire CORS protocol.
In the next article, CORS Complete Manual (Part 4): Let’s Look at the Specification Together, we will look at the specification together to further understand the CORS protocol.
Comments