Introduction
In my blog, there are actually few tool-related tutorial articles. One reason is that these tool-related articles are all similar, and the other reason is that I am lazy and many step-by-step tutorials require detailed descriptions and rich screenshots, which is not suitable for me.
But this time I decided to write this topic because I think webpack is a tool that beginners are not easy to understand, and even if they understand it, they may not really understand it. In other words, it is a tool that is often misunderstood.
This is not a problem with webpack itself, but many beginners now start with React or Vue directly in front-end development, and they all use the CLI tools provided by them. When they need to customize some settings, they will notice: “Oh, there is a thing called webpack.”
CLI tools bring convenience, and the advantage is that beginners can quickly get started without worrying about those cumbersome settings; the disadvantage is that if beginners are not aware of the tools behind them, when the tools are broken, cannot be used, or need to be modified somewhere, it will be the beginning of a nightmare.
In order to reduce this situation, I decided to write this article, hoping to introduce everyone to the concept of webpack and modularity from the source. You must first know what a module is to understand what webpack is.
At the beginning, I want to let everyone think about their familiarity with modularity and webpack through a few questions:
- Why do many projects (such as React) need to be built before deployment? What is this step doing?
- Do you know the difference between
require/module.exportsandimport/export? - Do you know that these two syntaxes of import and export cannot be used casually on the browser?
- Do you know why to use webpack?
- Do you know why webpack needs a loader?
These questions should inspire you a little bit while reading this article, and I will answer them for you at the end.
Modularity
I believe everyone should have heard of the term module. This is a simple example.
For example, your mobile phone, if the screen is broken, you can only replace the screen, if the camera is broken, you can only replace the camera, and if the battery is broken, you can only replace the battery. You may say, “Oh, what about it?”
Have you ever thought about why you can replace it like this? Because the screen and the camera are two completely independent functions, they do not interfere with each other and have no dependencies, so replacing the screen will not break the camera function, and vice versa. This is actually the concept of modularity. The screen is a module that is only responsible for displaying information, and the camera is another module that is responsible for taking pictures. Through the software of the mobile phone, the screen and the camera are integrated to display the picture captured by the camera on the screen.
If there is no concept of modularity, the entire mobile phone is really a whole, and each function is bound to each other. If the camera is broken, you have to replace the entire mobile phone, and you cannot replace only the camera.
If we talk about code, it will probably look like this:
import 相機
import 螢幕
import AA電池
import sim卡

Phone.start(相機, 螢幕, AA電池, sim卡)
One of the benefits of modularity is convenience. If you want to use someone else’s battery today, just change the battery part, and other parts don’t need to be changed:
import 相機
import 螢幕
import BB 電池
import sim卡

Phone.start(相機, 螢幕, BB 電池, sim卡)
When writing code, it is also like this. We often use many built-in modules or modules written by others. Taking Node.js as an example, you can use the built-in os module to obtain operating system-related information, such as which platform the operating system is:
var os = require('os')
console.log(os.platform()) // darwin
Here we use require to import the built-in os module and call os.platform() to get information.
This is the most basic use of modules in the program. After understanding this concept, we can narrow the scope and talk about how modularity works in Node.js. (I think it is important to have a basic understanding of Node.js to understand the concept of modularity. If you don’t know anything about it, it is highly recommended to learn a little bit, at least know what it is doing.)
Node.js Modules
It has been mentioned before that we can use require in Node.js to import built-in modules. What if we want to make a module ourselves? Use the module.exports syntax.
For example, we have a utils.js, which contains a frequently used function calculate for calculating prices:
// utils.js
function calculate(n) {
  return ((n * 100 + 20 - 4)) % 10 + 3  // 計算價格公式
}

module.exports = calculate // 把這個函式 export 出去
Then we can use the require syntax in another file main.js to import:
// main.js
var calculate = require('./utils')
console.log(calculate(30)) // 9
What we module.exports in utils.js will be imported with require('./utils') elsewhere. So you can think of var calculate = require('./utils') as var calculate = (module.exports in utils.js).
Let’s take another example where we change the output of utils.js to an object:
function calculate(n) {
  return ((n * 100 + 20 - 4)) % 10 + 3  // 計算價格公式
}

module.exports = {
  cal: calculate,
  name: 'hello'
} // 把這個物件 export 出去
In main.js, we can still get this object in the same way:
var obj = require('./utils')
console.log(obj.cal(30)) // 9
console.log(obj.name) // hello
This is the basic concept of module usage in Node.js, using module.exports to export things and require to import modules.
This module mechanism is not actually part of the JavaScript specification, but rather a standard called “CommonJS”.
Some people may be confused by this. Let’s imagine a scenario.
Before the emergence of ES6, JavaScript itself did not specify any mechanism related to modules.
At this time, everyone can come up with their own ideas. For example, A may think it’s better to write it like this:
// utils.js
function calculate(n) {
  return ((n * 100 + 20 - 4)) % 10 + 3  // 計算價格公式
}

out = {
  cal: calculate,
  name: 'hello'
}

// main.js
var obj = include('./utils')
console.log(obj.cal(30)) // 9
console.log(obj.name) // hello
Use out to output modules and include to import them.
And B may say it’s better like this:
// utils.js
function calculate(n) {
  return ((n * 100 + 20 - 4)) % 10 + 3  // 計算價格公式
}

EXP = {
  cal: calculate,
  name: 'hello'
}

// main.js
var obj = in('./utils')
console.log(obj.cal(30)) // 9
console.log(obj.name) // hello
Use EXP to output modules and in to import them.
So A’s standard is called A standard, and B’s is called B standard. Both of these standards can achieve modularity, but the syntax and implementation behind them are different. CommonJS is just one of these standards, which uses module.exports to export modules and require to import them.
Later, Node.js adopted this CommonJS standard, which is why we see this form now.
Have you noticed that we have been talking about Node.js all the time?
What about browsers? Sorry, browsers do not natively support this. So you can’t use module.exports or require in the browser.
Some people may say, “You’re lying! Why can my company’s project use these and still run in the browser?” Well, I’m not lying. It’s true that browsers don’t natively support it, but you can use other tools to achieve this (yes, you now know why you need to use webpack).
But before introducing the tools, let’s try to solve this problem ourselves.
Manually adding CommonJS support
In the CommonJS module standard, the two most important things are:
module.exportsrequire
As mentioned earlier:
Whatever we export in utils.js, we can import it with require('./utils'). So you can think of var calculate = require('./utils') as var calculate = (what is exported in utils.js) module.exports.
Therefore, we can try to add some code to make require('./utils.js) return what is exported in utils.js, and we’re done.
First, wrap the original content of main.js in a function called main and pass in require:
function main(require) {
  var obj = require('./utils')
  console.log(obj.cal(30)) // 9
  console.log(obj.name) // hello
}
Then wrap the content of utils.js in a function, and since utils.js does not use require, we change it to pass in a parameter called module, like this:
function main(require) {
  var obj = require('./utils')
  console.log(obj.cal(30))
  console.log(obj.name)
}

function utils(module) {
  function calculate(n) {
    return ((n * 100 + 20 - 4)) % 10 + 3
  }

  module.exports = {
    cal: calculate,
    name: 'hello'
  }
}
The above just wraps the two files with two functions and passes in parameters.
Next, we can declare a variable m outside and pass it into utils, then call it:
function main(require) {
  var obj = require('./utils')
  console.log(obj.cal(30))
  console.log(obj.name)
}

function utils(module) {
  function calculate(n) {
    return ((n * 100 + 20 - 4)) % 10 + 3
  }

  module.exports = {
    cal: calculate,
    name: 'hello'
  }
}

// 加入這兩行
var m = {}
utils(m)
After calling the utils function, m.exports will be what we exported in the utils function, which should be returned when require('utils.js') is called in main.
So the final step is to call the main function and pass in a require parameter:
function main(require) {
  var obj = require('./utils')
  console.log(obj.cal(30))
  console.log(obj.name)
}

function utils(module) {
  function calculate(n) {
    return ((n * 100 + 20 - 4)) % 10 + 3
  }

  module.exports = {
    cal: calculate,
    name: 'hello'
  }
}

var m = {}
utils(m)

// 加入底下這幾行
function r() {
  // 回傳我們所需要的 m.exports
  return m.exports
}
main(r)
That’s it! We can now pass module.exports from utils to main and return it when require('utils.js') is called. You can copy and paste the entire code above into the browser, and it should run smoothly!
The above code is just a rough demonstration of the principle. The basic principle is:
- Wrap the file into a function and receive parameters such as
moduleandrequire. - Call the function outside and pass in an object and the
requirefunction.
However, in reality, it is not that simple because there are still many problems to solve, such as:
- Dependency, for example, A depends on B, and B depends on C, so the loading order must be: C->B->A.
- Loading multiple modules, the function we passed to main only returns the module.exports of utils, but it should support multiple requires, so what to return should be determined based on the parameter in require.
- Caching, when a module is loaded multiple times, it should be cached.
After understanding the principle, let’s see how to use existing tools.
Introduction to Browserify
The world of front-end development is simple, in a nutshell:
If something is not supported, write a tool to support it.
Babel, webpack, and PostCSS are all tools that implement functions that are not natively supported by browsers.
In 2011, browserify was introduced. The first sentence on its official website describes its purpose:
Browserify lets you require(‘modules’) in the browser by bundling up all of your dependencies.
In short, it allows you to use require in the browser.
You can use the following command in the terminal to package the two files main.js and utils.js we just created:
npx browserify main.js -o bundle.jsThe first parameter passed in is the so-called entry point, which represents the main file to be executed. For example, when we demonstrated earlier, we used node main.js to execute, which means that the file to be executed is actually main.js, so main.js is the entry point.
Then the generated bundle.js content is as follows:
(
  function e(t, n, r) {
    function s(o, u) {
      if (!n[o]) {
        if (!t[o]) {
          var a = typeof require == "function" && require;
          if (!u && a) return a(o, !0);
          if (i) return i(o, !0);
          var f = new Error("Cannot find module '" + o + "'");
          throw f.code = "MODULE_NOT_FOUND", f
        }
        var l = n[o] = {
          exports: {}
        };
        t[o][0].call(l.exports, function(e) {
          var n = t[o][1][e];
          return s(n ? n : e)
        }, l, l.exports, e, t, n, r)
      }
      return n[o].exports
    }
    var i = typeof require == "function" && require;
    for (var o = 0; o < r.length; o++) s(r[o]);
    return s
  })({
  1: [function(require, module, exports) {
    function calculate(n) {
      return ((n * 100 + 20 - 4)) % 10 + 3 // 計算價格公式
    }

    module.exports = {
      cal: calculate,
      name: 'hello'
    } // 把這個物件 export 出去
  }, {}],
  2: [function(require, module, exports) {
    var obj = require('./utils')
    console.log(obj.cal(30)) // 9
    console.log(obj.name) // hello
  }, {
    "./utils": 1
  }]
}, {}, [2]);
It is normal if you cannot understand it because this is the compressed version. But the core concept is: “Wrap your code in a function and provide a function called require and an object called module for you to use.” It is similar to what we did above, but more rigorous.
If you really want to understand what is going on, I refer to the source code: browser-pack/prelude.js, and restore the packaged code and add comments. For readability, I also changed the order and removed some additional checks and functions.
The result is as follows (please note that for teaching purposes, only the most core functions are left below, and the rest of the code is removed):
// 跟我們做的事情一樣,把檔案包成一個 function,傳入 require, modules
function utils(require, module) {
  function calculate(n) {
    return ((n * 100 + 20 - 4)) % 10 + 3
  }

  module.exports = {
    cal: calculate,
    name: 'hello'
  }
}

// 跟我們做的事情一樣,把檔案包成一個 function,傳入 require, modules
function main(require, module) {
  var obj = require('./utils')
  console.log(obj.cal(30))
  console.log(obj.name)
}

/*
  定義一個叫做 modules 的物件,裡面把 module 換成數字編號
  陣列的第一個參數就是上面包好的 function,第二個參數則是相依性需要的 module 以及編號
  例如說: {
    "./utils": 1
  }
  代表說當我呼叫 require("./utils") 的時候,其實就是要載入編號為 1 的 module
*/
var modules = {
  1: [utils, {}],
  2: [main, {
    "./utils": 1
  }]
}

/*
  函式詳細內容可以見底下,第一個參數就是 modules
  第二個參數是 cache(先不管)
  第三個參數則是入口點,就像是 C 語言裡面的 main function 那樣
  以我們的範例來說,就是 main.js 這個檔案,也就是編號為 2 的 module
*/
outer(modules, {}, [2])

/*
  底下程式碼來自:https://github.com/browserify/browser-pack/blob/master/prelude.js
  為了方便理解核心功能,有經過刪改
*/
function outer(modules, cache, entry) {
  /*
    順序執行 entry,在我們的例子 entry 只有一個
    所以可以簡單想成是:newRequire(2)
  */
  for (var i = 0; i < entry.length; i++) {
    newRequire(entry[i]);
  }

  /*
    核心程式碼在下面
    以我們的例子而言,name 會是 2
  */
  function newRequire(name) {
    //先從 cache 裡面找這個 module 的內容,找不到的話載入 module 並且放入 cache
    if (!cache[name]) {
      // 找不到要載入的 module,拋出錯誤
      if (!modules[name]) {
        var err = new Error('Cannot find module \'' + name + '\'');
        err.code = 'MODULE_NOT_FOUND';
        throw err;
      }

      /*
        宣告一個物件來儲存 module export 出來的東西
        並且一併放到 cache 裡面
      */
      var m = cache[name] = {
        exports:{}
      };

      /*
        核心功能就是底下這四行
        呼叫我們最前面定義的那個包好的 function,並且傳入 require 以及 module
        在 require 裡面會根據 modules 的內容找到要引入的 id
        以 require('./utils') 為例
        modules[2][1]['./utils'] 是 1,就會去載入 id 為 1 的 module 並且回傳
      */
      modules[name][0].call(m.exports, function(x){
          var id = modules[name][1][x];
          // 載入 module 並且回傳
          return newRequire(id ? id : x);
      }, m);
    }

    // 找到的話就直接回傳 module.exports
    return cache[name].exports
  }
}
The original code is more complicated because it needs to consider many other situations, and only the core module function is left, which looks like the one above. It’s okay if you don’t understand it, after all, this is a more beginner-friendly article, just take a quick look.
You only need to know one key point:
CommonJS (require and module.exports) is not natively supported by browsers, and tools must be used to use them in browsers.
The “tool” mentioned above, we have introduced browserify, but there is another more famous one.
Yes, it’s webpack!
Exploring Webpack
When we used browserify just now, we used this command to specify the entry point and the name of the packaged file:
npx browserify main.js -o bundle.jsWebpack is essentially similar to browserify, but these need to be turned into configuration files. We can add a webpack.config.js:
module.exports = {
  entry: './main.js',
  output: {
    path: __dirname,
    filename: 'webpack_bundle.js'
  }
}
Careful observation will reveal that this is actually the same as the options that need to be set when using browserify, the entry point, the output file name, and the path (__dirname represents the same directory as the config file).
Then execute these few commands in the terminal, which is basically to install webpack and then execute webpack:
npm init -y
npm install webpack webpack-cli --save-dev
npx webpack --config webpack.config.js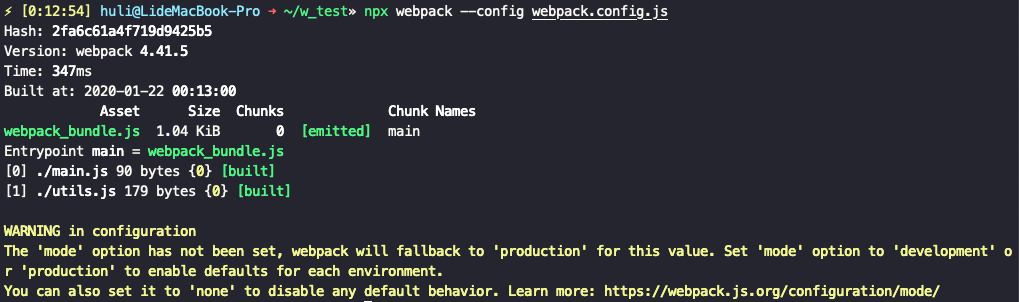
Then you will see a webpack_bundle.js in the directory, and the content is also something that cannot be understood at all. This is because webpack has two modes, production and development, and the default is the former. Production means that it will automatically compress and optimize for use in production environments.
During development, the development mode is usually used, and the packaging speed is faster. The way to change it is very simple, just change the configuration file:
module.exports = {
  mode: 'development',
  entry: './main.js',
  output: {
    path: __dirname,
    filename: 'webpack_bundle.js'
  }
}
After saving, execute npx webpack --config webpack.config.js again, and the result is as follows:
/******/ (function(modules) { // webpackBootstrap
/******/ 	// The module cache
/******/ 	var installedModules = {};
/******/
/******/ 	// The require function
/******/ 	function __webpack_require__(moduleId) {
/******/
/******/ 		// Check if module is in cache
/******/ 		if(installedModules[moduleId]) {
/******/ 			return installedModules[moduleId].exports;
/******/ 		}
/******/ 		// Create a new module (and put it into the cache)
/******/ 		var module = installedModules[moduleId] = {
/******/ 			i: moduleId,
/******/ 			l: false,
/******/ 			exports: {}
/******/ 		};
/******/
/******/ 		// Execute the module function
/******/ 		modules[moduleId].call(module.exports, module, module.exports, __webpack_require__);
/******/
/******/ 		// Flag the module as loaded
/******/ 		module.l = true;
/******/
/******/ 		// Return the exports of the module
/******/ 		return module.exports;
/******/ 	}
/******/
/******/
/******/ 	// expose the modules object (__webpack_modules__)
/******/ 	__webpack_require__.m = modules;
/******/
/******/ 	// expose the module cache
/******/ 	__webpack_require__.c = installedModules;
/******/
/******/ 	// define getter function for harmony exports
/******/ 	__webpack_require__.d = function(exports, name, getter) {
/******/ 		if(!__webpack_require__.o(exports, name)) {
/******/ 			Object.defineProperty(exports, name, { enumerable: true, get: getter });
/******/ 		}
/******/ 	};
/******/
/******/ 	// define __esModule on exports
/******/ 	__webpack_require__.r = function(exports) {
/******/ 		if(typeof Symbol !== 'undefined' && Symbol.toStringTag) {
/******/ 			Object.defineProperty(exports, Symbol.toStringTag, { value: 'Module' });
/******/ 		}
/******/ 		Object.defineProperty(exports, '__esModule', { value: true });
/******/ 	};
/******/
/******/ 	// create a fake namespace object
/******/ 	// mode & 1: value is a module id, require it
/******/ 	// mode & 2: merge all properties of value into the ns
/******/ 	// mode & 4: return value when already ns object
/******/ 	// mode & 8|1: behave like require
/******/ 	__webpack_require__.t = function(value, mode) {
/******/ 		if(mode & 1) value = __webpack_require__(value);
/******/ 		if(mode & 8) return value;
/******/ 		if((mode & 4) && typeof value === 'object' && value && value.__esModule) return value;
/******/ 		var ns = Object.create(null);
/******/ 		__webpack_require__.r(ns);
/******/ 		Object.defineProperty(ns, 'default', { enumerable: true, value: value });
/******/ 		if(mode & 2 && typeof value != 'string') for(var key in value) __webpack_require__.d(ns, key, function(key) { return value[key]; }.bind(null, key));
/******/ 		return ns;
/******/ 	};
/******/
/******/ 	// getDefaultExport function for compatibility with non-harmony modules
/******/ 	__webpack_require__.n = function(module) {
/******/ 		var getter = module && module.__esModule ?
/******/ 			function getDefault() { return module['default']; } :
/******/ 			function getModuleExports() { return module; };
/******/ 		__webpack_require__.d(getter, 'a', getter);
/******/ 		return getter;
/******/ 	};
/******/
/******/ 	// Object.prototype.hasOwnProperty.call
/******/ 	__webpack_require__.o = function(object, property) { return Object.prototype.hasOwnProperty.call(object, property); };
/******/
/******/ 	// __webpack_public_path__
/******/ 	__webpack_require__.p = "";
/******/
/******/
/******/ 	// Load entry module and return exports
/******/ 	return __webpack_require__(__webpack_require__.s = "./main.js");
/******/ })
/************************************************************************/
/******/ ({

/***/ "./main.js":
/*!*****************!*\
  !*** ./main.js ***!
  \*****************/
/*! no static exports found */
/***/ (function(module, exports, __webpack_require__) {

eval("var obj = __webpack_require__(/*! ./utils */ \"./utils.js\")\nconsole.log(obj.cal(30)) // 9\nconsole.log(obj.name) // hello\n\n\n//# sourceURL=webpack:///./main.js?");

/***/ }),

/***/ "./utils.js":
/*!******************!*\
  !*** ./utils.js ***!
  \******************/
/*! no static exports found */
/***/ (function(module, exports) {

eval("function calculate(n) { \n  return ((n * 100 + 20 - 4)) % 10 + 3  // 計算價格公式\n}\n  \nmodule.exports = {\n  cal: calculate,\n  name: 'hello'\n} // 把這個物件 export 出去\n\n//# sourceURL=webpack:///./utils.js?");

/***/ })

/******/ });
Like browserify, you can paste the entire string above into the browser console and execute it normally to output the result. Although you don’t need to look closely at the code above, you will notice that many things are similar to the code packaged by browserify.
Okay, I believe everyone has learned two key points here:
- webpack is similar to browserify
- To use the CommonJS module mechanism on the browser, you must use a tool to package the code first.
And the second point is the reason why webpack is necessary.
At this point, you may have a question:
But our company doesn’t use
require, we use ES6’simportandexport, isn’t the browser already supporting it? Then why do we need webpack?
That’s a good question. Take a break and get a drink of water, the second half is about to begin.
Standardization of ES6 modules
As mentioned earlier, before ES6 appeared, JavaScript did not have a standard module specification. Node.js supports CommonJS, so you can use require and module.exports, but the browser does not natively support it, so tools like browserify and webpack are needed.
After ES6 came out, there was finally a formal specification, which is the import and export that we often see. We can change the previous main.js and utils.js to the form of import and export:
// main.js
import obj from './utils'
console.log(obj.cal(30))
console.log(obj.name)

//utils.js
function calculate(n) {
  return ((n * 100 + 20 - 4)) % 10 + 3  // 計算價格公式
}

export default {
  cal: calculate,
  name: 'hello'
}
Although this is the ES6 standard, the support is not very good.
If you try to execute node main.js on Node.js, it will give you a SyntaxError: Unexpected identifier error directly because Node.js does not recognize the import syntax.
There are two ways to use import and export on Node.js. The first method is to change the file extension from .js to .mjs, and then add a flag when using node: node --experimental-modules main.mjs.

By the way, this is the situation when the Node.js version is less than 13. If it is the latest version 13 or above, just change the file name to mjs. For details, please refer to: Node.js v13.7.0 Documentation: ECMAScript Modules.
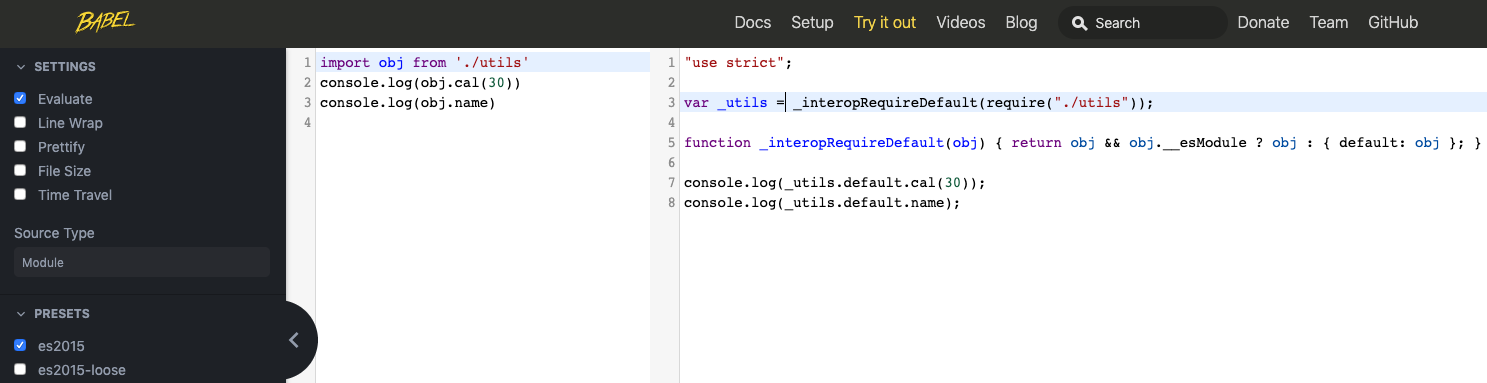
The second method is the famous babel, which relies on babel to convert ES6 syntax to ES5, and can be used directly on the simple online converter provided by babel. Convert the content of main.js from import to require:
The above is about Node.js. What about the browser?
You can try not to change anything first, just main.js and utils.js, and then add an index.html, the content is as follows:
<html>
<head>
  <script src="./main.js"></script>
</head>
<body>
</body>
</html>
After opening it, you will see that the devtool console spits out such an error:
Uncaught SyntaxError: Cannot use import statement outside a module
Similar to Node.js, if you want to use import and export, you must execute it in the form of a module, so you need to add a type to the script tag:
<html>
<head>
  <script src="./main.js" type="module"></script>
</head>
<body>
</body>
</html>
Then, when you reopen the page, you will find another error:
Access to script at 'file:///Users/huli/w_test/main.js' from origin 'null'
has been blocked by CORS policy: Cross origin requests are only supported for protocol schemes:
http, data, chrome, chrome-extension, https.
Currently, I am opening index.html by double-clicking it, so it is just opening the file, and the URL will start with file:///. If you want to use import, you must open it in a server. You can enter this command in the same directory to run a file server:
python -m SimpleHTTPServer 8080Then you can open it: http://localhost:8080.
Unfortunately, another error occurred this time: GET http://localhost:8080/utils net::ERR_ABORTED 404 (File not found)
You need to change import obj from './utils' in main.js to import obj from './utils.js' to explicitly specify that you want to import the .js file.
After changing it, refresh the page, and you can see the correct result on the console! Below is the complete code, with only three files:
main.js
import obj from './utils.js'
console.log(obj.cal(30))
console.log(obj.name)
utils.js
function calculate(n) {
  return ((n * 100 + 20 - 4)) % 10 + 3  // 計算價格公式
}

export default {
  cal: calculate,
  name: 'hello'
}
index.html
<html>
<head>
  <script src="./main.js" type="module"></script>
</head>
<body>
</body>
</html>
So far, everything seems to be going smoothly, and there doesn’t seem to be any problems. You can run it on the webpage by adding the type="module" attribute to the import tag, which is great.
However, things are not that simple.
The first problem is browser support.
This problem can be big or small depending on whether your company needs to support IE, because all major browsers support import and export, but IE does not.
The second problem is, what if I want to use packages written by others on npm?
There is no problem with this in Node.js because you must first install node_modules in the folder, but what about the webpage? Do you have to upload the entire node_modules folder?
Another problem is how to write the path when importing? Do you have to write it explicitly like import pad from './node_modules/pad-left/index.js'? This is a very poorly maintainable way of writing, and if the entry point of the module changes, you have to rewrite all the import statements.
This problem is actually quite troublesome because during development, you usually use modules written by others. If you cannot easily support importing these modules, it will cause a lot of inconvenience.
Do you remember what I said before?
“The world of front-end is simple. If something is not supported, write a tool to support it.” Here we need to modify it a bit to “The world of front-end is simple. If something is not supported or has poor support, write a tool to support it.”
It is because the native module mechanism of the browser will encounter many problems (compatibility, inability to be compatible with npm, etc.), so we need an additional tool.
And this tool is webpack.
Exploring webpack again
To experience the power of webpack, let’s install a package first:
npm install pad-leftThen import and use the package in main.js:
import obj from './utils.js'
import pad from 'pad-left'
console.log(obj.cal(30))
console.log(pad('4', 4, 0))
Then follow the previous process to package the file. The config file has been written before, so just enter the command:
npx webpack --config webpack.config.jsThen open index.html and change the imported script. You don’t need type=module because of webpack:
<html>
<head>
  <script src="./webpack_bundle.js"></script>
</head>
<body>
</body>
</html>
Finally, open index.html, and if you see the output of 9 and 0004 on the console, it means that the packaging was successful.
One of the benefits of using webpack is that we can package the modules installed using npm together, just like packaging the modules we wrote ourselves, without doing anything else. This is something that native browsers cannot do.
The reason we need webpack is that the native browser module function and support are not that complete.
However, the power of webpack is not just that. When you open the webpack official website, you will see this picture:
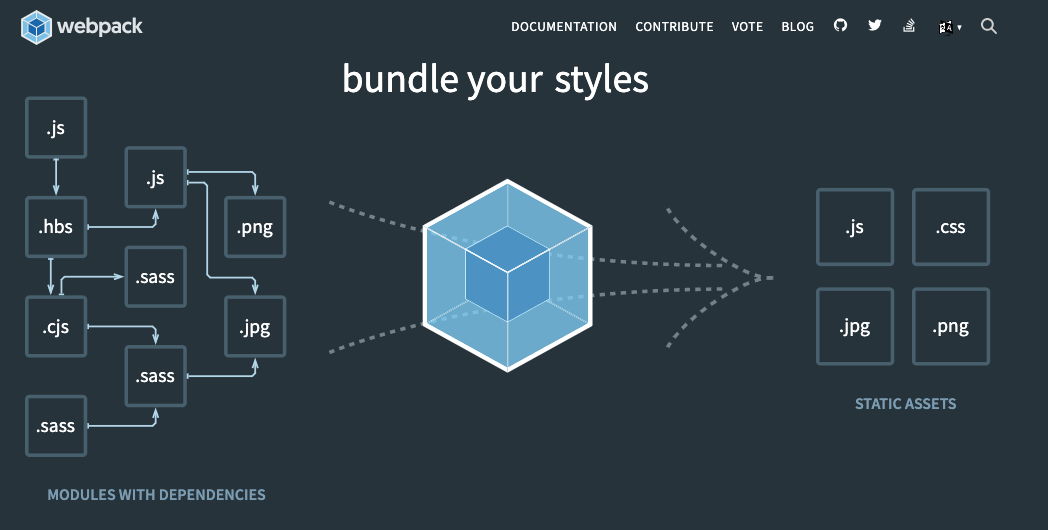
The most powerful thing about webpack is that it extends the concept of “modularity”. When we were discussing modularity just now, we only talked about JavaScript and program modules. But webpack regards “any resource” as a module.
Images and CSS are modules, so you can import Image from './assets/banner.png' and import styles from 'style.css'. You can import any resource and use it.
This has nothing to do with JavaScript or ES6. It is entirely an extension of webpack. You cannot use it in a browser.
To support this functionality, webpack defines many loaders for different resources. These loaders process the resources to load them. This is where webpack’s power lies.
For example, you can use the scss loader to load scss files, and it will compile them into CSS when you import them. You don’t have to do it yourself. The same goes for JS. You can write the latest and greatest syntax and use the babel-loader to convert ES10 syntax to ES5 when you load it.
This resource loading and conversion is where webpack is most powerful.
Do you remember when you were writing React and importing images and CSS like it was nothing? This is because webpack is handling it for you. It is not something that browsers natively support, but rather something that webpack’s module system does for you.
Furthermore, once you have mastered the basics of resource bundling, webpack can do more interesting things with loaders and plugins, such as:
- Uglifying JS when loading it
- Minifying CSS when loading it
- Adding a hash to the packaged file name
- Packaging different files for different pages so that you don’t have to load all JS at once
- Supporting dynamic JS imports, loading only when needed
That’s the end of the webpack tutorial. I don’t intend to go deeper into it, as it would be more about tool usage. The main purpose of this article is to let you know:
- Why use webpack?
- What happens if you don’t use webpack?
- What is the difference between webpack and the standard module defined by ES6?
- The most basic usage of webpack (writing configuration files and packaging JS)
Snowpack
As we mentioned earlier, one of the reasons for using webpack is that native browsers cannot package npm-installed modules. In addition to solving this problem, webpack also extends the definition of “modules” so that any resource can be treated as a module. With a powerful loader and plugin system, webpack can do more interesting things.
Recently, another library called Snowpack was released, which claims to be able to run in browsers without packaging. The principle is simple: it organizes the modules installed in node_modules and puts them in another folder called web_modules. When you need to import them, you can import them from there.
However, not every module can be used this way. The module itself must support the standard ESM module. For example, pad-left that we used earlier does not support it, so we cannot use it with Snowpack. Therefore, we will install a supported mathjs later to try it out.
Let’s try it out. First, install Snowpack and mathjs:
npm install --save-dev snowpack
npm install mathjs
Then run Snowpack to organize the modules:
npx snowpackAfter running it, you will see a new folder called web_modules with two files: import-map.json and mathjs.js.
Next, update main.js:
import obj from './utils.js'
import {pi} from './web_modules/mathjs.js' // 從 web_modules 資料夾引入
console.log(obj.cal(30))
console.log(pi)
Then update index.html:
<html>
<head>
  <script src="./main.js" type="module"></script>
</head>
<body>
</body>
</html>
Finally, run a server with the command: python -m SimpleHTTPServer 8080
You will see 3.141592653589793 in the console, indicating that we can use the npm-installed module successfully!
Snowpack is easy to use, and the problem it solves is simple. It only solves the problem of “importing third-party modules,” and does not manage anything else.
Can it import images and CSS like webpack? No, and the official website suggests that you use the old methods:
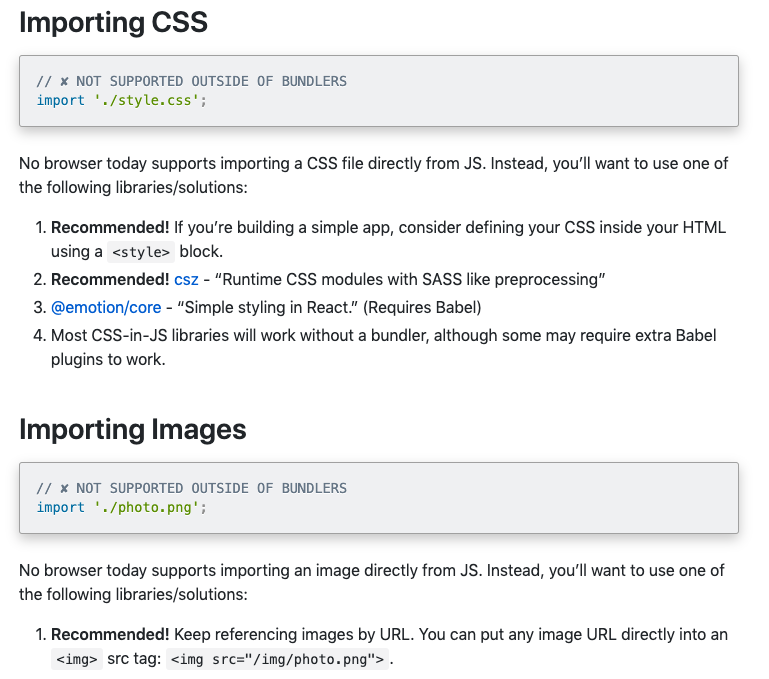
The website also has a section on who should use Snowpack and who should not. For example, if you want to support IE11 or need to use a library that does not support ESM, you should not use Snowpack.
Snowpack is still new, and there are still many issues to be resolved if you want to use it in production. I specifically mention it here to show you another solution besides webpack.
You may have heard of Parcel or Rollup, which are just other tools for packaging. You can choose a tool to familiarize yourself with, but the key is to understand why you need these tools before that.
Conclusion
Let’s answer the questions at the beginning:
Q: Why do many projects (such as React) need to be built before deployment? What is this step doing?
Because the source code cannot be directly placed on the browser (it will not be able to execute), it must be processed by webpack packaging, and the packaged file can be executed by the browser.
Q: Do you know the difference between require/module.exports and import/export?
require/module.exports is a specification called CommonJS, which is supported by Node.js but not by browsers.
import/export is a specification of ES6, which is partially supported by Node.js and browsers.
Q: Do you know that these two syntaxes import/export cannot be used casually on browsers?
There are usage restrictions, such as adding type=module, and you cannot directly import modules in npm. The browser support is also a consideration, and IE11 does not support this syntax.
Q: Do you know why you need to use webpack?
There are many reasons, such as:
- I want to use third-party modules on npm
- I want to import images as resources
- I want to import CSS as resources
- I want to handle uglify and minify in one place
However, the key is actually the first one, because the native ES6 module support of the browser is not so high, especially when importing third-party modules, so we need webpack or other packaging tools to help us handle this part.
Q: Do you know why webpack needs a loader?
Because importing images or CSS as resources is not a formal specification, but a definition extended by webpack itself. In order to support these resources, a special loader must be written to load them, otherwise the default loader can only load JavaScript.
When I first came into contact with webpack, I was also very confused. I didn’t know why I needed webpack, and I didn’t know what magic it did.
It wasn’t until later that I slowly explored and found that I was wrong from the beginning, and I shouldn’t start with webpack. If you don’t understand the concept of modularization, don’t even know that you can’t use require on the browser, how can you understand what webpack is doing?
And some students I recently met, even though they have work experience or have used webpack, they still have only a vague understanding of this part. In my opinion, the reason is that the understanding of modularization is insufficient, the understanding of historical context is not enough, and the distinction between “executing JS on the browser” and “executing JS on the computer using Node.js” is not clear enough, so many things are mixed together and treated as the same.
So although this article is called “webpack beginner’s tutorial”, it talks more about modularization and the reasons for using webpack, and does not really elaborate on “how to use webpack”. One reason is that I think that understanding the principles and reasons will greatly reduce the threshold for using tools; the other is that if I continue to write, it will never end. If you really want to talk about webpack, you can write another article.
In fact, there are many things about modularization that I deliberately did not mention, such as other specifications such as AMD/UMD and the tool RequireJS. I think it is good for this article to ignore these contents selectively, because once they are mentioned, things will become more complicated, so these contents are selectively ignored.
When writing, choosing what to say and what not to say is also a skill, and maybe I can write another article to make up for these parts that have not been mentioned in the future.
Finally, I hope that after reading this article, you can really understand the problems that the native ES6 module will encounter on the browser, and you will know why you need to use webpack.
If there are any errors, please feel free to correct them. Thank you!
Reference:
Comments