Introduction
I have always recommended a course called CS50 because it is deep, broad, and taught in a clear and concise manner. The assignments are also solid, making it an excellent course.
The course I am introducing today can be described as the “CS50 of computer hardware.”
From Nand to Tetris was created by two professors, Shimon Schocken and Noam Nisan. Like CS50, it was originally a university course that later became an online course. The course has a subtitle on its official website: “Building a Modern Computer From First Principles.” Yes, you will build a computer.
The course is divided into two parts. Part 1 is From Nand to HACK. Nand is the name of a logic gate, just like Or, And, and Xor. HACK is the computer that will be built at the end of Part 1. Therefore, Part 1 will take you from the most basic logic gate and gradually build a computer. This part is heavily focused on hardware.
Part 2 is From HACK to Tetris, which extends from the computer to software. It covers topics such as compilers and operating systems.
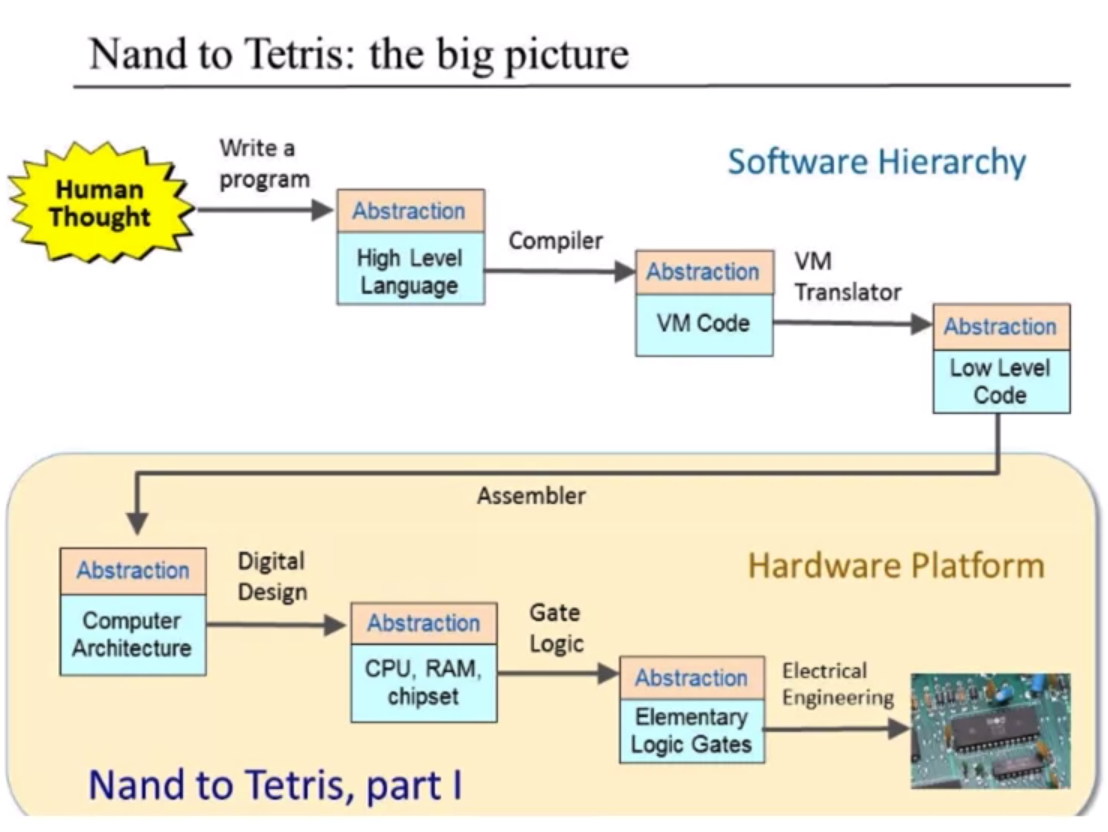
The course overview can be seen in this image:
I have always wanted to take this course, but I never got around to it. Recently, I finally took the course seriously and completed it. It is indeed an excellent course! Therefore, I am writing this article to introduce and recommend it to everyone.
Why I Wanted to Take This Course
Seven years ago, when I was a freshman, I took two courses: “Computer Organization and Assembly Language” in the Department of Computer Science and “Computer Organization and Structure” in the Department of Information Management. The reason I took these two courses was simple: I had a fascination with assembly language.
Although I am not good at writing assembly language, I think it is cool. Whether it’s C++, Go, Rust, or my favorite JavaScript, I think they are not as cool as assembly language. I don’t know why, but I think writing assembly language is cool.
To learn and write assembly language, I took those two courses. The first half of those courses covered some low-level computer topics that I still don’t understand. I got low scores on the first two assignments, and I never understood those circuit diagrams. However, after entering the assembly language part, I felt like a fish in water. Finally, I was studying a topic that I liked and was good at.
In short, besides assembly language, I didn’t gain much from those two courses because I couldn’t understand many things. After completing those courses, I knew about registers, L1 and L2 caches, branch prediction, and instruction pipelines, but I still didn’t know how computers work or how they execute instructions.
However, because I didn’t plan to study computer science and I wouldn’t encounter such low-level things in my work, I gradually stopped paying attention. But in my heart, I still wanted to know how computers work.
After growing up, I accidentally heard about From Nand to Tetris (hereinafter referred to as nand2tetris), which takes you from the simplest logic gate and builds a computer. Then, you will run a Tetris program on this computer. Wow, it sounds great.
This is why I wanted to take this course. I want to know how computers work. I want to know what is inside the CPU, not just a black box.
What Does the Course Cover?
The course has six weeks and is divided into seven units (Units 0-6). Unit 0 is an introduction to the course. Below, I will introduce each unit to you.
Unit 0: Introduction
In addition to introducing the course, this unit also introduces two important concepts: Abstraction and Implementation.
An example will make it easier to understand. For example, if you are given a computer and asked to write a program that outputs “Hello World,” you don’t have to worry about how print works. You can assume that it will print something. In other words, you don’t need to worry about how print is implemented (Why), you just need to know what it can do (What).
This concept is very important in computer science because a computer is a layered thing. It is built layer by layer, from the bottom layer of electronic circuits, to basic logic gates (And, Or, and Not), to more complex hardware (Register, ALU), to even more complex hardware (CPU, RAM), and so on.
And this course will take you from the bottom up, building up to let you know what a computer is made of.
The “bottom” here refers to logic gates. You don’t need to know how the circuits in the physical world are connected (because that’s the field of electronics or electrical engineering), nor do you need to know how the “input” is input or where the “output” will be output.
Unit1: Boolean functions and logic gate
This week will introduce basic logic gates, such as Or, And, Xor, Nand, and Nor, etc., to let you know their functions. You will also be taught to draw truth tables to familiarize yourself with these basic logics.
The homework for this week is to only give you a logic gate Nand and ask you to create the following 15 circuits:
- Not
- And
- Or
- Xor
- Mux
- DMux
- Not16
- And16
- Or16
- Mux16
- Or8Way
- Mux4Way16
- Mux8Way16
- DMux4Way
- DMux8Way
So how to do it? You can use the HDL (hardware description language) and hardware simulator developed by the course team.
For example, if you want to use Nand to create Not, you can write it like this:
CHIP Not { // 我要寫一個叫做 Not 的 chip
    IN in; // 輸入的訊號叫做 in
    OUT out; // 輸出叫做 out

    PARTS:
    Nand (a=in, b=in, out=out); // 把 in 跟 in 傳進 Nand chip,輸出到 out
}
If my input is 0, then in is 0, and the result of 0 Nand 0 is 1, so out will be 1, which is the result of not after 0. If the input is 1, 1 Nand 1 is 0, and out will be 0.
Therefore, we can complete the function of Not using only the Nand logic gate.
This unit is to familiarize you with the writing of HDL and try to combine circuits. In the testing part, the course team also thoughtfully provided a self-made hardware simulator, which allows you to load circuits and conveniently test whether they are correct:

(Image from the official website)
Unit 2: Boolean Arithmetic and the ALU
This week, we will introduce number operations in computers. We will talk about how computers represent numbers, which is commonly known as binary, and we will also discuss the representation of negative numbers (two’s complement). The assignment is to create the following circuits:
- HalfAdder
- FullAdder
- Add16
- Inc16
- ALU
The full name of ALU is Arithmetic Logic Unit. Those who have taken related courses should be familiar with this. In short, it is a circuit used for arithmetic operations. You input two numbers and the operation you want to perform, and it will output the result.
Unit 3: Memory
The difficulty of the first two weeks was manageable, but I think the difficulty suddenly increased this week due to the introduction of a new concept: Sequential logic.
The circuits designed in the previous units are called Combinational logic. Simply put, it can be represented by the formula: out[t] = function(in[t]). You input a value at a certain time t, and it will return the corresponding result. Everything is very simple and clear.
However, Sequential logic is different. Its output is not only related to the current input, but also to the “previous input”. In other words, Sequential logic has the ability to remember things.
To use programming as an analogy, Combinational logic is like a pure function. If you give the same input, you will always get the same output. Sequential logic is like a function with side effects.
The assignment for this week is to create the following circuits:
- 1 bit register
- 16-bit register
- RAM8 (16-bit / 8-register memory)
- RAM64
- RAM512
- RAM4K
- RAM16K
- PC (Program Counter)
Unit 4: Machine Language
Actually, the previous unit was only one step away from what the computer does. But this week, we will temporarily depart from hardware and circuits and assume that the computer has been built. So, how do we make the computer execute programs?
The answer is machine language, which is the only language that the CPU can understand, consisting of 0101010. However, it is too cruel to ask you to write machine language directly, so the official provides an Assembler, which allows you to write assembly language.
Therefore, this week is about writing assembly language to familiarize yourself with the instruction format of the HACK computer. There are two assignments: one is to input two numbers and return the product, and the other is an interactive program where the screen turns black when you press a key and turns white when you release it.
This week, I found it interesting to explain the principles of input and output. For example, how does the computer know what keys were pressed on the keyboard after typing? It can be simplified as follows: whenever the keyboard is pressed, a signal is sent to the computer, and the code for the key pressed is placed in a specific memory location. By checking that memory location, we can determine if a key was pressed.
Output works in a similar way. There is a specific memory block where each bit represents a pixel, with 1 representing black and 0 representing white. The screen reads this memory block at a fast frequency (e.g. 50 times per second) and displays the appropriate pixels.
In this way, input and output can be achieved through specific memory locations.
Unit 5: Computer Architecture
This week, we continued building the computer we started in week 3, focusing on building the memory and CPU and learning how the computer executes instructions. This unit is important, as it integrates what we learned in week 3 and culminates in building a complete computer.
Unit 6: Assembler
In week 4, we used the official assembler to convert assembly language into machine code. In the last week of part 1, we wrote our own assembler to convert assembly language into machine code.
If you don’t know how to program, the course also provides another way to complete the assignments: manual translation. You can look up each line of code and translate it into machine code.
After completing these seven units, we built many circuits, including a CPU, memory, and a complete computer. We also learned how to execute instructions on the computer and how to write an assembler.
Course Review
Like CS50, this course claims that anyone can take it without prior knowledge. However, as I mentioned before, I don’t think CS50 is suitable for everyone without a foundation. For some people, the gradient is still too high, and the difficulty increases too quickly, leaving room for improvement.
What about this course? I think beginners can try it because you really don’t need any programming foundation. However, I think the assignments will still be quite challenging. Although you don’t need a programming foundation, some assignments still require logical and thinking skills, and it’s easy to forget where you were if you lose focus.
During the course, there were several points that surprised me. Warning: spoilers ahead that may ruin the fun of taking the course.
The first is that HACK’s machine language has two types: A-instruction and C-instruction, distinguished by the highest bit, which is 0 or 1, respectively. A-instruction is used to load a 15-bit value.
In week 4, when I was writing assembly language, I didn’t understand why I couldn’t specify which operation to perform. In a programming language, I would imagine something like this:
if (op === 1) {
  return x
} else if (op === 2) {
  return y
} else if (op === 3) {
  return x+y
} else if (op === 4) {
  return x&y
}
But circuits don’t have if statements. So how do you do it?
The answer surprised me. You use six control bits to operate on the input, and the combination of these six bits produces the desired result. See the figure below for details:
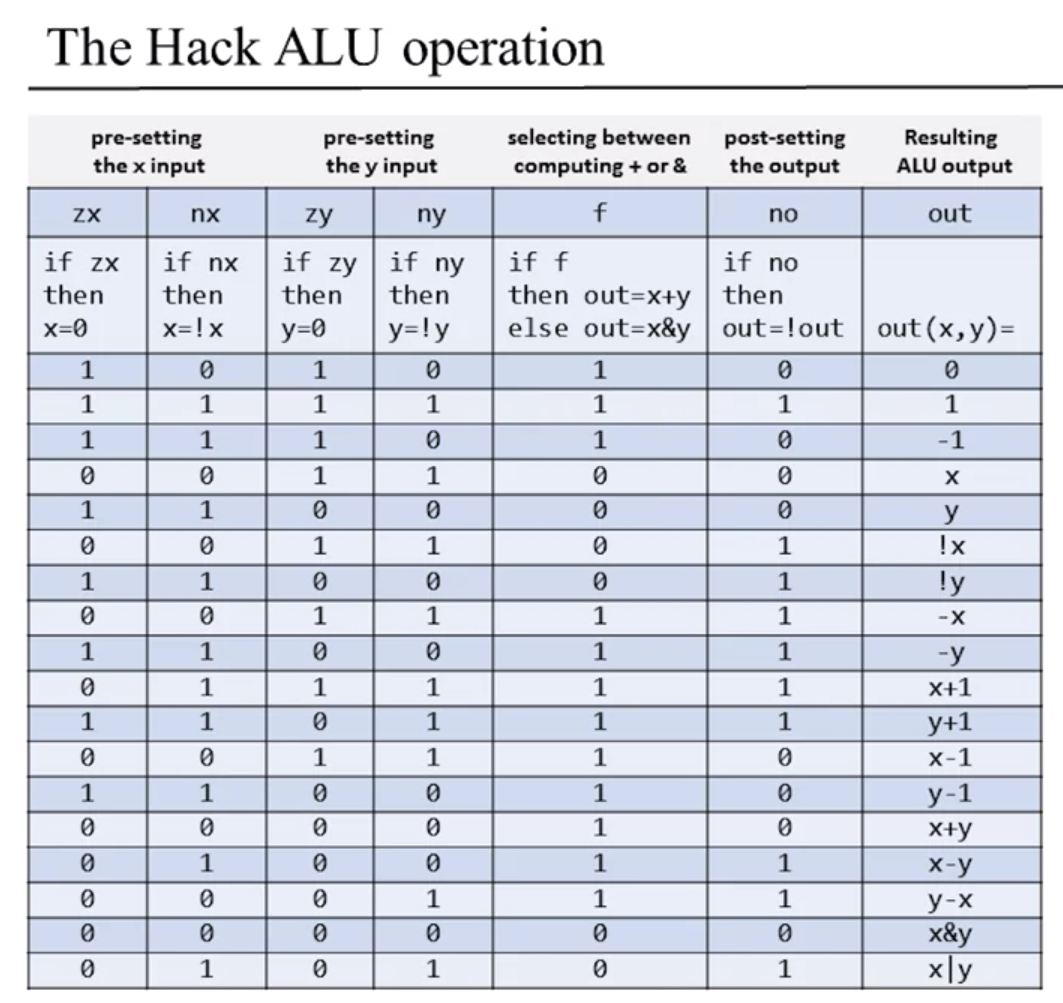
The other two outputs of the ALU, ng (whether the output is negative) and zr (whether the output is zero), may seem useless, but they are actually used for jump, which we will encounter later in the course.
Overall, I think this course is well-organized, starting with the most basic circuits and gradually becoming more complex. It also teaches you machine language and assembly language, making you familiar with the underlying concepts of computers.
As a teacher, there are several things in this course that are worth emulating.
The first is customized tools, such as the HDL and hardware simulator developed specifically for this course, which make it easy for beginners to learn.
The second is the way assignments are graded. Each assignment folder contains corresponding test files, so students can check if their code is correct.
The third is the alternative assignments. In the final week’s assignment, an alternative was provided for students who don’t know how to program: manually translating the code into machine code.
The fourth is the course arrangement. Although circuits are discussed, the course doesn’t go too deep into electronics and electrical engineering. The course progresses continuously from Nand to CPU.
The fifth is the order of the course. The first few weeks are bottom-up, building concepts from the ground up. In week 4, we suddenly switch to top-down, writing assembly language before building the computer. This arrangement makes students more aware of machine code when building the computer.
The sixth is the way common questions are handled. At the end of each unit, there is a Perspectives video where two professors answer common questions, saving a lot of time.
Conclusion
Whether or not you have a programming background, I think you can give this course a try. I sincerely recommend it to everyone.
I took the version on Coursera, which is completely free. However, if you want to submit assignments and get a certificate, you need to pay $50. I didn’t hesitate to pay to support this course, but whether or not to purchase is up to you.
Also, this is only part 1. Next year, I plan to continue with part 2 and share my experience with everyone after completing it. Previously, Professor Chung-Cheng Chen from the Department of Computer Science at Kinmen University also wrote about his experience in the article “Nand2Tetris MOOC Notes - From Logic Gates to Block Games“. Interested friends can also refer to it.
Finally, don’t hesitate anymore, go and take the course.
Comments