Preface
Recently, I was busy with the product redesign of my company, switching from the original PHP to backend Go + frontend React SPA. It was divided into two different projects, desktop version and mobile version. Since we were redesigning, we naturally wanted to include the latest and coolest PWA in our goals. Although I had heard of PWA for a long time, I had never implemented it before, so I had the opportunity to try it out.
Now that the product has been redesigned and has been online for two or three months, it has gradually stabilized. In the process of optimizing PWA, I have gained some experience that I can share with everyone.
Before giving some practical examples, let’s talk about what PWA is.
What is PWA?
From Google’s official document: Your First Progressive Web App, we can see some detailed definitions of PWA. However, I don’t like this kind of standardized rules. For me, PWA is a Web App that is very similar to Native App, and browser support also accounts for a large part of it.
In the past, no matter how much your website looked like a Native App, you still had two difficulties that couldn’t be overcome: when offline, it was GG, and it couldn’t be installed on a mobile phone. So no matter how you look at it, people know that you are a Web App and will never look like Native.
However, since the browser began to support Service Worker and manifest, these two points have been overcome! Thanks to Service Worker, the webpage can also operate when offline, and you can write code to decide what to render. The browser’s “Add to Home Screen” function makes it possible to install Web Apps, and developers can also use manifest.json to customize some content, such as the startup screen and the name displayed on the home screen.
For me, if you can use the above two technologies to successfully install your Web App on a mobile phone and make it look no different from Native App, I think it can be called PWA.
I have shared what PWA looks like on a mobile phone in my previous article (CORS is not as simple as I thought), so I won’t go into details here. I remember being scared the first time I experienced installing PWA because it looks no different from Native App. If it is really well done, it should be difficult to distinguish. It is obviously a webpage but looks like Native App, which is PWA.
Next, let’s introduce several important factors of PWA. You must have the following things to do PWA.
manifest.json
First, let’s talk about manifest.json. Anyone who has written Android knows that there is something called AndroidManifest.xml. In fact, the two are essentially the same thing, describing some characteristics of this App.
Let’s take a look at the example given in Google’s official document: The Web App Manifest:
{
  "short_name": "Maps",
  "name": "Google Maps",
  "icons": [
    {
      "src": "/images/icons-192.png",
      "type": "image/png",
      "sizes": "192x192"
    },
    {
      "src": "/images/icons-512.png",
      "type": "image/png",
      "sizes": "512x512"
    }
  ],
  "start_url": "/maps/?source=pwa",
  "background_color": "#3367D6",
  "display": "standalone",
  "scope": "/maps/",
  "theme_color": "#3367D6"
}
The information given inside is very simple and is closely related to what appears when you add PWA to the home screen. name is the name of your App, which will be displayed on the home screen. However, if you also provide short_name, it will be used first.
Next, icons are the logos that appear on the home screen, which is self-explanatory. start_url is the place where you will connect when you open it from the home screen. Many people will add ?source=pwa or something similar, so you can know that this user is using PWA, which is convenient for statistics.
There is a small point to note here, that is, in a certain version of iOS Safari (sorry, I forgot which version it was, but the latest one no longer has this problem), it will not follow start_url! It will be based on the URL you used to install PWA. For example, when you are in https://example.com/test/123 and click “Add to Home Screen”, when you open PWA on the home screen, you will connect to this screen.
This part is actually quite troublesome, but fortunately, the latest iOS Safari no longer has this problem, so you don’t have to worry about it.
Another thing to mention is that name, background_color, and icon will automatically form Splash screens, which is the screen you will see when you open PWA. It is automatically composed by Chrome based on these three pieces of information, which means you cannot customize this startup screen.
It will display the background color you specified, then place an icon in the middle and your app name below it. There is nothing else you can adjust, at least for now.
In this regard, iOS is different. iOS does not support this type of startup screen, but the advantage is that you can set it yourself through html tags!
<link
    rel='apple-touch-startup-image'
    href='/assets/splash/splash-1125x2436.png'
    media='(device-width: 375px) and (device-height: 812px) and (-webkit-device-pixel-ratio: 3) and (orientation: portrait)'
/>
There are some size-related settings that you need to prepare a picture for each different device. For details, please refer to: Progressive Web App Splash Screens or Few Tips That Will Make Your PWA on iOS Feel Like Native.
The difference between iOS and Android is that you can put a picture on the iOS startup screen, so it can be fully customized. You can put whatever you want, and it has a higher degree of freedom than Android.
Also, for the icon part, iOS does not look at your mainfest.json settings, but looks at its own html tag, so you must set an additional icon for iOS to use:
<link
    rel='apple-touch-icon'
    sizes='192x192'
    href='/assets/favicons/iOS192x192.png'
/>
For manifest.json, these are the points to note. In fact, the biggest problem is support, so Google has a PWACompat that can automatically adjust your files and html tags for old browsers. However, someone wrote an article: You shouldn’t use Chrome’s PWACompat library in your Progressive Web Apps to tell everyone not to use it. The argument is that you cannot generalize like this. You must understand the differences between each platform and browser and then adapt to get the best user experience. This unified adjustment method may look okay in many places, but it is strange in many places.
Since iOS has been mentioned above, let’s talk about some of the differences in iOS. In fact, iOS began to support PWA this year (2018), and the support was quite poor when it was first launched, but it is slowly improving.
These two articles explain the differences in iOS very clearly: PWAs are coming to iOS 11.3: Cupertino, we have a problem and Progressive Web Apps on iOS are here 🚀.
One of the biggest differences is that many times it does not look at manifest.json, and you need to set some corresponding html tags yourself to make it work. This point needs to be paid special attention to.
Then there is the <meta name=”apple-mobile-web-app-capable” content=”yes”> tag, which is also very important. It mainly tells the browser: “I am ready to provide a full-screen experience, even if the browser UI is hidden.” This article: Don’t use iOS meta tags irresponsibly in your Progressive Web Apps tells you not to abuse this tag, otherwise your Web App experience on Safari will become very poor because many things are not supported.
As for Safari’s biggest problem, I will directly quote one of the paragraphs from PWAs are coming to iOS 11.3: Cupertino, we have a problem:
Also, it’s a massive problem for apps with two-factor authentication, such as Twitter. If you need to go to another app to get a token or to open a text message or an email, you will get out of the PWA. When you go back to paste the code, you are out of context and, you need to start the login process again losing the validity of that code. It happened to me on Twitter! Which means, the Twitter PWA on iOS is completely unusable for me.
This is a huge problem, especially for apps that require two-factor authentication, such as Twitter. If you need to switch to another app to get a token or open a text message or email, you will be taken out of the PWA. When you return to paste the code, you will be out of context and will need to start the login process again, losing the validity of the code. This happened to me on Twitter! This means that the Twitter PWA on iOS is completely unusable for me.
Regarding the issue with iOS and the manifest.json, it is similar to what was mentioned earlier. Now, let’s talk about the second key point of PWAs: Service Worker.
Service Worker
The purpose of adding a Service Worker is solely for caching. Through the Service Worker (SW), we can intercept and process requests before they are sent. The principle of offline operation is also based on this. We register the SW on the first opening and use it to download and cache static files. If the user goes offline, we can use the cached files to respond, so no real requests are sent, and there is no connection failure.
Google provides a convenient tool called Workbox to help us automatically generate SW and use more convenient syntax to intercept requests.
For example, I use the Webpack plugin:
new workboxPlugin.InjectManifest({
    swSrc: path.join(__dirname, '..', SRC_DIR, 'sw.js'),
    swDest: path.join(__dirname, '..', DIST_DIR, 'sw.js'),
    globDirectory: path.join(__dirname, '..', DIST_DIR),
    globPatterns: ['**/*.{js,css}']
}),

//sw.js
let precacheList = self.__precacheManifest || []
workbox.precaching.precacheAndRoute(precacheList)
By writing this, it will automatically find files that meet the rules and add them to the cache list. When you register the SW, those files will be cached.
In addition, Workbox can also listen to URLs:
// sw.js
workbox.routing.registerRoute(/(https?:\/\/)(.*)\/api\/(.*)/, args =>
    workbox.strategies
        .networkFirst({
            cacheName: 'data-cache',
            plugins: [
                new workbox.expiration.Plugin({
                    maxEntries: 100,
                    maxAgeSeconds: 2592000
                })
            ]
        })
        .handle(args)
        .then(response => {
            return response
        })
        .catch(err => {
            console.log('err:', err)
        })
)
The above code caches requests containing api in the path, so API responses that were previously cached can be used when offline.
Workbox provides several strategies for dynamic caching, including staleWhileRevalidate, cacheFirst, networkFirst, networkOnly, and cacheOnly. You can roughly understand the strategy from the name. For more details, please refer to the official document: Workbox Strategies.
Since the introduction of Workbox, we basically don’t need to write SW manually anymore. We can rely on its provided API and functions to automatically generate SW that meets our needs.
Finally, let’s talk about the “Install PWA” feature. On iOS Safari, there is no other way but to bring up the menu and select “Add to home screen.” However, on Android Chrome, if you meet certain conditions (have set mainfest.json and registered Service Worker), a cute Install banner will automatically pop up for you.
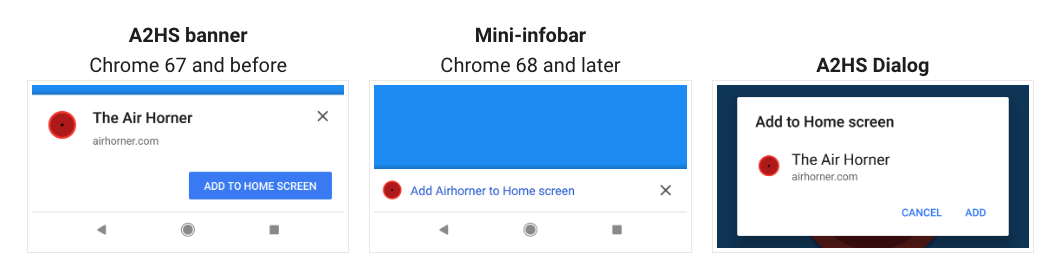
(Image from: Changes to Add to Home Screen Behavior)
Depending on the version of Chrome, the behavior is different.
In Chrome 67 and earlier versions, if you don’t use preventDefault() or explicitly call prompt() in the beforeinstallprompt event, a large A2HS banner will appear on the left.
Then, in Chrome 68 and later versions, no matter what you do, the system will automatically display the Mini-infobar. However, if the user closes it, it will take three months to appear again, which is quite long.
Next, both A2HS banners and Mini-infobar will display the A2HS Dialog on the right after the user clicks on them, prompting the user to install the PWA.
However, in Chrome 68 and later versions, you can also use the event.prompt() obtained in beforeinstallprompt to display this dialog through code.
It sounds a bit complicated, right?
Let’s first introduce the beforeinstallprompt event. This event will be triggered when everything is ready and it is confirmed that you meet the conditions to display the prompt. It will pass an event, and you can prevent the prompt from being displayed and save this event:
// 此範例來自上面的官方文件
let installPromptEvent;

window.addEventListener('beforeinstallprompt', (event) => {
  // Prevent Chrome <= 67 from automatically showing the prompt
  event.preventDefault();
  // Stash the event so it can be triggered later.
  installPromptEvent = event;
  // Update the install UI to notify the user app can be installed
  document.querySelector('#install-button').disabled = false;
});
Why save it? Because the user may not want to see this popup as soon as they open the website, or they may be checking out and you are interfering with them. So save it and call installPromptEvent.prompt() to display the Dialog at an appropriate time.
But one thing to note is that calling installPromptEvent.prompt() directly is useless. You must do it within a user gesture, which means you have to put it in the click event of a button (or other event triggered by the user) to be effective. Directly calling it is useless and will cause an error message to appear in the console.
I was curious about how it was judged before, but later I found out that there is event.isTrusted that can be used to determine whether an event is triggered actively by the user. Reference: MDN - Event.isTrusted.
Anyway, because Chrome has different behaviors on different versions, we finally decided to use the following code to have different responses for different versions:
// 把 event 存起來
var installPromptEvent

// 要顯示 prompt 的延遲
var showTime = 30 * 1000

window.addEventListener('beforeinstallprompt', function (e) {
  e.preventDefault()
  installPromptEvent = e
  var data = navigator.userAgent.match(/Chrom(e|ium)\\/([0-9]+)\\./)
  var version = (data && data.length >= 2) ? parseInt(data[2], 10) : null
  if (version && installPromptEvent.prompt) {

    // 延遲一段時間才顯示 prompt
    setTimeout(function() {
        // 如果 Chrome 版本是 67(含)以下,可以直接呼叫
        if (version <= 67) {
            installPromptEvent.prompt()
            return
        }

        // 否則的話必須透過 user action 主動觸發
        // 這邊幫 #root 加上 event listener,代表點擊螢幕任何一處都會顯示 prompt
        document.querySelector('#root').addEventListener('click', addToHomeScreen)
    }, showTime)
  }
});

function addToHomeScreen(e) {
    if (installPromptEvent) {
        installPromptEvent.prompt()
        installPromptEvent = null
        document.querySelector('#root').removeEventListener('click', addToHomeScreen)
    }
}
If it is below 67, you can directly call it to display the prompt. Otherwise, you need to add an event listener, and we also choose to delay it for 30 seconds before displaying it.
Surprisingly, this small change brought amazing growth. Originally, only about 20-30 people installed the PWA per day. After this adjustment, it suddenly increased eight to ten times. I was also surprised when I saw the statistical chart in GA. I didn’t expect the effect to be so good.
Instead of actively asking others to install the PWA, it is better to only require people who are really interested in your product (staying for more than 30 seconds).
Manifest Observation
Finally, let’s take a look at how some well-known PWAs write their manifest.json.
The first is the well-known flipkart:
{
    "name": "Flipkart Lite",
    "short_name": "Flipkart Lite",
    "icons": [
        {
            "src": "https://img1a.flixcart.com/www/linchpin/batman-returns/logo_lite-cbb3574d.png",
            "sizes": "192x192",
            "type": "image/png"
        }
    ],
    "gcm_sender_id": "656085505957",
    "gcm_user_visible_only": true,
    "start_url": "/?start_url=homescreenicon",
    "permissions": [
        "gcm"
    ],
    "orientation": "portrait",
    "display": "standalone",
    "theme_color": "#2874f0",
    "background_color": "#2874f0"
}
Next is the famous twitter:
{
  "background_color": "#ffffff",
  "description": "It's what's happening. From breaking news and entertainment, sports and politics, to big events and everyday interests.",
  "display": "standalone",
  "gcm_sender_id": "49625052041",
  "gcm_user_visible_only": true,
  "icons": [
    {
      "src": "https://abs.twimg.com/responsive-web/web/ltr/icon-default.604e2486a34a2f6e.png",
      "sizes": "192x192",
      "type": "image/png"
    },
    {
      "src": "https://abs.twimg.com/responsive-web/web/ltr/icon-default.604e2486a34a2f6e.png",
      "sizes": "512x512",
      "type": "image/png"
    }
  ],
  "name": "Twitter",
  "share_target": {
    "action": "compose/tweet",
    "params": {
      "title": "title",
      "text": "text",
      "url": "url"
    }
  },
  "short_name": "Twitter",
  "start_url": "/",
  "theme_color": "#ffffff",
  "scope": "/"
}
Finally, Google I/O 2018:
{
  "name": "Google I/O 2018",
  "short_name": "I/O 2018",
  "start_url": "./?utm_source=web_app_manifest",
  "display": "standalone",
  "theme_color": "#6284F3",
  "background_color": "#6284F3",
  "icons": [{
    "src": "static/images/homescreen/homescreen57.png",
    "sizes": "57x57",
    "type": "image/png"
  }, {
    "src": "static/images/homescreen/homescreen114.png",
    "sizes": "114x114",
    "type": "image/png"
  }, {
    "src": "static/images/homescreen/homescreen128.png",
    "sizes": "128x128",
    "type": "image/png"
  }, {
    "src": "static/images/homescreen/homescreen144.png",
    "sizes": "144x144",
    "type": "image/png"
  }, {
    "src": "static/images/homescreen/homescreen192.png",
    "sizes": "192x192",
    "type": "image/png"
  }, {
    "src": "static/images/homescreen/homescreen512.png",
    "sizes": "512x512",
    "type": "image/png"
  }],
  "prefer_related_applications": false,
  "related_applications": [{
    "platform": "play",
    "id": "com.google.samples.apps.iosched"
  }],
  "gcm_sender_id": "103953800507"
}
I like to observe these things from other people’s homes, because you will find a lot of information that you missed or couldn’t find when you searched, and you will also have a concept of which attributes are particularly commonly used. In addition to manifest.json, you can also refer to the tags in html to learn a lot.
Conclusion
Recently, after struggling with PWA and being squeezed by PM, I collected a lot of information related to PWA and referred to many useful articles. I sincerely thank those predecessors for sharing, which can avoid later generations from stepping on a lot of pits.
Although the experience on iOS is a bit poor, overall, I still have high hopes for the development of PWA. The first is that Google strongly promotes it, and the second is that the support of browsers is getting higher and higher. As I said above, iOS Safari has slowly fixed the bugs, and future functions will be more complete.
Moreover, the user experience of PWA is very good, with acceptable speed and the flexibility of the Web. The key is that there is no need to download it from Google Play, which eliminates a threshold for conversion (although there is still a threshold for installing PWA, but I think it is easier), and Chrome also provides many mechanisms for PWA. I hope users can install PWA on their mobile phones.
In short, this article mainly shares some of my experiences while working on PWA. If you have any insights, please feel free to leave a comment below and share with me. Thank you.
Further reading and references:
- Changes to Add to Home Screen Behavior
- Progressive Web App Splash Screens
- Few Tips That Will Make Your PWA on iOS Feel Like Native
- PWAs are coming to iOS 11.3: Cupertino, we have a problem
- Will Progressive Web App be the future trend?
- PWA case studies
- A Pinterest Progressive Web App Performance Case Study
Comments