Introduction
During the past year, I have conducted several teaching experiments in my spare time, hoping to improve my teaching materials through continuous teaching and gain some insights from student feedback.
When conducting these teaching experiments, I often think about which existing services can reduce my workload. After all, as an engineer, I want to automate some trivial tasks, and the time saved in the long run is considerable.
Half a year ago, I made my first attempt and shared my experience here: Using Github Classroom and Travis CI to Build a Homework Grading System. After having an automated homework grading system, it did save me a lot of trouble.
This time, I want to share an automated sign-in system that I implemented in about one or two days two weeks ago.
Why do we need a sign-in system?
In order to grasp the progress of students and ensure that students are really interested in continuing to attend classes, I introduced the Daily Stand-up meeting that I do every day in the company during the last teaching experiment. Everyone quickly shares what they did yesterday, what they will do today, and if there is anything that prevents them from completing these tasks.
At that time, I used a fixed format for everyone to post these things in the Slack channel:

The advantage is that it is concentrated in one place and is very convenient to view, but the disadvantage is that I can only see it with my own eyes and cannot record it. That is to say, if I want to make a form of which students did not post, I can only fill it out one by one.
Last time, because there were few students and posting was not mandatory, it was not a problem, but in this teaching experiment, I introduced the elimination system. If a student fails to submit a progress report too many times within a certain period, he or she will be eliminated from the course.
Since I have this mechanism, I must record these progress reports, and record which people and which days have no reports. In this way, I must have a more complete sign-in system. The goals I want to achieve are:
- I want to see everyone’s progress report in the slack channel
- I want a place to record whether each student has posted a progress report every day (called sign-in)
How to make this sign-in system?
My first idea is to use Google Sheets, after all, this thing is the most convenient. Fill in each student’s account on the horizontal axis and the date on the vertical axis. If there is a report, give a mark, otherwise leave it blank. In this way, I can clearly see the sign-in record. The finished product looks like this:

In this way, the second requirement is completed, and the remaining is to think about how to complete the first requirement. The easiest way is to let students post by themselves in a certain channel, and then I write a program to connect to Slack’s webhook, and write the data into the Google Sheet when receiving the data.
This solution seems good, but there is a problem that the workspace used in the course is the free version, and the message will be eaten up after a certain amount, and the previous progress reports cannot be seen. I think this is a bit regrettable, so this solution is not feasible.
Then I thought of another better solution:
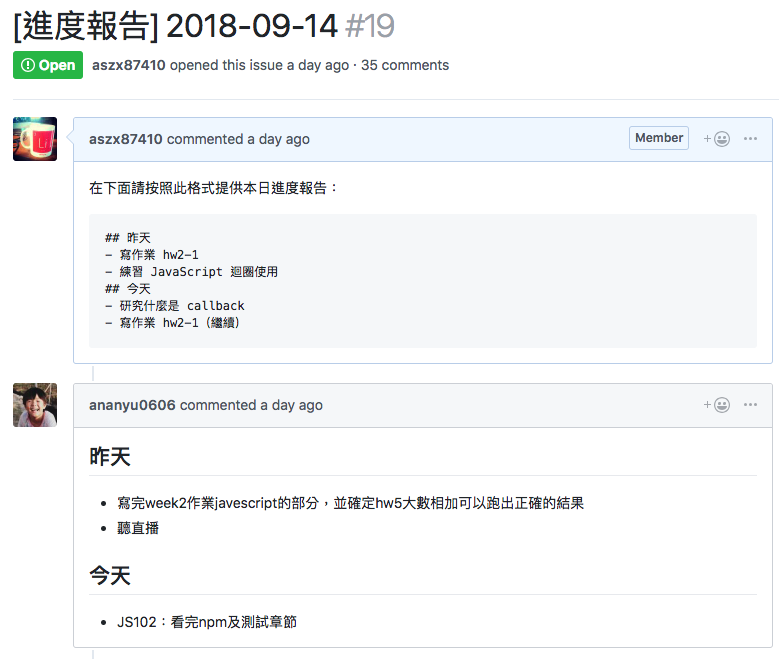
- Let students leave a message under the GitHub Issue
- Synchronize the message to the Slack channel
- Connect to the GitHub Webhook and synchronize the record to the Google Sheet
The advantage of this is that the record can be permanently saved, and it can be divided by day! It is easy to find all the progress reports of everyone on a certain day, which cannot be done by directly posting in Slack.
Let me show you the finished product first. The finished product looks like this:

After having a concept of the entire sign-in system, we can divide the technical tasks into the following three items:
- Open a GitHub issue every day with today’s date as the title.
- Synchronize every comment under each issue to Slack.
- Integrate GitHub Webhook to synchronize records to a spreadsheet.
Now it’s time to implement!
1. Open a GitHub issue every day with today’s date as the title.
When I saw the keyword “every day,” I knew this was something that could be done with a Cron Job. Originally, I wanted to write a simple program on my own machine to run it every day, but then a keyword popped up in my mind: AWS Lambda.
If you don’t know what it is, let me explain briefly. It is one of the popular concepts of Serverless in recent years. It doesn’t mean there is no server, but it means you don’t have to manage the server yourself. All you have to do is write your application, and you don’t have to worry about anything related to the server or the machine.
AWS Lambda is such a service. All you have to do is put your code up there, and you don’t have to worry about anything else. The billing is based on the execution time of the program. Maybe because it is still in the promotion period, it is free for a certain amount of time per month.
If I don’t use Lambda, I have to send the files to my server and set up a Cron Job to run them. If something goes wrong with the host, I have to fix it myself. But what I want to do is just such a simple thing! Using Lambda can save me a lot of trouble and is definitely the best choice.
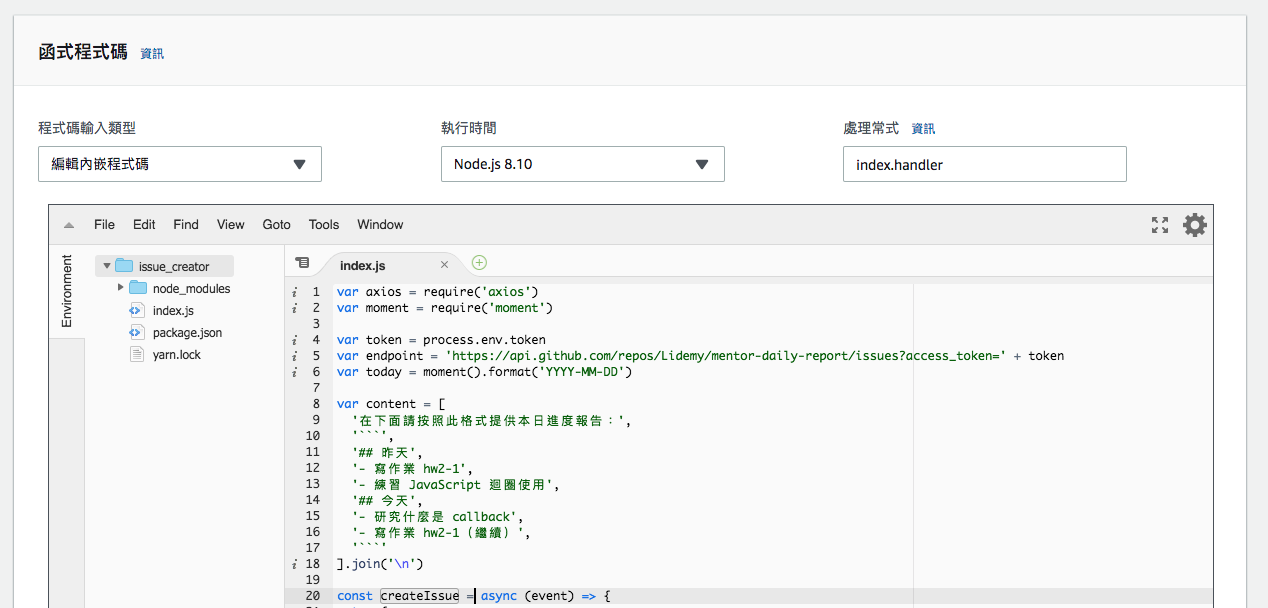
After deciding to use Lambda, the next step is to write the code according to its requirements. Actually, the requirements are very simple. Just export the function you want to execute with exports.handler.
Here is the code:
var axios = require('axios')
var moment = require('moment')

var token = process.env.token
var endpoint = 'https://api.github.com/repos/Lidemy/mentor-daily-report/issues?access_token=' + token
var today = moment().format('YYYY-MM-DD')

var content = [
  '在下面請按照此格式提供本日進度報告:',
  '```',
  '## 昨天',
  '- 寫作業 hw2-1',
  '- 練習 JavaScript 迴圈使用',
  '## 今天',
  '- 研究什麼是 callback',
  '- 寫作業 hw2-1(繼續)',
  '```'
].join('\n')

const createIssue = async (event) => {
  try {
    const result = await axios.post(endpoint, {
      title: '[進度報告] ' + today,
      body: content
    }, {
      headers: {
        'Accept': 'application/vnd.github.v3+json'
      }
    })
    return 'success'
  } catch (err) {
    return err;
  }
}

exports.handler = createIssue
It is a very simple program that will use the GitHub API to create a new issue with today’s date as the title.
One thing to note is that other npm libraries are used here. There should be a way to only send the package.json, and Lambda will help you execute npm install to get those packages. But I’m too lazy to check, so I just packed node_modules into the compressed file and uploaded it.
The last time I used Lambda was about two or three years ago when this service was just launched. I played with it out of curiosity and found that the interface was very simple and I didn’t know how to set many things.
After many years, when I saw its interface again this time, I was really shocked. It has made great progress!
First of all, the trigger condition is clear at a glance:

Because I want to run it every day at a fixed time, you can use CloudWatch to set a schedule on AWS. Note that the time of this schedule on Lambda will be based on UTC, which is the +0 time zone. So if you say it runs at 00:00 every day, it actually means it runs at 08:00 in the morning in Taiwan.
The expression I set here is: 5 0 ? * MON-FRI *, and Lambda will be triggered at 08:05 on weekdays in Taiwan time to execute the function of creating an issue.
Then, if your code is not very large, you can edit it directly on the Lambda interface, which has a fully functional editor (I always feel very familiar with it, and later I realized that it should be because Amazon bought Cloud9. I used Cloud9’s IDE when I took CS50 before, no wonder it’s so familiar):
Finally, after setting the environment variable token, it is completed. After testing, I found that the issue was successfully created. The first task was completed easily. Thanks to Lambda’s efforts.
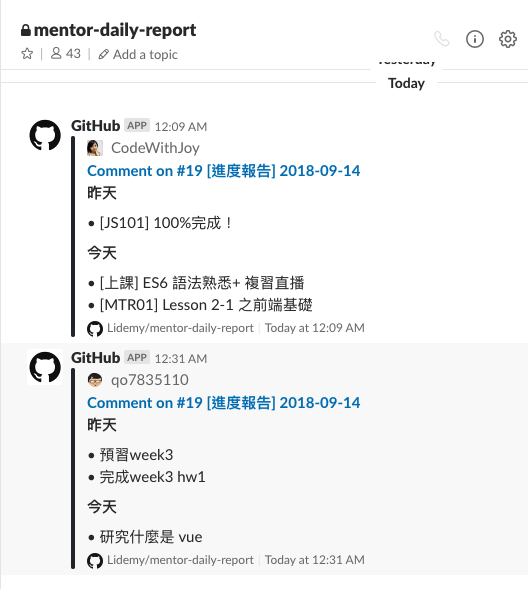
2. Synchronize every comment under each issue to Slack.
This is the simplest of the three tasks because Slack’s original advantage is that it can be integrated with many ready-made things. You can install the GitHub App on Slack and use commands to subscribe to a specific repo and event.
Because this is too simple, I don’t need to introduce it anymore. I’ll show you the result directly:
3. Integrate GitHub Webhook to synchronize records to a spreadsheet.
We can easily implement this task by using Lambda with other AWS services. The process is as follows:
- The student leaves a message, triggering the GitHub Webhook.
- The GitHub Webhook hits AWS API Gateway.
- Trigger the Lambda function through API Gateway.
- The Lambda function writes to the spreadsheet via the Google Sheet API.
Let’s first prepare the API to be sent to the webhook. Here, we use API Gateway to trigger Lambda, like this:

API Gateway configuration is also super convenient. You just need to set what HTTP method to use, and it will give you a URL. For example, if I set it to GET, you can trigger Lambda by using GET to call this API. It can create a webhook in a very short time, which is much more convenient than building your own server and setting up domain and https.
Next is to integrate with the Google Sheet API. After looking at the official API, I found that it still maintains the usual style, which is that the document is very complete but the explanation is very complicated. I couldn’t figure out how to implement the functionality I needed at a glance, so I found a package that someone else had wrapped: Simple Google Spreadsheet Access (node.js), which is much easier to use.
The most troublesome permission management also teaches you how to implement it. Basically, you need to create a Service Account, set it to have permission to the Google Drive API, and then generate a token for this account. You can use that token.
What the main program needs to do is basically to filter the data, then find the account from the data sent over from GitHub, and pass the account and date to another function I wrote separately. Finally, return the result to end:
var updateSheet = require('./lib')

exports.handler = async (event, context, callback) => {
    if (!event.body) return 'no body'
    const body = JSON.parse(event.body) || {}
    if (!body || body.action !== 'created') return response(callback)
    const title = body.issue.title.split(' ')
    if (!title.length) return response(callback)
    const date = title[1]
    const account = body.comment.user.login
    console.log('log:', date, account)
    try {
        await updateSheet(date, account)
        return callback(null, {
            statusCode: 200,
            body: date + account
        })
    } catch (err) {
        console.log('error:', err)
    }

    return response(callback)
};

const response = (cb) => {
    cb(null, {
        statusCode: 200,
        body: 'ok'
    })
}
The updateSheet function does a simple job, which is to find the correct position based on the date and account, and change the value of that cell to O. Here is some sample code for your reference:
async function searchAccount(sheet, account) {
  const firstRow = await getCells(sheet, {
    'min-row': 1,
    'max-row': 1
  })
  const length = firstRow.length
  for(var i=0; i<length; i++) {
    if (firstRow[i].value === account) {
      return {
        col: firstRow[i].col,
        batchId: firstRow[i].batchId
      }
    }
  }
  return null
}

async function setValue(sheet, row, col, value) {
  const cells = await getCells(sheet, {
    'min-row': row,
    'max-row': row,
    'min-col': col,
    'max-col': col,
    'return-empty': true
  })
  if (cells && cells[0]) {
    cells[0].value = value
    cells[0].save(function(err) {
      if (err) {
        console.log('err', err)
      }
    })
  }
}

async function updateSheet(date, account) {
  try {
    const sheet = await getSheet()
    const accountPosition = await searchAccount(sheet, account)
    const datePosition = await searchDate(sheet, date)
    console.log('position:', accountPosition, datePosition)
    if (!accountPosition || !datePosition) return
    await setValue(sheet, datePosition.row, accountPosition.col, 'O')
  } catch (err) {
    console.log('err', err)
  }
}
Finally, just set the webhook URL on GitHub, and everything is done!
How to debug on Lambda?
Although I wrote it lightly above, I actually encountered a few small problems during development. The first is that debugging is not as straightforward as on a computer, and webhooks are usually harder to debug.
Regarding this part, Lambda will actually send the log to CloudWatch, so you need to write logs in the app yourself, and then analyze those logs in CloudWatch. If it is a simple application, it should be quite easy. If it is more complex, the function should be divided into smaller ones, otherwise debugging will be quite troublesome.
Another problem I encountered is that the Google Sheet API is slower, and the entire process takes about 5 seconds. The default timeout is about 3 seconds, so remember to increase the timeout yourself, otherwise it will keep failing.
Summary
This time, the experience of using AWS Lambda was pretty good. I didn’t encounter any major difficulties during the development process, which may be related to the fact that what I wanted to implement was relatively simple. But I think this kind of simple thing is super suitable for this kind of serverless solution, because it is really convenient without a server, and it saves a lot of trouble.
In the future, if there are similar simple requirements, I think I will still use this solution, just connect one ready-made service to another, and everything will be done. I also recommend that if you want to do some small things, you might as well try to use these ready-made services to get things done, which can save a lot of time.
Comments