Introduction
(Supplement: Thanks to the guidance of senior othree, it is pointed out that this is actually talking about the order of event propagation in the DOM, so the title and content are revised. The original title is: JavaScript Event Propagation: Capturing and Bubbling)
Today, we bring you the event propagation mechanism in the DOM, and the code related to these events, I believe everyone should be familiar with, that is addEventListener, preventDefault and stopPropagation.
Simply put, it is the order in which events are propagated in the DOM, and what you can do with these events.
Why is there the term “propagation order”? Suppose you have a ul element with many li elements underneath, representing different items. When you click on any li, you actually click on ul because ul wraps all li.
If I add eventListener to two elements, which one will be executed first? At this time, it is important to know the execution order of events.
In addition, because the mechanism of some browsers (yes, I am talking about IE) is different, I will not mention those things at all. Those who are interested can study the reference materials attached at the end of the article.
Simple Example
To facilitate later explanation, we first write a very simple example:
<!DOCTYPE html>
<html>
<body>
  <ul id="list">
    <li id="list_item">
      <a id="list_item_link" target="_blank" href="http://google.com">
        google.com
      </a>
    </li>
  </ul>
</body>
</html>
In this example, there is an outermost ul, followed by li, and finally a hyperlink. For ease of identification, the naming of the id is also related to the hierarchical structure.
The DOM diagram looks like this:
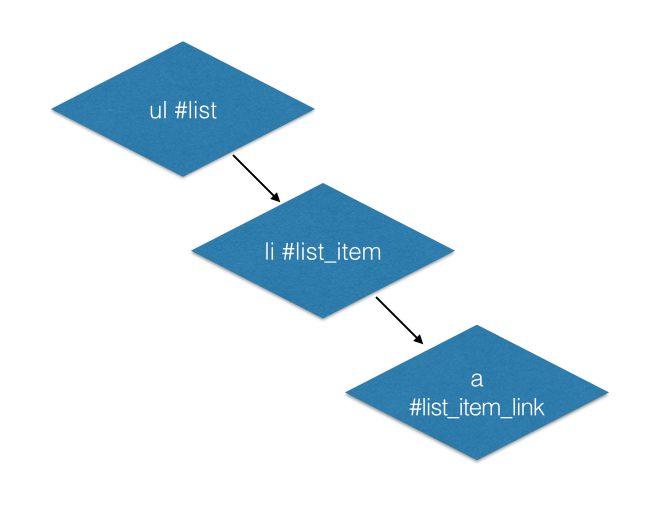
With this simple HTML structure, we can clearly explain the event propagation mechanism in the DOM.
Three Phases of Events
To add a click event to a DOM, you would write:
const $list = document.getElementById('list');
$list.addEventListener('click', (e) => {
  console.log('click!');
})
The e here contains many related parameters of this event, one of which is called eventPhase, which is a number indicating which phase the event is triggered in.
const $list = document.getElementById('list');
$list.addEventListener('click', (e) => {
  console.log(e.eventPhase);
})
The definition of eventPhase can be found in the DOM specification:
// PhaseType
const unsigned short      CAPTURING_PHASE                = 1;
const unsigned short      AT_TARGET                      = 2;
const unsigned short      BUBBLING_PHASE                 = 3;
These three stages are the focus of our discussion today.
When the DOM event propagates, it starts from the root node and goes down to the target. If you add an event here, it will be in the CAPTURING_PHASE, the capturing phase.
target is the target you clicked on. At this time, the eventListenr added to target will be AT_TARGET phase.
Finally, the event is propagated back up from the child node to the root node, and this is called the BUBBLING_PHASE, which is also the more familiar bubbling phase.
You may find it confusing to understand the text, so I’ll directly quote a w3c diagram about event flow, which should make it clear for everyone.
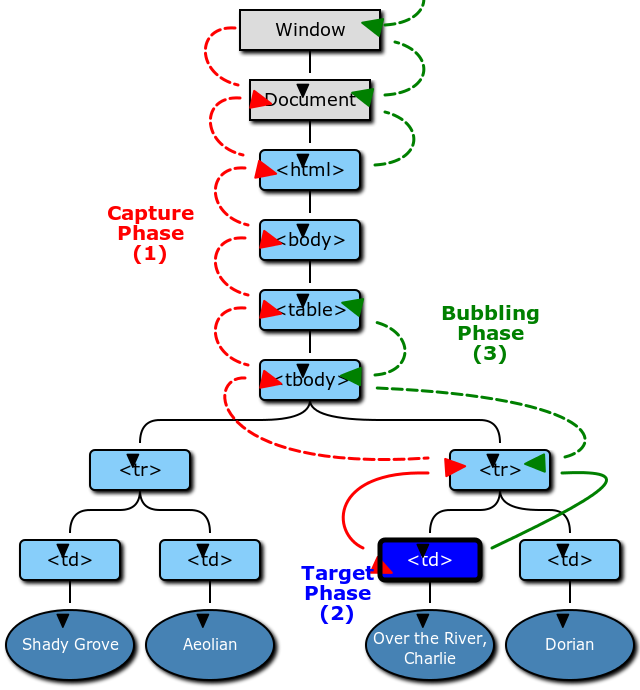
When you click on a td, the click event will start from the window and propagate down to the td, which is called the CAPTURING_PHASE.
Then the event is dispatched to the td itself, which is called the AT_TARGET.
Finally, the event bubbles up from the td to the window, which is called the BUBBLING_PHASE.
Therefore, when reading articles about event mechanisms, you will often see a slogan:
Capture first, bubble later.
That’s how it works.
But how do I decide whether to listen to this event in the capturing phase or the bubbling phase?
Actually, we still use the familiar addEventListener, but this function actually has a third parameter. true means adding this listener to the capturing phase, false or not passing it means adding this listener to the bubbling phase.
Practice
After understanding the event propagation mechanism, let’s take the simple example we wrote above to demonstrate it. First, let’s attach the event to each element in each phase and see if the result is the same as expected:
const get = (id) => document.getElementById(id);
const $list = get('list');
const $list_item = get('list_item');
const $list_item_link = get('list_item_link');

// list capturing
$list.addEventListener('click', (e) => {
  console.log('list capturing', e.eventPhase);
}, true)

// list bubbling
$list.addEventListener('click', (e) => {
  console.log('list bubbling', e.eventPhase);
}, false)

// list_item capturing
$list_item.addEventListener('click', (e) => {
  console.log('list_item capturing', e.eventPhase);
}, true)

// list_item bubbling
$list_item.addEventListener('click', (e) => {
  console.log('list_item bubbling', e.eventPhase);
}, false)

// list_item_link capturing
$list_item_link.addEventListener('click', (e) => {
  console.log('list_item_link capturing', e.eventPhase);
}, true)

// list_item_link bubbling
$list_item_link.addEventListener('click', (e) => {
  console.log('list_item_link bubbling', e.eventPhase);
}, false)
Click on the hyperlink and the console will output the following results:
list capturing
1
list_item capturing
1
list_item_link capturing
2
list_item_link bubbling
2
list_item bubbling
3
list bubbling
3
1 is CAPTURING_PHASE, 2 is AT_TARGET, and 3 is BUBBLING_PHASE.
From here, it is clear that the event does propagate from the top to the target, and during this propagation process, we use the third parameter of addEventListenr to add the listener to the CAPTURING_PHASE.
Then the event is passed to the hyperlink (a#list_item_link) that we clicked on. Here, regardless of whether you use the third parameter of addEventListener as true or false, e.eventPhase will become AT_TARGET.
Finally, it bubbles back from the target, first to the parent #list_item, then to the grandparent #list.
A small trap of capturing and bubbling
Since it is capturing first and then bubbling, it means that no matter how the order of addEventListener changes, the output should still be the same. Let’s switch the order of capturing and bubbling and see if the output is still the same.
const get = (id) => document.getElementById(id);
const $list = get('list');
const $list_item = get('list_item');
const $list_item_link = get('list_item_link');

// list bubbling
$list.addEventListener('click', (e) => {
  console.log('list bubbling', e.eventPhase);
}, false)

// list capturing
$list.addEventListener('click', (e) => {
  console.log('list capturing', e.eventPhase);
}, true)

// list_item bubbling
$list_item.addEventListener('click', (e) => {
  console.log('list_item bubbling', e.eventPhase);
}, false)

// list_item capturing
$list_item.addEventListener('click', (e) => {
  console.log('list_item capturing', e.eventPhase);
}, true)

// list_item_link bubbling
$list_item_link.addEventListener('click', (e) => {
  console.log('list_item_link bubbling', e.eventPhase);
}, false)

// list_item_link capturing
$list_item_link.addEventListener('click', (e) => {
  console.log('list_item_link capturing', e.eventPhase);
}, true)
Clicking on the hyperlink will output:
list capturing
1
list_item capturing
1
list_item_link bubbling
2
list_item_link capturing
2
list_item bubbling
3
list bubbling
3
It can be seen that something magical happened, which is that the listener added in the bubbling phase was executed before the listener added in the capturing phase.
Why is this?
In fact, as mentioned earlier, when the event is passed to the actual target, which is e.target, regardless of whether you use the third parameter of addEventListener as true or false, e.eventPhase will become AT_TARGET.
Since it has become AT_TARGET here, there is no distinction between capturing and bubbling, so the execution order will be determined by the order in which you added the addEventListener, with the first added being executed first and the last added being executed last.
Therefore, this is why when we switched the order of capturing and bubbling, list_item_link bubbling appeared first.
Regarding the order of event propagation, just remember two principles:
- Capturing first, then bubbling
- When the event is passed to the target itself, there is no distinction between capturing and bubbling
Cancel event propagation
Next, what we are going to talk about is that since this event chain is so long, there must be a way to interrupt this chain and stop the event propagation from continuing. And this method should be familiar to everyone, which is: e.stopPropagation.
Wherever you add it, the event propagation will stop there and will not continue to propagate downward.
For example, using the example above, if I add a capture phase to #list:
// list 的捕獲
$list.addEventListener('click', (e) => {
  console.log('list capturing', e.eventPhase);
  e.stopPropagation();
}, true)
Then, the console will only output:
list capturing
1
Because the event propagation is stopped, the remaining listeners will not receive any more events.
However, there is still one thing to note here.
The “event propagation is stopped” here means that the event will not be passed to the “next node”, but if you have more than one listener on the same node, they will still be executed.
For example:
// list 的捕獲
$list.addEventListener('click', (e) => {
  console.log('list capturing');
  e.stopPropagation();
}, true)

// list 的捕獲 2
$list.addEventListener('click', (e) => {
  console.log('list capturing2');
}, true)
The output is:
list capturing
list capturing2
Even though e.stopPropagation has been used, the remaining listeners on the same level will still be executed.
If you want to prevent other listeners on the same level from being executed, you can use e.stopImmediatePropagation(); instead.
For example:
// list 的捕獲
$list.addEventListener('click', (e) => {
  console.log('list capturing');
  e.stopImmediatePropagation();
}, true)

// list 的捕獲 2
$list.addEventListener('click', (e) => {
  console.log('list capturing2');
}, true)
The output is:
list capturingPreventing Default Behavior
People often confuse e.stopPropagation and e.preventDefault. The former we just explained, which is to stop the event from propagating, while the latter is to prevent the default behavior of the browser.
The most common practice is to prevent hyperlinks, for example:
// list_item_link 的冒泡
$list_item_link.addEventListener('click', (e) => {
  e.preventDefault();
}, false)
This way, when you click on a hyperlink, the original default behavior (opening a new tab or redirecting) will not be executed, and nothing will happen. This is the function of preventDefault.
Therefore, preventDefault has “nothing to do with” JavaScript’s event propagation. Even if you add this line, the event will still propagate.
One thing worth noting is that W3C’s documentation states:
Once preventDefault has been called it will remain in effect throughout the remainder of the event’s propagation.
This means that once preventDefault is called, it will remain effective in the events that follow.
Let’s look at an example:
// list 的捕獲
$list.addEventListener('click', (e) => {
  console.log('list capturing', e.eventPhase);
  e.preventDefault();
}, true)
We have already written e.preventDefault() in the capture event of #list, and according to the documentation, this effect will continue in the events that follow.
Therefore, when the event is passed to #list_item_link, you will find that clicking on the hyperlink still has no response.
Practical Applications
Now that we know the event propagation mechanism, how to stop the propagation of events, and how to prevent default behavior, what are their practical applications in actual development?
The most common usage is actually event delegation. For example, if you have a ul with 1000 li elements, if you add an event listener to each li, you will create 1000 new functions. However, as we just learned, any click event on an li will actually be passed to the ul, so we can just add a listener to the ul.
<!DOCTYPE html>
<html>
<body>
  <ul id="list">
    <li data-index="1">1</li>
    <li data-index="2">2</li>
    <li data-index="3">3</li>
  </ul>
</body>
</html>document.getElementById('list').addEventListener('click', (e) => {
console.log(e.target.getAttribute('data-index'));
})The advantage of this is that when you add or delete an li, you don’t have to deal with the listener related to that element, because your listener is on the ul. This way of handling events through parent nodes is called event delegation.
In addition, I have thought of several interesting applications that you can refer to. For example, the e.preventDefault() we just mentioned. Since we know the principle and usage skills, we can use it like this:
window.addEventListener('click', (e) => {
  e.preventDefault();
  e.stopPropagation();
}, true);
With just this code, you can disable all elements on the page, and clicking on them will have no response, such as clicking on an <a> tag will not jump to the hyperlink, and clicking on a <form> submit button will not work. And because the event propagation is prevented, other onClick events will not be executed either.
Or, you can use it like this:
window.addEventListener('click', (e) => {
  console.log(e.target);
}, true)
Using the characteristics of event propagation, using capture on the window can ensure that it is the first event to be executed. You can detect the click of every element on the page in this function and return it for data statistics and analysis.
Conclusion
The event propagation mechanism of the DOM is relatively simple among the many classic JavaScript interview questions, as long as you can grasp the principles and order of event propagation, it is almost the same.
The difference between e.preventDefault and e.stopPropagation can also be understood roughly after knowing the order of event propagation. The former only cancels the default behavior and has nothing to do with event propagation, while the latter prevents the event from propagating downward.
I hope this article can help you understand the event propagation mechanism of the DOM. If there is anything wrong, please feel free to point it out. Thank you.
Reference materials (the latter original materials are more recommended):
Comments