(The original article was written on Medium, and I’m backing it up here.)
Although I have always been clear about my preferred learning methods and paths, and have turned what I think is suitable into a course outline for teaching, few people seem to look at that outline, and it does not explain the reasons behind it in detail. Therefore, I feel it is necessary to write this article to describe what I think is a “solid” front-end learning path.
Before we begin, there are a few things that must be explained.
First of all, this article is aimed at people with no programming background. If you already have a programming background, you can skip the relevant units. In addition, for people with no background who want to switch careers, this article is definitely not the “fastest” career guide.
If you want to be quick, I believe that many of the things mentioned in the article do not need to be learned, as some job thresholds are so low that they scare me. But focusing only on speed will only make an unstable foundation even more unstable. Even if you find a job, then what? Will you stop improving yourself? Will you let your skills stay where they are?
If you want to do this job for a long time, you will eventually face these questions, and the foundations that were not learned well in the past will come back to haunt you when you are confused about why you can’t move forward. Everyone’s definition of “essential” and “solid” is different. For example, some people may think that as long as they complete the subjects taught in computer science, everything else is not as important. This article is about the learning path that I think is solid.
This article will tell you what I think you should learn and in what order. Most importantly, I will provide reasons. You can judge for yourself whether the reasons behind it are reasonable and decide whether to follow this order of learning. The reasons are the most important.
If you have time, you can refer to these two articles I wrote before:
The learning path below is basically adapted from my previous course outline, and is designed based on the principles mentioned above. In addition, most of the following is actually telling you what tools you should learn, but please remember that when learning tools, you must also think about why you need to use these tools and what problems they solve. This article only focuses on the field of front-end web development, and does not include the basic skills of other engineers (such as problem decomposition or problem definition).
Regarding the recommended resources, I only recommend resources that I have tried and really think are good, so not every section will have them. If there are none, you can search for them yourself through Google. Learning how to find information is also an important part.
The article below will be very long because I have to write reasons and goals. I will first provide the learning path:
- Command Line Usage
- Git Usage
- npm, Node.js, and JavaScript Programming Basics
- Unit Testing and Jest
- Basic Network Concepts
- HTML and CSS
- JavaScript, DOM, and Event Mechanisms
- Asynchronous and AJAX
- Basic Backend PHP and MySQL
- Information Security Concepts
- Learn Backend Framework Express
- Backend Deployment
- jQuery and Bootstrap
- CSS Preprocessors
- Asynchronous History: Callbacks, Promises, and Async/Await
- In-depth Understanding of JavaScript and Browser-related Mechanisms
- gulp and webpack
- Object-oriented Programming
- Choose one of React/Vue/Angular
Next, I will provide a detailed introduction for each point.
1. Command Line Usage
This is the first step in bringing you closer to the computer and the most important foundation before starting to learn programming.
First, let’s briefly talk about what the command line is. Basically, it’s what you see in movies when you see a computer expert typing a bunch of commands on a black background with white text. The first step is to learn how to use these basic commands.
 My Terminal, which has been modified to look nicer
Reasons for Learning
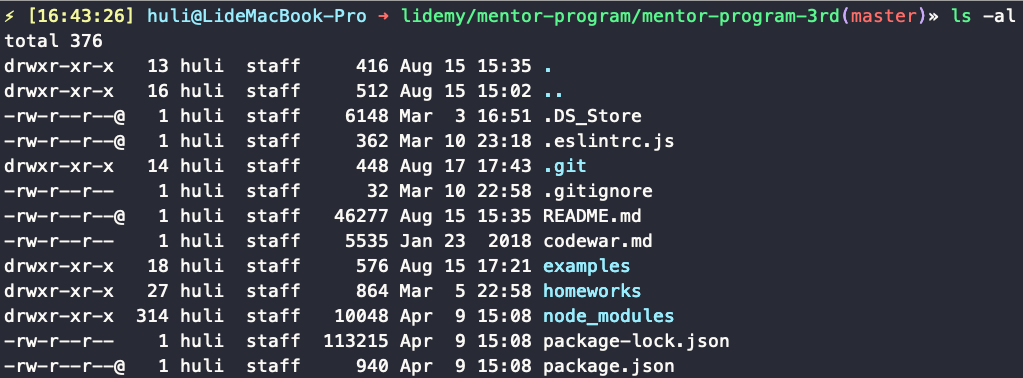
The reason why this step is placed at the beginning is twofold. The first is that it allows you to switch from a graphical user interface (GUI) to a command line interface (CLI). To put it simply, in the past, if you wanted to see what files were on your desktop, you would use the mouse to click on the file manager or Finder. You operated using these graphical interfaces.
But the reason why the command line is different is that it operates using text. Just like in the screenshot above, by typing a magical command ls -al, you can list all the files in a folder.
The essence of programming is the same as using the command line:
Communicating with the computer using commands
The second reason is that it is very important in software development. If you are in a design-related field, you may have software like PS, AI, or Sketch in your computer, and you can just double-click to use them. But for us programmers, many tools do not provide a graphical interface, and you can only use commands (command line) to operate them.
Learning Objectives
Just learn common commands (such as cd, ls, rm, mv, etc.).
2. Using Git
Assuming you have a boss who loves to make changes, he asks you to draw a picture. So after you finish drawing, you save the picture as v1.ai and show it to your boss, but he says no, he wants more changes, so you have v2.ai. Later, the boss says, “Just change the color and it will be good enough,” so you make the changes and save it as final.ai.
But who knows, after the boss sees it, he says he wants more changes, and he wants to start from v2 (this is when you will be glad you saved it), so you have to open the v2 file, make the changes, and save it as v2-2.ai.
The rest of the story doesn’t need to be said, final.ai, real-final.ai, fucking-final.ai, real-real-final.ai, and finally, there are so many files that you don’t know which one is the final version, and you get a headache.
 This is my resume folder, and I don’t even know which one is the latest…
Version control is a difficult thing, especially with this traditional copy and paste method, which only makes things confusing. If one person gets confused, it’s okay, it just takes a little more time to find it, but if a whole team collaborates on a document, the problem is much bigger.
And software engineers are an industry that cannot escape team collaboration and version control. For example, the current version is v2 stable version, and Xiao Ming continues to develop new features for v3. But one day, a bug was found in v2! Xiao Hua, who is responsible for fixing it, is very efficient and fixes the bug in less than a day.
But the problem is that the new feature that has already been written cannot be released because v3 has not been completed yet, but after fixing the bug, users need to be updated to the new version quickly, so what should be done? This is where version control is needed.
After talking so much, I just want to illustrate the importance of version control in programming (especially in multi-person collaboration), and the most famous program that helps you do version control is called Git.
Learning Reasons
It is listed as the second thing to learn because after learning Git, you can experience version control for the code you will write in the future. Although some difficulties that only arise in team collaboration may not be experienced by a single person, it is okay to start with the basics.
Learning Objectives
Learn the basic concepts of Git: what is a repository, what is a commit, what is staged…
Learn to use basic commands such as add, commit, status, log, etc.
Understand the difference between Git and GitHub and learn to use push, pull, clone, fetch
Learn to use branch and checkout
If you want to learn how to use branches, I highly recommend Learn Git Branching.
3. npm, Node.js, and JavaScript Programming Basics
JavaScript is just a programming language that can currently run on two main environments. The first environment is well known, called the browser, and JavaScript can be used to manipulate the screen. The second environment is called Node.js, which can operate independently of the browser. After installing Node.js, you can enter the command node index.js to execute the index.js file on your computer.
Here, I hope that everyone will not touch the browser first, but run their own JavaScript code in the Node.js environment.
Therefore, this stage is to install the Node.js environment on your computer and learn the basics of the programming language (variables, conditionals, loops, functions, etc.) through JavaScript. The recommended learning resource is Modern JavaScript Tutorial.
So what is npm? Before talking about npm, let’s talk about what a library is. In the programming field, it is not called a library, but a “function library”, which is a collection of many functions.
Simply put, some functions are not used very often, right? Maybe I will use it, you will use it, and Cyclops will use it. It is better to share the joy of sharing than to have it alone. I wrote a lot of commonly used functions today, which can be used by others, and everyone is happy. This is called “I wrote a library for others to use.”
npm stands for Node Package Manager. The package here is similar to the library mentioned above, and it is translated into “package” in Chinese. It is a service that manages Node.js-related packages, so you can publish your own packages on it, or install packages written by others through npm.
Reasons for Learning
Some people may ask, “Why not learn HTML and CSS first?” when they see this.
My reason is that if you want to go into web front-end development, you must learn the JavaScript programming language. It’s just a matter of whether you learn it early or late. HTML and CSS can quickly give learners a sense of accomplishment because they can immediately see what they have learned, which can supplement their motivation to learn.
When learning something new, you always have the most perseverance at the beginning, and then it slowly fades away, and procrastination sets in. Choosing to learn JavaScript at this time is because of this. I think it’s better to learn it while the motivation is still there, and then learn HTML and CSS later, while also replenishing the motivation.
The reason npm is important is that you will use npm frequently in the future. At this stage, you can find some simple packages to try out and practice reading documentation.
Learning Objectives
If you want to test whether you have a good foundation in programming languages, you can verify it through some simple small problems or by writing some Codewar problems. As long as you can write the basic problems mentioned in them, it’s okay.
For npm, you only need to know the following concepts:
- What is package.json
- What does npm install do
4. Unit Testing and Jest
In the previous stage, it was mentioned that you can write some small problems to test whether your programming foundation is qualified. On websites like Codewar, it will help you correct and tell you where the errors are, but how do you test it on your own computer?
It’s simple, just come up with a few test cases yourself, and then use console.log to print out whether the answer is correct or not.
 for providing the service](https://cdn-images-1.medium.com/max/2000/1*hT0xGx8tfHdRbY0ev6cR3g.png) Thanks to https://carbon.now.sh for providing the service
Thanks to https://carbon.now.sh for providing the service
Yes, this is possible, but it’s not a good method. Because you have to use your eyes to judge which test case is wrong. If you have more test cases, it’s also difficult to see whether the answer is correct at once.
Make way! Let the professionals come! (Suddenly realized that this sentence also has a sense of age)
Jest is a framework specifically designed to test JavaScript code. As long as you use the structure and functions specified by it, you can easily write files for testing, and there will be beautiful test reports.
And this way of testing the input and output of functions is called unit testing. If the test is done well, the program is not afraid of being broken. Because as long as you run the test, you can see whether the code is written correctly.
Reasons for Learning
The reason why unit testing is placed here is because I think it is the most appropriate. In the previous stage, a lot of small functions were written, and after learning Jest, you can add unit tests to these functions to experience the power of testing.
Learning Objectives
- Know how to use Jest to test the input and output of a function
- Try to come up with various test cases
5. Basic Concepts of the Internet
Before officially entering the most famous HTML and CSS in web front-end development, there is one last thing to do, which is to know a little about the basic concepts of the Internet.
In this stage, you must know things including but not limited to:
- What is front-end? What is back-end?
- What is Request? What is Response?
- What is HTTP? What are the HTTP methods?
- Common HTTP status codes (200, 301, 302, 400, 404, 500…)
- What is an API?
After understanding these concepts, you can try to find some ready-made APIs, and then use some Node.js packages such as request or axios to try to connect them.
It’s okay if you don’t understand it very clearly, but you must have the basic concepts. Because a lot of beginners have almost no concept of this aspect, which leads to spending a lot of time finding the wrong point when problems occur, and it turns out that the error is not where they imagined it to be.
Here are some more theoretical courses that can help you understand the basic concepts:
Reasons for Learning
I put these internet concepts at the forefront because I have seen too many problems in various technology-related communities. People ask questions about front-end in back-end communities, thinking it’s related to the framework used in the back-end; or they think it’s a front-end problem when it’s actually a network problem. I believe that these problems are caused by a lack of understanding of the overall network concept.
Learning Objectives
Know what Request and Response are.
Know what DNS is.
Know what localhost and 127.0.0.1 are.
Know what API is.
Be able to use Node.js to write a program that connects to an API.
Know the basic HTTP methods.
Know the basic HTTP status codes, such as 200, 301, 400, 404, 500.
6. HTML and CSS
After laying the groundwork, we can finally start learning HTML and CSS. The former is the skeleton of a webpage, and the latter is the clothing. HTML is just a file composed of specific formats and tag combinations. You must choose the appropriate tags to represent the content. Understanding some common tags is enough, and there are two key points to learning.
The first is to make your HTML semantically correct. For example, if you have a list today, using <ul> and <li> is much more appropriate than using a bunch of <div>. How do you check? Don’t look at the screen, just look at the tags in the HTML source code. Try to see if you can tell what each block represents or how important it is. If you can, it means you wrote it well.
The second is to pay a little attention to SEO (Search Engine Optimization), which is actually quite related to the previous point. Search engines need to crawl many web pages and parse them based on the webpage’s source code. SEO is to make them understand your webpage and know what the focus of your webpage is.
For example, suppose there are two web pages now. The first one only has <div> tags, and the second one uses <h1> to write out the title. Which one can the robot understand? Of course, it’s the second one, because h1 represents the title, and it will regard the content inside as one of the main topics of this webpage.
Or to put it this way, tags are like the layout of writing an article. If you don’t use them well, there is no bold, no title, and even no period. All the text looks the same at a glance, and you can’t tell which is the title and which is the subtitle. Using tags well is high-quality layout, which is clear at a glance, and everything is very clear.
HTML can only do basic layout for webpages. If you need further beautification, you need CSS. With CSS, you can give different styles to different parts of the webpage, such as making the background of block A red and the background of block B green, and so on.
This brings out the first key point of CSS: how do I select the part I want?
This is called CSS selector. There are some rules to learn. You can select the elements you want through tags, class, id, or more complex ways. After learning some basics, you can review and strengthen your understanding of selectors through the super cute and fun game CSS dinner.
Then it’s related to layout. You need to know what the box model is, and know the differences between position and display properties. These are all important things for layout.
Why are they important? Because if you don’t understand the above mechanisms, you can’t do layout. The box model represents how the browser looks at each element, and display determines whether these elements can be arranged on the same line. Position allows you to place elements wherever you want.
In addition, you must also know how to use Flexbox for layout. You can learn through the fun games Flexbox Froggy or Flex Pirate. If you have time, you can also look at the newer property grid and play this little game: Grid Garden.
Finally, you need to know how to do different layouts on different screen sizes.
The core concept is to “apply different CSS to different sizes.” For example, if you originally had a two-column layout, when you view it on a mobile phone, you can set the width of these two columns to 100%, and it becomes a two-row layout instead of side by side, which is more in line with the usage habits of mobile phones.
To do this, you need to use media queries to load different CSS according to different conditions (such as screen width, height, etc.).
The key points of learning CSS have been mentioned before, but theory is just theory after all. You must not think that you can understand what those theories mean just by reading tutorials.
I used to read the explanation of position thousands of times, but I never understood what position: absolute was positioning based on and what it was used for. It wasn’t until one day when I had to implement a function that put a cross in the upper right corner of the picture that I really knew why I needed absolute.
Apart from CSS, everything else is the same. It’s useless to just read it. You’re better off opening the browser and playing around with those properties yourself, even if you’ve read the explanation of the position a hundred times.
Recommended resources include:
- html & css is hard
- Learn to Code HTML & CSS
- MarkSheet
- HTML & CSS: The Way to Website Design and Optimization (recommended by my students)
Learning Reasons
If you want to start learning front-end development, you must know HTML and CSS because these two are the foundation of web pages.
Learning Objectives
- Know how to use semantic tags
- Know the basic CSS Selector
- Know what the box model is, and the relationship between padding, margin, border, width/height, and it
- Know the difference between block, inline, and inline-block display properties
- Know the difference between static, relative, absolute, fixed, and sticky position properties
- Know how to use Flexbox for layout
- Know how to use media queries
7. JavaScript and DOM and Event Mechanism
Do you remember I said earlier that JavaScript can basically run in two places? Browsers and Node.js. After learning HTML and CSS, you can try to write JavaScript on the browser.
The biggest difference between writing on Node.js and the browser is that
You can use JavaScript to manipulate the screen
Anything visible on the page can be changed. You can add elements, delete elements, change styles, and add different event listeners to different elements. For example, you can listen to the click event of a button, and when the user clicks the button, you will know, and you can respond to this event, such as popping up an alert.
There are two key points to learning this part. The first is how JavaScript manipulates the screen? It is through something called the Document Object Model (DOM). Simply put, the browser converts the HTML elements on the screen into objects and provides you with an API to manipulate them.
For example, document.querySelector(‘#aaa’) returns the #aaa DOM object, and you only need to change it, and the elements on the screen will change accordingly. So the first key point of learning is how to manipulate DOM objects. You need to learn how to add, modify, and delete these objects.
The second key point will be on the event mechanism.
How do I add an event listener to an element? How do I remove it? What happens if I add two?
In addition, the event mechanism of the DOM is a bit more complicated than you think. For example, if you have two overlapping elements, the outside is blue called Blue, and the inside is red called Red:
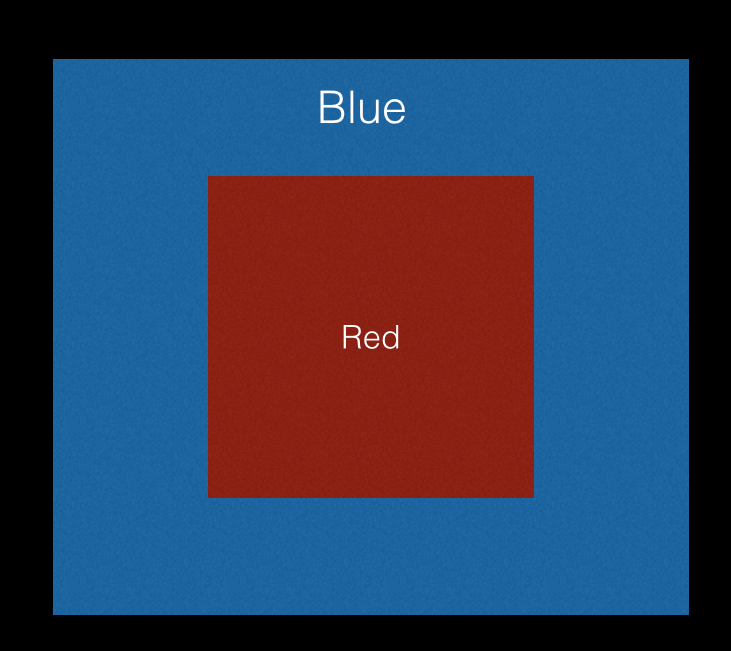 Event Transmission Mechanism Figure
When you click on the Red box, the click event of Red is triggered. But not only that, the click event of Blue is also triggered! It’s actually quite reasonable to think about it, because Red is inside Blue, the blue box is not hollow, it’s just covered by red.
This is the key point to learn in this part: the operation of the event mechanism. For details, please refer to the learning objectives below.
After learning this part, you can make any “non-network-related” application. For example, Sudoku games or Gomoku games that can be played on a single machine can be made because they are just a collection of screens and events.
For example, how to make Gomoku?
- Draw the chessboard with HTML and CSS
- Detect the click event of the chessboard, draw a chess piece where you click
- Determine whether the chess pieces on the chessboard are connected
- If yes, the game is over
- If not, switch to the other player’s turn and return to step 2
Don’t think that you have only learned these things, and these are the essence. As long as you can listen to events, change the screen, what function can’t be done? When you break down what you want to do, you will find that it is just a combination of these operations. There is no magic in it. All you need is a little imagination.
Learning Reasons
If you want to learn JavaScript on the browser, you must talk about DOM to manipulate the screen.
But as I said before, I don’t want to talk about HTML and CSS first. I want to talk about “programming language JavaScript” first. At this time, learning in the Node.js environment is a better method because it does not involve DOM or other front-end things, it is just a simple programming language.
I believe this has two benefits:
Knowing that JavaScript can run not only on browsers.
Knowing that JavaScript is just a programming language, and the DOM is something provided by the execution environment (browser). For example, Node.js does not have a DOM.
This way, the execution environment and JavaScript are not confused.
Learning Objectives
Know the basic operations of the DOM, such as insertion, deletion, and attribute modification.
Know how events are propagated. Know what capturing and bubbling are.
Know the functions and differences between e.preventDefault and e.stopPropagation.
Know the difference between e.target and e.currentTarget.
Know what event delegation is and when to use it.
8. Asynchronous and AJAX
After learning about the event mechanism in the previous section, the last piece of the puzzle is communication between JavaScript and the backend. We will use a technology called AJAX, which sounds difficult, but it is actually using the Web API provided by the browser to send requests to the backend and receive responses.
This part is super important for front-end development because there are many concepts to understand, and we will go through them one by one.
The first is the Same-Origin Policy of the browser.
When you use JavaScript to send a request, the browser has some restrictions for security reasons. Different requests have different restrictions, but the general principle is “if the backend does not allow you to do this, you will not get a response.” Therefore, backend assistance is usually required to enable CORS (Cross-Origin Resource Sharing).
You must understand what the Same-Origin Policy is, why it exists, and what it restricts. You must also understand how to use XMLHttpRequest or Fetch to connect to APIs.
The second is that since we mentioned AJAX, you must also know what asynchronous means. Some people may be misled by the literal meaning of synchronous, which looks like “doing things at the same time.”
However, in the field of computer science, synchronous actually means “can only complete one thing at a time, and must wait for the previous thing to finish before doing the next thing.” What happens if the API connection with the backend is synchronous? It’s terrible. If the backend is slow and takes 10 seconds to return a response, JavaScript must wait for 10 seconds before executing the next command.
This is impossible. You can’t let the entire screen freeze for 10 seconds, so the first A in AJAX represents Asynchronous, which means communicating with the server asynchronously and exchanging data.
So how do you get data asynchronously? This is where the concept of callback functions comes in. You prepare a function and tell the browser, “Hey, come over here, remember to call me when you’re ready.”
In addition to AJAX, timers (such as setTimeout) are also asynchronous. You can’t just wait in place for three seconds and then execute it. You must do other things in the meantime, and the timer will be triggered after three seconds. But as everyone knows, JavaScript execution is single-threaded, and only one thing can be done at a time. How can it be asynchronous?
This involves the mechanism of the Event Loop, and I strongly recommend this video, which explains it very well: What the heck is the event loop anyway? | Philip Roberts | JSConf EU.
Learning Reasons
First, let’s talk about why we recommend learning this way. Because we already have the concept of the network and the event mechanism, and there is no problem with the basic JavaScript. Understanding asynchronous related operations is the last piece of the puzzle for understanding JavaScript and an important part of front-end web development.
So AJAX is placed here, and after the foundation is laid, we will learn AJAX and understand the related concepts of asynchronous.
Learning Objectives
Know the difference between asynchronous and synchronous.
Know what the Same-Origin Policy is.
Know how to access cross-domain resources (CORS).
Know how to use XMLHttpRequest or Fetch to connect to APIs.
Understand the Event Loop.
9. Basic Backend PHP and MySQL
Next, we will learn basic backend development, using pure PHP without any PHP frameworks.
Another focus is the database. We will use the most common MySQL, and the combination of PHP + MySQL has a lot of ready-made tools, such as XAMPP, which directly helps you build the entire environment.
Regarding MySQL, don’t go and learn ORM (Object Relational Mapping). Please write SQL Query obediently, learn how to do CRUD (Create, Read, Update, Delete), and decide the data format of the columns by yourself.
Reasons to Learn Backend Development
Some of you may ask: why learn backend development?
Well, have you noticed the four words in the title? “Web Frontend” represents both “frontend in web” and “web and frontend”. Websites are divided into frontend and backend. If you only understand frontend, you will never understand the entire website.
As I mentioned in the fifth point of the basic network concepts, many people lack a holistic concept, which leads to locating problems incorrectly or not knowing where the problem is. The main reason to learn backend development is to fill in the missing concepts, so that when problems occur, you know exactly where the problem lies.
I don’t recommend learning Ruby on Rails, Laravel, or Express. Instead, I recommend starting with PHP - without using any frameworks.
Because it’s simple. One PHP file is responsible for one page. Whatever you echo in the file will be output on the screen. It’s very simple and easy to learn.
If you have some programming knowledge or have looked up related information, you may ask, “But won’t the code become messy if it’s written like this? There’s no structure at all!”
Yes, you’re right - but that’s intentional.
If all the men in the world looked like Takeshi Kaneshiro, would Takeshi Kaneshiro still be handsome? No. Takeshi Kaneshiro is handsome because you have seen many people who are less attractive than him, so you know that Takeshi Kaneshiro is handsome. This is a comparison.
The same goes for writing code. If you haven’t written bad code before, how do you know what good code looks like? You won’t know, and you might not even recognize good code. You must write enough bad code to know what makes good code great.
That’s why I recommend starting with pure PHP. As you progress, you will write messy, difficult-to-modify, and difficult-to-maintain code. But only then will you know what makes frameworks great when you encounter them.
Learning Objectives
Understand what frontend and backend are.
Know what a database is.
Understand basic SQL syntax, including Select, Insert Into, Delete, and Update.
Be able to use PHP to create a simple message board or blog.
10. Information Security Concepts
Learning backend development has another benefit: you will have a clearer understanding of how common information security vulnerabilities occur and how to defend against them.
If you follow my advice and learn pure PHP, you are likely to create websites with SQL Injection, XSS (Cross-site Scripting), and CSRF (Cross-site request forgery) vulnerabilities.
No matter how many articles you read, you won’t feel it until your own website has a vulnerability. One of my hobbies is attacking websites that students think are well-defended, to show them the importance of information security.
Common security vulnerabilities are usually caused by unexpected user input.
For example, if you have a message board that allows people to leave messages, and the backend directly prints the message content, you might think it’s okay. Until one day someone leaves <script>alert(1)</script>, and everyone who opens the message board pops up a window. Then you realize, “Oh my god, someone can enter such strange things.”
Learning Objectives
Know the difference between hashing and encryption.
Know what SQL Injection is and how to prevent it.
Know what XSS is and how to prevent it.
Know what CSRF is and how to prevent it.
11. Learning the Express Backend Framework
You’ve already suffered enough with pure PHP, written enough bad code, and created enough vulnerabilities. Now I recommend that you start learning a framework. You can learn any framework, but I recommend Express because it’s lightweight and uses JavaScript.
The goal of this section is simple: experience the difference between having a framework and not having one, and become familiar with the elements (such as MVC) and overall structure of the backend framework.
For frontend engineers, learning Express has another benefit: you can do any side project you want in the future, and you can write the backend yourself. This is a headache for many frontend engineers who want to do side projects but don’t know backend development, and don’t know where to get data.
If you have time, you can also learn an ORM, such as Sequelize. You will find that it’s much faster and simpler than SQL queries.
But please remember, frameworks like Express or ORMs like Sequelize have no magic behind them. At the bottom, they are the basics you learned in PHP, such as parsing requests, fetching parameters, returning responses, and executing SQL queries.
After learning frameworks, you can abandon pure PHP and use frameworks for development. Because you are a developer who knows what frameworks are doing and why they are used, not just someone who only knows how to use frameworks but can’t even write SQL queries.
Learning Reasons
Experience the difference between having and not having a framework and become familiar with the backend MVC architecture, which will make the difference between having and not having a structure clearer.
Learning Objectives
Know what MVC is.
Know what ORM is.
12. Backend Deployment
Since you have started learning backend, let’s complete the entire backend process! The next thing to learn is deployment. You must rent a machine yourself (AWS and Google Cloud have some discounts for the first year, and DigitalOcean, which has no discounts, has the cheapest machine for five dollars a month), and then upload the code.
You also need to buy a domain and learn how to set up DNS to map the domain to the machine you purchased. After completing this, you can have a personal website, and all your works can be placed on your website.
Learning Reasons
This is the last part of the backend in the learning path, and there will be no more backend content in the future. You may think that as a web front-end engineer, is it necessary to learn so much backend?
You are wrong. These are not too much. I think they are just the tip of the iceberg. The backend is also very deep, and these backend concepts are what I think many front-end engineers lack.
As I said before, a website is composed of both front-end and back-end, and neither side is complete without the other. You are not required to learn these backends to become a backend engineer, but to enable you to clearly know where the problem is when there is a problem with the website.
Learning Objectives
Know how to set up a domain (A, CNAME).
Know how to use SSH to remotely connect to your own host.
Know how to deploy your own program.
Mid-term Summary
After learning all of the above, I think the basics are okay. With what you have learned, you can implement any visible website. I’m not kidding. It’s just that the function may be a bit simple and the speed may be a bit slow, but you can really do it.
Any website is composed of the following basics, and the corresponding technologies learned are in parentheses:
Backend server and business logic (PHP + Apache)
Database (MySQL)
Front-end page and interaction (HTML + CSS + JavaScript)
](https://cdn-images-1.medium.com/max/2048/1*OwtfTb6aTniXF0aRlR4SBw.jpeg) Image source: https://tw.beanfun.com/kartrider/img_newhand/s01.jpg
Image source: https://tw.beanfun.com/kartrider/img_newhand/s01.jpg
Have you ever played KartRider? Anyway, it’s a racing game. The current situation is that you have learned how to drive, how to drift, and how to use nitro, and you have also learned how to run common maps. You can definitely reach the finish line, but only the speed is different.
So the next thing to learn is only for one purpose:
Make you run faster.
13. jQuery and Bootstrap
In the previous paragraphs related to front-end, almost no libraries were mentioned, but the recommended learning path for the next part will include many libraries and tools.
The first is the famous jQuery. You don’t need to learn too much, just learn the basics. I think jQuery is still very useful, and it is a very important part of the history of front-end development.
Next is Bootstrap. If you just want to get started, I think it’s not difficult to learn. Just add the CSS of the component according to the official document. Anyway, it is a UI library that can help you make the interface more beautiful and consistent.
As mentioned earlier, the basics have been learned, and the content that follows will focus on “how to run faster.” I think these two libraries meet this condition, and using jQuery and Bootstrap can improve your development speed.
Learning Reasons
The reason for learning jQuery is that although it is not so popular now, it is still very useful in small projects, and through jQuery, you can reduce some tedious native operations and save time. If you just want to get started with jQuery, I think it won’t take too long to learn, so it’s better to learn it.
Bootstrap can beautify your interface and speed up layout.
In addition to learning new tools, it also trains your ability to read documents. Today, if you want to use jQuery to do AJAX, which function should you use? How to use the class to apply the Bootstrap button? These can only be found through Google or official documents. Reading documents is also one of the essential skills for engineers.
Learning Objectives
I think with these two things, it’s no problem to write a TodoList.
14. CSS Preprocessors
One of the ways to “run faster” is to stand on the shoulders of giants and use the useful tools developed by predecessors, which can make development faster and code easier to maintain.
CSS preprocessors are such a thing that allows you to write CSS in a programming-like way, defining variables, running loops, and even calling functions.
Well-known preprocessors include SaSS/SCSS, Less, and Stylus, among others. Just pick one to learn from. Learning this is necessary because few people write CSS directly now, and instead use CSS preprocessors to compile.
Learning Reasons
Helps you write better-maintained CSS while also improving development efficiency.
Learning Objectives
Understand the purpose and principles of CSS preprocessors
Be able to rewrite CSS previously written using any preprocessor
15. Asynchronous History: Callbacks, Promises, and Async/Await
In the eighth point “Asynchronous and AJAX,” we learned about the concept of Callbacks. This can be extended to learn about Promises, as well as the newer async/await syntax, which are all closely related to the concept of asynchronous.
Learning Reasons
In JavaScript, understanding the use and development history of these things is quite important, so I specifically gave this topic a section, after all, these things should be learned together.
The reason for learning is that many things in JavaScript are asynchronous, and now almost all use Promise to handle asynchronous problems, so understanding these syntaxes can know how to use them.
Learning Objectives
Know how to use Promise
Know how to use .then and .catch
Know how to “simultaneously” execute multiple Promises
Know how to “sequentially” execute multiple Promises
Know how to use async/await
In the previous sections, we learned more about tools that allow us to build our own products using them. But in addition to tools, the underlying principles are also important. Learning the principles and some more low-level concepts will make you more confident in these technologies, and you will have more places to think about when problems arise.
For example, sometimes the problems encountered may have nothing to do with JavaScript itself, but rather the browser’s operating mechanism that leads to such results. If you don’t know what the browser is doing at all, you may be stuck in “the problem must be here!” but in fact it is not.
The recommended learning resource here is How Browsers Work: Behind the scenes of modern web browsers, where you can see how modern browsers work.
There is also the Inside look at modern web browser series that Chrome launched when it was about 20 years old, which can greatly enhance your understanding of the browser. If your English is not good, you can find unofficial Chinese translation versions of these articles.
Finally, I also recommend a course that Google offers on Udacity: Website Performance Optimization, which will mention the process of parsing HTML by the browser and the order of loading resources, etc.
As for the JavaScript part, you can start with some common problems, such as closure, scope, this, hoisting, etc., which are all common keywords.
Here, I recommend the popular JavaScript: Understanding the Weird Parts, as well as You Don’t Know JS and five related articles I wrote before:
In-depth discussion of parameter passing in JavaScript: call by value or reference?
I know you understand hoisting, but how deep do you understand?
All functions are closures: discussing scope and closure in JS
Learning Reasons
In addition to using tools, you also need to know the principles behind the tools. This will help you locate problems more accurately when they occur.
I think JavaScript is important for beginners, although sometimes they may not feel it. Many times, beginners will write related bugs and encounter similar problems, but because they lack these abilities, they don’t know how to find out where the problem is and how to debug it.
Learning Objectives
Know what is scope
You know what Hoisting is
You know the principle of Hoisting
You know what Closure is
You can give an example of using Closure
You know what Prototype is in JavaScript
You know what the value of this is in most cases
17. gulp and webpack
As the project becomes larger and larger, you may need some tools to assist in development.
gulp can manage workflows and can be used to perform a series of tasks, such as:
Convert SCSS to CSS
Compress CSS files
Convert ES6 to ES5 using babel
Compress JS files
Change all images in HTML to webp format
gulp is just a workflow manager, and the above functions require the installation of corresponding plugins to be used successfully.
Webpack, on the other hand, is a completely different thing. It is a packaging tool. In the past, the native browser did not support the import and export syntax written in Node.js (now it is supported), so a packaging tool must be found to do this. One of the purposes of webpack is this.
However, in addition to this, it regards “packaging” as a broader concept. Everything is a resource, not just JS files. As long as it is a resource, it can be packaged by webpack, and some things can be done through webpack’s plugins during the packaging process, such as converting SCSS to CSS or compressing JS files.
The reason why these two are put together is that these two are often confused, but I think it can be seen very clearly that they are fundamentally different. gulp itself is useless, it is just a task manager, and the real focus is on what tasks are executed below; webpack is a packaging tool that can package your front-end project. In the packaging process, resources can also be transformed through webpack’s plugins.
If you really understand these two things, you will know that webpack can also be executed as one of gulp’s tasks.
Learning Reasons
Why learn these two things? I think it’s okay not to learn gulp, but the concept is not difficult and the threshold is not high. It is also very good to learn. And often confused with webpack, after learning, it can better explain the similarities and differences with webpack.
The real focus is actually webpack. I think understanding what webpack is doing is one of the key points to enter modern front-end development. Because almost all front-end frameworks use webpack for packaging, if you don’t learn webpack, you will never understand what they are doing.
Learning Objectives
Know the purpose and principle of gulp
Know the purpose and principle of webpack
Familiar with how to use webpack for modular development
Familiar with how to use gulp to construct automated workflows
18. Object-oriented
I really don’t know where to put object-oriented things, so I can only put them in front of the framework.
In fact, the concept of object-oriented can be slowly cultivated in the previous process, such as using XMLHttpRequest or using Promise, there are object-oriented concepts in them.
Here you need to learn the basic concepts of object-oriented, as well as how to use ES6’s Class syntax and inheritance. If you have time, you can also learn ES5’s prototype, after all, JavaScript is prototype-based, and Class is just syntactic sugar.
If you really want to learn object-oriented, there are many things you can learn. When you start learning, you will be overwhelmed by a lot of new terms, but it is recommended to learn some more common or commonly used ones in JavaScript, such as inheritance and encapsulation.
As for polymorphism or overloading, you can put it aside for a while, just have a concept, and go deeper into learning in the future if you have the opportunity.
Learning Reasons
Before entering the front-end framework, you must have the concept of object-oriented, otherwise you will not understand what a lot of usage is doing.
Learning Objectives
Know what is Class
Know the difference between Class and Instance
Know what is super()
Know how to use ES6 Class and write simple object-oriented programs
Know what is Inheritance
19. Choose one from React/Vue/Angular
After learning so much, we are finally approaching the end of this learning path. It’s time to learn front-end frameworks (React is not strictly a framework, but I think it can be considered as one when combined with the entire ecosystem, so I’ll call it a framework here).
For learning, you can choose one of the three major frameworks: React/Vue/Angular. Vue seems to be easier to get started with, but I only know React and I recommend it. I have never used the other two, and I recommend learning React simply because I like it (yes, it’s a weak reason).
I recommend starting with The Road to learn React, which I think is an invaluable resource. The first four lessons are the essence, which teach you how to learn React without directly teaching React. After that, you can check out the official tutorial, which is also very comprehensive.
To master the core concepts and basic usage of front-end frameworks, for example, in React, the core concept is that the state corresponds to the UI. If you want to change the UI, just change the state. The UI is just a presentation of the state, so basically you won’t directly manipulate the UI, but change the state and let React redraw the UI for you. In addition, Component and JSX are also important concepts, and you must also understand React’s lifecycle methods.
In short, once you enter modern front-end development, you are almost there. If you have learned everything mentioned above, you are already a decent web front-end engineer in my mind.
Reasons for Learning
Why put front-end frameworks at the end?
Because I think it is necessary to have a foundation for learning these front-end frameworks. Without a foundation, you will only end up in a mess and not know what you are learning. At least you should be proficient in using JavaScript and understanding object-oriented programming, and you should also know a little about basic webpack before learning front-end frameworks.
I think frameworks are not something for beginners. Please build a foundation before learning frameworks, so that you can achieve twice the result with half the effort. Learning frameworks directly is half the effort for twice the result. Please take it step by step. Many beginners learn frameworks too early, which leads to not knowing whether the problem is with the framework or with JavaScript itself, which I call an unstable foundation.
Learning Objectives (Using React as an example)
- Know the purpose and principle of React
- Know why we need React
- Know the difference between using React and using jQuery
- Understand the difference between state and props
- Be familiar with basic operations in React
Conclusion
Is there a lot to learn? Yes, but this is just the beginning, and there are many topics I haven’t mentioned.
The above are just what I consider to be the basics, and each basic can lead to many deeper topics. For example, when a React project becomes larger, you will encounter some state management issues, which lead to Redux and some Redux middleware.
Or CSS will become more complicated as you write more, and you will encounter some CSS methodologies such as OOCSS, SMACSS, BEM, and Functional CSS.
I haven’t mentioned web performance optimization yet, such as gzip, Cache, CDN, HTTP/2 on the server side, lazy loading, image compression, PRPL Pattern, or code splitting on the front end. There are too many things to learn and research.
Is it easy to become a web front-end engineer?
It depends on your own standards for this profession. If you just want to find a job titled “web front-end engineer”, I don’t think it’s very difficult in the current situation. As I said at the beginning, if you are oriented towards quick job hunting, you don’t need to learn many of the things I mentioned.
But if you want to build a better foundation for yourself and make your future smoother, it is certainly not an easy task. It is easy to become an engineer, but it is another matter to become an engineer with a solid foundation.
I hope this long list will be helpful to those who want to learn web front-end or strengthen their web front-end foundation.
Finally, thanks to my friends who helped me review the article and gave me suggestions.
Comments